Cisco Collaboration and Contact Center Solutions

Aurus Blog

This blog is to share our expertise in Cisco UCM, UCCX/UCCE and Cisco Meeting Server

  • Archive

    «   April 2024   »
    M T W T F S S
    1 2 3 4 5 6 7
    8 9 10 11 12 13 14
    15 16 17 18 19 20 21
    22 23 24 25 26 27 28
    29 30          

Packet Sniffing in Cisco UCM

Hello! In this article, we’ll tell you how to capture packets on Cisco phones connected to Cisco Unified Communications Manager (CUCM).

Packet capture is useful for troubleshooting. This article will show you how to do this by connecting a phone to PC via the built-in PC port. In this case, the copy of the traffic coming to the phone’s SWITCH port will be forwarded to PC port (sometimes this is called mirroring). You can obtain these packets with any traffic-sniffing software.

Connecting and Configuring Cisco IP Phone

First of all, let’s connect up the Cisco IP phone. The phone’s back panel has several ports. Find the port named SWITCH and plug the switch cable here. Connect the port named PC to the network adapter on your PC.

Now proceed to your CUCM, select Device → Phone and find your phone. In the Product Specific Configuration Layout section, find PC Port parameter and select Enabled. Then find Span to PC Port and select Enabled. Some phones do not have Span to PC Port parameter, in this case all data is automatically forwarded to the PC port.

Now open your packet sniffer (WireShark, for instance), select the network interface the phone is connected to, and click Start.

That’s it! Now you can start analyzing packets.

Cisco UCM PBX database tables overview

This article describes the practical details of handling the databases in Cisco Unified Communications Manager (CUCM) PBX and Voice Operating Systems (VOS) in general.

The article is recommended for engineers with more than a year’s CUCM administration experience.

In 2006, when CUCM 5.0.1 (the first VOS-based version) was released, IBM Informix Database was chosen for a configuration storage.

The database contains a few hundred tables that contain the dialing plan as well as the configuration data for the phones, gateways and users. An administrator can use Tomcat web server to make changes in the database tables. It’s highly recommended not to use SQL requests to modify the data directly.

Technical support engineers often have to create SQL SELECT requests to obtain the required information and export it in text format. I’ll briefly describe the table types and give examples of the most frequently used requests.

Note that since version 7.0 when the main PBX process starts, the database configuration is being copied into RAM (in-memory database, IMDB) to speed up. The main process (Cisco Call Manager) basically uses the data from IMDB instead of the database tables.

We would mark out a few types of database tables for VOS products:

  • type (dictionary)
  • system
  • dynamic
  • functional
  • mapping

This classification is to be used for educational purposes only.

We recommend to copy the output of SQL commands to Notepad++ or a similar text editor to look through it.

Type tables

The contents of «type» tables are being created during the system installation and cannot be altered by the administrator or users. These tables contain data formatted as key-value and can be referred by the tables of other types.

A few examples are given below. The first one (typemodel) shows the list of phone models supported by a specific CUCM version.

admin:run sql SELECT enum,name,moniker FROM typemodel WHERE enum IN ('110','90','131','437','493')
enum name moniker
==== ======================= ================
110 Media Termination Point MODEL_MTP
90 Route List MODEL_ROUTE_LIST
131 SIP Trunk MODEL_SIP_TRUNK
437 Cisco 7975 MODEL_CISCO_7975
493 Cisco 9971 MODEL_Cisco_9971
...

The following example shows the types of entries in the enumeration order:

admin:run sql SELECT enum,name FROM typepatternusage
enum name
==== ======================================
0 CallPark
1 Conference
2 Device
3 Translation
4 Call Pick Up Group
5 Route
...

The protocols supported on Cisco UCM server:

admin:run sql SELECT enum,name FROM typedeviceprotocol
enum name
==== ============================
0 SCCP
1 Digital Access PRI
2 H.225
3 Analog Access
4 Digital Access T1
5 Route Point
6 Unicast Bridge
7 Multicast Point
8 Inter-Cluster Trunk
9 RAS
10 Digital Access BRI
11 SIP
12 MGCP
...

System tables

System tables are the ones like typetableinfo, typefieldinfo, treecontrolgroupnodes.

The first two tables form the database schema, describing the tables and their fields. The third one stores web server pages.

admin:run sql SELECT enum,tablename FROM typetableinfo
enum tablename
==== ================================
1 Device
...
13 DevicePool
...
18 H323Device
22 MediaMixer
24 NumPlan
...
46 TypeDeviceProtocol
...
77 DeviceNumPlanMap
79 TypeModel

Dynamic tables

The contents of dynamic tables can be altered by a system administrator as well as by the end users (which actually happens more often). The users can utilize such features as Call Forwarding, DND (do not disturb), hunt group, extension mobility and other. The current call forwarding status for a selected user’s line number is stored in the database along with all the other parameters.

The following request shows all the line numbers (it happens to be a single line 1411) with unconditional forwarding (CFA) to the line 5000.

admin:run sql SELECT c.pkid,c.cfadestination,n.dnorpattern line,n.fkroutepartition pt,c.datetimestamp FROM callforwarddynamic c INNER JOIN numplan n ON n.pkid==c.fknumplan WHERE c.cfadestination='5000'
pkid cfadestination line pt datetimestamp
==================================== ============== ==== ==== =============
7ded9e18-f706-4d7b-8f96-aa54fa3898c6 5000 1411 NULL 1493195338

Configuration tables

The last type of tables is for storing the current system configuration. It can only be altered by the system administrator.

This request shows all phone numbers configured by the administrator, i.e. phone routing table.

admin:run sql SELECT pkid,dnorpattern num,fkroutepartition pt,tkpatternusage FROM numplan
pkid num pt tkpatternusage
==================================== =========== =========== ==========================
00ee7548-6ac0-1828-0b6c-d542d63f445a 1110 NULL 2
87398763-efa2-8a8c-9693-745300db3b72 134X NULL 5
f2856fc5-dcbe-1a7a-f4dc-a7685d4ac0cd 1411 NULL 2
a4dd3b81-dc2e-8b59-6ae1-032f5df8e829 1461 NULL 2
fb0471f2-01d0-2a2a-f1cc-d45b16bb5573 5111 NULL 7
7916b98d-3974-6e8e-5dc8-6e1aa4ec6ecd 1120 NULL 2
2c30de37-cf1d-6060-dc0c-7e2959e34c9a 5102 NULL 2
4d3de192-6692-37d5-aaad-63cfc5cfdd24 1100 NULL 2
a16d29ba-b0c0-c0cf-35ec-63abbaa38009 1011 NULL 2

Another example that shows the list of configured devices: phones, SIP trunks, CTI Route Points and media resources.

admin:run sql SELECT pkid,name,tkmodel,tkdeviceprotocol proto FROM device WHERE pkid NOT IN ('7248bc9-53a8-4940-90df-1a2335c76a72','1ecbc4f3-eef3-45c5-9be1-7756bbdf1bd8','59765051-833a-435d-9d9d-783eab0297a6','27abd0a0-c549-4656-9f96-67c8308f610c','07248bc9-53a8-4940-90df-1a2335c76a72')
pkid name tkmodel proto
==================================== ==================== ======= =====
ee4c9f70-ea2b-45d5-8ffe-31fb4e9681a6 MTP_2 110 6
0d874bc4-c7bc-4949-a140-58e640d94629 CFB_2 50 6
47bb29fe-4e71-4dd9-b057-4520c1b6c548 ANN_2 126 0
f1c32bf7-e309-47db-931c-a6219a0c792a MOH_2 70 0
474729f0-f3da-ffcd-d289-271f441445a3 std-hl 90 0
2633e474-b883-4cbe-8f07-3a7dddd4f7bc SEP005056996F7E 30016 0
9f86b82f-89c4-72bd-c04b-a24cc3adaee8 7962-em-5102 404 0
d76b4ce1-3da3-cd1c-6f07-841fdc3302e0 ICM-TR-Trig1380 73 0
34de5b13-d98a-47f6-a35b-9427c1c2f5eb SEPA45630BB07AF 437 0
5a358a31-80b7-6a8a-cfe3-487624d49a09 ICM_RP_1120 73 0
4f03ff2f-d89a-415b-8262-2d775230dddc SEPA45630BB06F9 437 0
36f07a4d-74f8-2ee0-5779-460caa1ed923 SEP0024142DDF24 437 0
87655d65-0317-5ac1-1a4e-7a7bbc1b278f ccx15_1464 72 0
00984b02-3c20-46ae-aa5d-bd3ed3b2179d ccx15_1465 72 0
3e17cd58-1731-cfb8-92b2-707f4b34b8ab ccx215_1460_aa 73 0
0aa53d21-b192-436d-8d56-f77cd508fca5 SEPA45630BB0387 437 0

Mapping tables

Mapping tables can be mentioned as a sub-type. They are necessary for associating lines with phones and users with phones, and in some other cases as well.

Here’s an example of an association based on keys. Note the device id (fkdevice) and the number if (fknumplan) and compare with the output of the commands above.

admin:run sql SELECT pkid,fkdevice,fknumplan FROM devicenumplanmap WHERE fkdevice='34de5b13-d98a-47f6-a35b-9427c1c2f5eb' AND fknumplan='f2856fc5-dcbe-1a7a-f4dc-a7685d4ac0cd'
pkid fkdevice fknumplan
==================================== ==================================== ====================================
018ab5e8-9218-48ef-a55d-9dcc84ec8f81 34de5b13-d98a-47f6-a35b-9427c1c2f5eb f2856fc5-dcbe-1a7a-f4dc-a7685d4ac0cd

Here’s an example of the same association that’s more convenient for the administrator. There’s a phone with MAC A45630BB07AF. The phone’s 1st line is associated with the line 1411 in partition NULL.

admin:run sql SELECT m.pkid,d.name device,n.dnorpattern line,m.numplanindex pos,p.name FROM devicenumplanmap m INNER JOIN device d ON d.pkid=m.fkdevice INNER JOIN numplan n ON n.pkid=m.fknumplan LEFT JOIN routepartition p ON p.pkid=n.fkroutepartition WHERE n.dnorpattern LIKE '%1411%'
pkid device line pos name
==================================== =============== ==== === ====
018ab5e8-9218-48ef-a55d-9dcc84ec8f81 SEPA45630BB07AF 1411 1 NULL

Frequently used requests

Below you can find a few helpful SQL requests that can be used to analyze different problems.

Show all phone lines with their current call recording parameters:

admin:run sql select rd.pkid,n.dnorpattern,n.fkroutepartition AS pt,trec.name AS recflag from recordingdynamic AS rd INNER JOIN devicenumplanmap AS mdn ON mdn.pkid==rd.fkdevicenumplanmap INNER JOIN numplan AS n ON n.pkid==mdn.fknumplan INNER JOIN typerecordingflag AS trec ON trec.enum==rd.tkrecordingflag WHERE rd.pkid!='4ef381b2-ff24-47f9-bdb2-022b7e8fcaf9'
pkid dnorpattern pt recflag
==================================== =========== ==== ================================
c5611b10-c5d4-4365-b55c-23edb300fbbb 101X NULL Call Recording Disabled
f52ea03c-fffe-4787-a4d6-b070a580ce4e 5035 NULL Call Recording Disabled
c6c3263e-281c-4bb4-b75b-e5ad8fef0506 5034 NULL Automatic Call Recording Enabled
88d28cd8-0580-46cb-a523-724f69dd9998 3014 NULL Automatic Call Recording Enabled

Show the current CUCM logging parameters:

admin:run sql select ts.name,p.servername,p.enable AS traceon,p.tracelevel,p.numfiles,p.maxfilesize,p.numlines,p.numminutes from processnodeservice AS p INNER JOIN typeservice AS ts ON ts.enum==p.tkservice
name servername traceon tracelevel numfiles maxfilesize numlines numminutes
================================================= ============ ======= ========== ======== =========== ======== ==========
Cisco CallManager 10.48.47.143 t 1 1 2 10000 1440
Cisco CallManager 10.48.47.136 t 127 1 2 10000 1440
Cisco Tftp 10.48.47.143 t 127 1 2 10000 1440
Cisco Tftp 10.48.47.136 t 127 1 2 10000 1440

The phones subscribed to XML services:

admin:run sql select mt.pkid,d.name as device,mt.servicename,mt.fktelecasterservice from telecastersubscribedservice as mt INNER JOIN device as d ON d.pkid==mt.fkdevice
pkid device servicename fktelecasterservice
==================================== ==================== =========== ====================================
ab11d152-fdba-0cc6-a6dc-b6658e8a8ae7 7962-em-5102 EM 49ce7246-de87-1eb4-e768-ddc34f2b9ccf
a2c8399c-89a0-3169-d914-93eebaceb948 SEPA45630BB07AF FIPPA dbb3533c-7301-8175-7e03-616b9e4f100f
491a4ec1-2d4b-c2b0-93c4-edf97df84c09 milnagy 8861 Profile EM 49ce7246-de87-1eb4-e768-ddc34f2b9ccf

The following request may help to solve certificate issues.

admin:run sql select c.pkid,c.servername,c.ipv4address,c.serialnumber,tctr.name AS role,tsc.name AS type,c.subjectname,c.issuername,c.timetolive from certificate AS c INNER JOIN certificatetrustrolemap as ctr ON ctr.fkcertificate==c.pkid INNER JOIN certificateservicecertificatemap AS sc ON sc.fkcertificate==c.pkid INNER JOIN typecertificateservice AS tsc ON tsc.enum==sc.tkcertificateservice INNER JOIN typetrustrole AS tctr ON tctr.enum==ctr.tktrustrole
pkid servername ipv4address serialnumber role type subjectname issuername timetolive
==================================== ========== ============ ====================================== ================================ ================= ================================================================================================================================================ ====================================================================================================================================================================== ==========
9e045d3a-be58-6e75-690e-0086541b1632 ucm11-1 10.48.47.143 360000005923e9c225e8f6d963000100000059 CallManagerTFTP CallManager CN=ucm11-1.allevich.local,OU=TAC,O=Cisco,L=Krakow,ST=Malopolskie,C=PL CN=allevich-DC12-CA,DC=allevich,DC=local NULL
9e045d3a-be58-6e75-690e-0086541b1632 ucm11-1 10.48.47.143 360000005923e9c225e8f6d963000100000059 CallManagerTFTP CallManager-trust CN=ucm11-1.allevich.local,OU=TAC,O=Cisco,L=Krakow,ST=Malopolskie,C=PL CN=allevich-DC12-CA,DC=allevich,DC=local NULL
9e045d3a-be58-6e75-690e-0086541b1632 ucm11-1 10.48.47.143 360000005923e9c225e8f6d963000100000059 CallManagerTFTP Phone-SAST-trust CN=ucm11-1.allevich.local,OU=TAC,O=Cisco,L=Krakow,ST=Malopolskie,C=PL CN=allevich-DC12-CA,DC=allevich,DC=local NULL
9e045d3a-be58-6e75-690e-0086541b1632 ucm11-1 10.48.47.143 360000005923e9c225e8f6d963000100000059 SAST CallManager CN=ucm11-1.allevich.local,OU=TAC,O=Cisco,L=Krakow,ST=Malopolskie,C=PL CN=allevich-DC12-CA,DC=allevich,DC=local NULL
9e045d3a-be58-6e75-690e-0086541b1632 ucm11-1 10.48.47.143 360000005923e9c225e8f6d963000100000059 SAST CallManager-trust CN=ucm11-1.allevich.local,OU=TAC,O=Cisco,L=Krakow,ST=Malopolskie,C=PL CN=allevich-DC12-CA,DC=allevich,DC=local NULL
9e045d3a-be58-6e75-690e-0086541b1632 ucm11-1 10.48.47.143 360000005923e9c225e8f6d963000100000059 SAST Phone-SAST-trust CN=ucm11-1.allevich.local,OU=TAC,O=Cisco,L=Krakow,ST=Malopolskie,C=PL CN=allevich-DC12-CA,DC=allevich,DC=local NULL
9e045d3a-be58-6e75-690e-0086541b1632 ucm11-1 10.48.47.143 360000005923e9c225e8f6d963000100000059 TFTP CallManager CN=ucm11-1.allevich.local,OU=TAC,O=Cisco,L=Krakow,ST=Malopolskie,C=PL CN=allevich-DC12-CA,DC=allevich,DC=local NULL

We hope this information will be useful, and not only to Cisco technical support engineers.

Configuring Dialed Number Analyzer in CUCM

This article tells about the Dialed Number Analyzer in Cisco Unified Communications Manager (CUCM). Why do you need it? Suppose you are configuring a complicated dial plan on your server. There are CSS, Partitions, Route Groups, Route Lists, Route Patterns, etc. How should you test it to find mistakes? Here comes the Dialed Number Analyzer. It helps you to analyze a dial plan and gives the full call flow information for the dialed digits.

Configuration

First of all, proceed to the Cisco Unified Serviceability menu → Tools → Service Activation. Now check Cisco Dialed Number Analyzer and click Save.

Now proceed to Tools → Dialed Number Analyzer, or open the following URL: https://[cm-machine]/dna. In the window that appears, open Analysis → Analyzer.

Here you should fill out three fields:

  • Calling Party – the caller’s phone number for the test call;
  • Dialed Digits – the dialed digits;
  • CSS – Calling Search Space for the test phone.

After that, click Do Analysis. You will see what happens to a call under the specified conditions.

To analyze gateways, phones and trunks separately choose Gateway, Phone or Trunk in the Analysis menu.

Time of the Day Routing in CUCM

This article is about routing in Cisco Unified Communications Manager (CUCM). Today’s topic is Time of the Day routing. This feature helps you to distribute calls depending on the time of day and day of the week. For example, you can forbid international calls during nonworking hours and on weekends, and reroute intercity calls to a different trunk for this time period.

Time of Day Routing can be used together with CSS, Partitions and routing technologies like Route Pattern and Route List/Route Group.

If you are going to use it with Partitions, specify the required time period in Time Schedule and link it to a partition. This partition will only be active during the specified time period. For the rest of the time it will stay invisible.

To manage routing depending on the time, create several Partitions and set their priority using the CSS list (the first partition on the list has the highest priority). Then create several Route Patterns and put them into different partitions.

Configuration

First of all, configure time periods. Proceed to Call Routing → Class of Control → Time Period and click Add New. Enter the name for your time period, start and end time, time zone and repetition parameters. Click Save.

Now create a time schedule. Proceed to Call Routing → Class of Control → Time Schedule and click Add New. Fill out the Name field, click Save. Then the Time Period Information field will appear. Select the required time periods.

Now configure partitions. Proceed to Call Routing → Class of Control → Partition, select a partition to edit (or create a new one). Select the Time Schedule you have created.

Proceed to Call Routing → Class of Control → Class of Control and move your partitions to a CSS. A partition’s priority depends on its position on the list.

Then add partitions to Route Patterns that are located here: Call Routing → Route/Hunt → Route Pattern.

Now you can distribute calls in your system depending on the time.

Configuring Callback feature in CUCM

This article will show you the CallBack feature in Cisco Unified Communications Manager (CUCM). The CallBack feature is used to inform the caller when the called party line becomes available.

First, open Cisco Unified Serviceability menu → Tools → Service Activation. Then select your server and make sure that Cisco Extended Functions option is checked.

Now configure Softkey. Proceed to Cisco Unified CM Administration menu → Device → Device Settings → Softkey Template. Then click Add New, select the Standard User template and click Copy. Enter the name and description for the new template. Then select Configure Softkey Layout in a dropdown menu in the upper right corner and click Go. In the field that appears, move Call Back from Unselected Softkeys to Selected Softkeys using the right arrow button. Repeat for On Hook, Connected Transfer and Ring Out states (select a call state to configure in the corresponding field).

Then apply the softkey template to a phone. Proceed to the Phone tab and select the phone to apply the template to. Select your template in the Softkey Template field, then click Save and Apply Config.

The CallBack button will appear at the bottom of the screen.

Let’s see how it works.

Make a call from phone A to phone B while phone B is busy. Press CallBack on the phone A.

Then press OK. The message will change to CallBack is activated. Press Exit to quit this screen. To deactivate the function, click Cancel.

As soon as phone B becomes available, a window with an audio signal and a notification about phone B being available will appear on phone A. To call phone B, press Dial.

Call Tracing in CUCM Using RTMT

This article will show you how to gather traces in Cisco Unified Communications Manager (CUCM). This information can be useful for trouble shooting. It is also needed in a request for Cisco TAC engineers.

To collect traces, you will need to install Real-Time Monitoring Tool application. You can find an installation guide on the official Cisco website.

First of all, proceed to Cisco Unified Serviceability menu -> Trace -> Configuration. Now select your server in the Sever field, select CM Services for the Service Group, select Cisco CallManager for the Service. You can see a screenshot with the default parameters below:

Make sure that Trace On is checked. Select Detailed in the Debug Trace Level dropdown menu.

If you are using a clustered environment, repeat this for each server in the cluster.

Now launch RTMT and connect to your server. Proceed to the System menu -> Tools -> Trace & Log Central -> Collect Files. In the window that appears, check Cisco CallManager for the required servers.

Click Next. On the next screen, check Event Viewer -> Application Log and Event Viewer -> System Log services.

Now you should select the time range in the Collection Time field. Select the directory for the log files in the Download File Options section.

Now click Finish. After the information is gathered, all the needed files will be placed into the specified directory.

Caller’s Alerting Name in Cisco UCCX

UCCX is possibly the only commercial call center platform that never makes you say “sorry, this is technically not feasible”. But it also has its disadvantages.

One of them is the caller’s number. Instead of the caller’s phone number, a call center phone gets the number of the CTI port that accepted the call. Actually, this behavior is correct: a call in a queue is placed on hold. As soon as an operator connects, the call is forwarded from the CTI port to the operator’s phone. When the operator picks it up, the caller’s phone number is already displayed. It often confuses contact center employees.

Since the version 10, UCCX has a function that helps to pass the caller’s number to a phone in a pop-up window. To do this, connect to UCCX via ssh (or connect to a terminal session directly) and enter the following command:

  • utils uccx icd clid enable

You can change the pop-up window title:

  • utils uccx icd clid header HEADER_LINE

And the prefix text to be displayed in front of the caller’s number:

  • utils uccx icd clid prefix PREFIX_LINE

After these changes you should restart Cisco Unified CCX Engine. It is located in Cisco Unified CCX Serviceability\Tools\Control Center - Network Services.

If you are using an HA environment, these actions should be repeated for each node in a cluster.

Actually, this function meets the requirements of a call center working with external clients. However, what shall we do if a contact center works with the company’s internal users and the operators want to see the names the numbers are resolved into?

There is a certain number of requests for this function on supportforums.cisco.com, but at the time of version 10.6 it wasn’t even declared as planned, so we’ll create workarounds.

There are two options: one is easier, the other is more difficult.

We can either use a CUCM function: Corporate Directory (this is the easy option), or create a phone directory of our own based on CUCM DB (this is more difficult).

Create the following variables in the UCCX script:

Add “Call Contact\Get Call Contact Info” action to the script:

Set the CUCMDirURL variable to the following value:

  • http://CUCM_address:8080/ccmcip/xmldirectorylist.jsp – if you are using Corporate Directory;
  • http://web-server/output_phone_directory_list.xml – if you are using your own directory.

Create a URL document: Document\Create URL Document.

For Corporate Directory (pass a parameter named “n” with a value of “CallingNumber”):

You don’t have to pass any parameters for your own directory:

Create an XML document: Document\Create XML Document.

Assign a name that corresponds to the phone to the AlertingName variable (Document\Get XML Document Data). The XML request for Corporate Directory: ″//DirectoryEntry/Name″

For your own directory: ″/return/row[dn='″+CallingNumber+″‘]/alertingname″

All output information will be displayed in CAD. First, create a variable for the name of the agent’s template: Settings\Expanded Call Variables…

Create a Scalar variable named user.layout.

Then, after our XML manipulations, you should add a Call Contact\Set Enterprise Call Info action. On the General tab, add two variables named Call.PeripherialVariable (with numbers that have never been used in the script before). Assign the following values: CallingNumber and AlertingName. On the Expanded Call Variables tab, add a variable named “user.layout”. Set Array Indexes to Scalar, set the value to the name of the displaying template for CAD.

We’re done with the script now.

Now proceed to Cisco Desktop Administrator\Services Configuration\Enterprise Data\Fields. Find the Call Variables with the numbers you have set in Set Enterprise Call Info. Change the Display Names to something meaningful (for example, Calling Number for 1, Name for 10).

Proceed to Cisco Desktop Administrator\Services Configuration\Enterprise Data\Layout List and create a new Layout with the name specified in Set Enterprise Call Info. Add Call Variable 1 and Call Variable 10 to the Selected field.

If you are using Corporate Directory, then everything is ready for use. However, you should keep in mind that CUCM gets the data from your directory server. If it doesn’t contain all the data on the company’s phones or the data is cluttered for some reason, then your only option is to create an XML phone directory using the data downloaded from the CUCM database. You may also want to use a “directory or your own” if you have a database with your external clients’ numbers and other data that can be used to display specific information about the calling party in CAD.

The required data will be obtained through a SOAP request. Create an XML file with the following contents:

<?xml version=″1.0″ encoding=″UTF-8″?>
<soapenv:Envelope xmlns:soapenv=″http://schemas.xmlsoap.org/soap/envelope/″ xmlns:ns=″http://www.cisco.com/AXL/API/10.5″>
<soapenv:Header/>
<soapenv:Body>
<ns:executeSQLQuery>
<sql>
select distinct n.alertingname, n.dnorpattern as DN
from device as d, numplan as n, devicenumplanmap as dnpm
where dnpm.fkdevice = d.pkid and dnpm.fknumplan = n.pkid and d.tkmodel != 72 and ( d.tkclass = 1 or d.tkclass = 20 or d.tkclass = 254);
</sql>
</ns:executeSQLQuery>
</soapenv:Body>
</soapenv:Envelope>

The SQL request is marked in yellow. Basically, we pick alertingname and number fields. We only use the active phone numbers with associated IP phones, device profiles or remote destination profiles (d.tkclass = 1 or d.tkclass = 20 or d.tkclass = 254) and make sure that the device model is not a CTI Port (d.tkmodel != 72).

Make sure that Cisco AXL Web Service is activated on your CUCM (Cisco Unified Serviceability\Tools\Service Activation\Database and Admin Services).

Create a user on CUCM (Cisco Unified CM Administration\User Management\End User) with the “Standard AXL API Access” role.

Now you can use cURL to send the following request to CUCM:

curl -k -u username:password -H ″Content-type: text/xml;″ -H
″SOAPAction:CUCM:DB ver=10.5″ -d @/path/to/xml/file/with/request.xml
https://cucm.local:8443/axl/ | awk ‘{print substr($0,202,length-264)}’

As a result, every phone number is going to look like:

<row>
<alertingname>Name</alertingname>
<dn>8800</dn>
</row>

CUCM forms the output enclosed in tags:

<?xml version=″1.0″ encoding=″UTF-8″?>
<soapenv:Envelope xmlns:soapenv=″http://schemas.xmlsoap.org/soap/envelope/″>
<soapenv:Body>
<ns:executeSQLQueryResponse xmlns:ns=″http://www.cisco.com/AXL/API/10.5″>
<return>
//output
</return>
</ns:executeSQLQueryResponse>
</soapenv:Body>
</soapenv:Envelope>

In fact, everything is correct, but UCCX’s built-in XML parser crashes while working with namespaces. These tags will be cut out by the awk script marked in yellow.

You can add this command to the scheduler, so it will be executed automatically, and redirect the output to an XML file available via http.

That’s it.

Call Recording Topic on CCIE Collaboration Exam v2.0

Cisco teaches how to record CUCM calls even without having its own call recording solution. Why?

That's interesting. As we're all aware Cisco MediaSense reached its EOL in 2017 with no replacement available from Cisco. All the call recording solutions on the market are developed by 3rd party Cisco Solution Partners. But take a look at CCIE Collab exam topics for 2018 - https://learningnetwork.cisco.com/community/...

The 6.7 section is all about designing and implementing call recording architecture, including SIP recording, built-in bridge and network-based approaches etc etc.

Why? Any suggestions?

Updating CUCM 8.6 to 11.5 on UCS C220 M3S step by step

Based on the documentation:
https://www.cisco.com/c/en/us/td/docs/voice...

The prerequisites (hardware and software) are the following:

  • 2x UCSC-C220-M3SBE
  • VMWare ESXi 5.1
  • CUCM (two Subscriber nodes, Publisher, version 8.6.2.25900-8)
  • CUCM (up to 1000 users)
  • CUCM Guest: 2vCPU, 4096Mb vRAM, 80Gb virtual disk
  • UCCX: one node, version 8.5.1.11004-25

Upgrading the Publisher

The Subscriber should be alive.

1. Take a Backup (1) – shut down the VM and make a copy.
2. Install V3 RSA keys via SFTP: Software Upgrade > ciscocm.version3-keys.cop.sgn
3. Use the following command to shut down CUCM: utils system shutdown
4. In this example the hardware was 2vCPU, 4096Mb vRAM, one 80Gb virtual disk. The following Guest VM Settings changes were required in order to upgrade to CUCM 11.5 (with 1000 users): https://www.cisco.com/c/dam/en/us/td/docs/voice_ip_comm/uc_system/virtual...
a. Guest OS: switch to 64-bit Red Hat Enterprise Linux 6
b. vRAM settings: increase the RAM size to 6 Gb
c. Configure the Network Adapter:
- Take a screenshot of the MAC address

  • Browse the datastore. Locate the *.vmx file and download it
  • Edit it. Add the following string at the end: ethernet0.virtualDev = "vmxnet3"
  • Upload the modified vmx file to the VMWARE folder
  • Remove the machine from the inventory
  • Add it to the inventory again
  • The network adapter parameters will be updated:

5. Run the Virtual Machine with the new settings. Wait for about 20 minutes for the machine to start all the services, so the CPU stabilizes.
6. Upload the new ISO image and map it to the CUCM VM.
7. Make sure that now you have 6 Gb RAM:

8. Open the operating system administration panel. Proceed to Software Upgrades > Install / Upgrade.

  • Source: DVD
  • UCSInstall_UCOS_UNRST_11.5.1.12900-21.sgn.iso
  • Choose “"Do not switch to new version after upgrade"
  • A refresh upgrade takes about 3 hours (Publisher: Started at 11.47, Completed at 13.35; Subscriber Started at 15.15)

9. Take a fresh Backup (2) – shut down the VM and make a copy.

Upgrading the Subscriber

The Publisher should be alive.
Perform the steps 1 to 8.

Configuring Self-Provisioning in CUCM

Self-Provisioning is another function that makes CUCM deployment and user management much easier.

It helps the user to automatically associate and configure the phone.

Let's look into the process of configuring this function.

The users already have been imported from Active Directory. Integrating CUCM with AD is described in the previous article.

First of all, configure device and line templates for auto-registration: Cisco Unified CM Administration > User Management > User/Phone Add > Universal Device Template and Cisco Unified CM Administration > User Management > User/Phone Add > Universal Line Template

Universal Device Template

Universal Line Template

Here you can configure the route partition for the lines to be placed in, CSS, alerting name, the user's locale and other parameters.

Now enable auto-registration.

Proceed to Cisco Unified CM Administration > System > Cisco Unified CM.

Select the server to enable auto-registration. Uncheck "Auto-registration Disabled on this Cisco Unified Communications Manager" and select the templates you have configured.

Now the first step is over. New phones will be automatically registered with DNs from the range specified in the Auto-registration Information section.

Now you should let the users configure the phones for themselves.

Create a CTI Route Point.

Cisco Unified CM Administration > Device > CTI Route Point

Add a DN for this CTI Route Point.

Create an Application User: Cisco Unified CM Administration > User Management > Application User

Add your CTI Route Point to the Controlled Devices. Add the user to Standard CTI Allow Control of All Devices and Standard CTI Enabled groups.

Configure the Self-Provisioning parameters in Cisco Unified CM Administration > User Management > Self Provisioning

Configure the User Profile in Cisco Unified CM Administration > User Management > User Settings

The configuration is complete.

Now a user can make a call from a phone to your CTI Route Point. The IVR will take up the call and prompt the user to enter the Self Service User ID and PIN. Then the phone will restart automatically and after the launch it will be configured for this user.

The phone will be bound to the user's DN, the owner will be specified and the phone will be added to the user's Controlled Devices.

The following DN parameters will also be configured: CSS, Alerting Name, Caller ID and Line Text Label.

So, after you've configured Self-Provisioning, you can completely exclude the administrator from the process of setting up new phones.

Cisco logo history and evolution

Why do companies change their logos?

Here are some reasons skipping obvious ones like M&A, change in the name etc:

There are a number of reasons, most often brought about by a combination of external cultural changes and shifts along with internal company shifts that now warrant ensuring that the company is NOT being pigeon-holed into "something from its past."

David Brier, Brand identity specialist, award-winning designer

Companies change their typefaces to keep them up to date, or because an old logo no longer fits with a new business strategy… this could range from a small refinement to a complete redesign.

David Airey, graphic designer, author of Logo Design Love

Sometimes companies change their logos for the wrong reasons…Sometimes they change it because there’s a new marketing person in charge…. Sometimes companies make very small changes – almost infinitesimal changes to their logos – which, quite rightly, are derided by the general public… But quite often those little refinements do a good job of making the company seems that little bit more up to date, that little bit more modern. And if you look back over the logo over time, you'll see that those little incremental changes were actually quite important.

Patrick Burgoyne, editor of Creative Review

Cisсo Systems

So, Cisco Systems… one of the largest manufacturers of networking equipment and software, headquartered in Silicon Valley with more than 70K employees all over the world and revenue of U.S. $48 billion in 2017.

Founded 33 years ago the company has grown from on-product vendor into a recognized worldwide leader in networking business.

Here's a rundown of the Cisco logo design evolution, along with some key highlights of the company history.

1984 – Golden Gate Bridge | San FranCISCO

Founded in December 1984, Cisco actually started operations in 1987 after the battle with Stanford over charges that the founders used technology that belonged to Stanford to start their business.

"Cisco" was actually derived from the city name San Francisco and initially the company's engineers insisted on using the lower case "cisco". The initial logo depicts the shape of the Golden Gate Bridge, the famous landmark from San Francisco.

1996 – Digital Signal

The growth of the Internet and wide adoption of the IP (Internet Protocol) changed the telecom landscape. Cisco acted promptly to use the new opportunity and quickly became the leading provider of routers and switches.

The evolved logo is appended with the company's name "Cisco Systems". It consists of the same bridge but with a different silhouette and enclosed in a box. It now gets a second meaning - a digital signal that reflects the company's business.

2006 – The Human Network

Cisco launched the "Human Network" campaign, which centered on the impact of Internet networks on people and businesses.

This campaign (actually Cisco's largest one) shifted the company's image from a tech vendor to the company that changes the world and the way people communicate. Cisco became the leader in communication and collaboration technologies – VoIP, video conferencing, online collaboration.

The logo also changed and became much more simple – the bridge consists of only 9 bold strokes, the 'systems' is removed and the remaining "cisco" gets updated to be in the same case and height.

The Cisco logo comes in red and blue. The red color symbolizes responsibility, passion, and readiness to work hard for further success; the blue color represents tranquility, optimism, fame, and prosperity.

2013 – Tomorrow Starts Here

Already the leader, with its CEO John Chambers on the Forbes magazine cover, Cisco started pushing the IoT concept and starts the new "Tomorrow start here" campaign: "Today, more than 99% of our world is still not connected to the Internet. But we're working on it."

Tolleson and Cisco changed the logo colors to blue.

Yes, this is the brand agency that defines Cisco's visual center – Tolleson. BTW guest where it is located?

Basic check-up of a CUCM server

This article presents a small set of commands for Cisco Voice Operation System (VOS) based servers. These commands help to reveal most problems caused by the platform. Each command comes with a brief description. The most important output data is marked with bold.

1. show status

If you need to analyse any problem, this is the first command to begin with. It displays the server’s name, its version and uptime. Since Cisco VOS servers are built on the basis of Linux Red Hat (RH), it may be handy to know your RH version, which in this case is 6.0. Average processor load above 60-70%, IOWAI above 1-2% and disk usage above 95% for any partition may indicate potential problems with this server.

admin:show status

Host Name : ucm11-1
Date : Mon Feb 13, 2017 22:24:14
Time Zone : Central European Time (Europe/Warsaw)
Locale : en_US.UTF-8
Product Ver : 11.0.1.20000-2
Unified OS Version : 6.0.0.0-2

Uptime:
22:24:19 up 20 days, 10:34, 1 user, load average: 0.27, 0.16, 0.13

CPU Idle: 94.94% System: 02.78% User: 02.28%
IOWAIT: 00.00% IRQ: 00.00% Soft: 00.00%

Memory Total: 8062356K
Free: 147272K
Used: 7915084K
Cached: 3739040K
Shared: 451788K
Buffers: 288744K

Total Free Used
Disk/active 20173692K 7107128K 12860280K (65%)
Disk/inactive 20173692K 7443172K 12524236K (63%)
Disk/logging 70515112K 21109572K 45816884K (69%)

2. show tech network hosts

This command can be used to get the list of servers in a cluster in a convenient format. The main purpose is to understand the scale of a system: 1 server means no fault tolerance, 8 servers mean that the system serves a lot of users and any changes must be carefully thought out and coordinated with the customer. The output of this command must be the same for all the servers in your cluster. Otherwise, there may be problems with database replication.

admin:show tech network hosts
——————– show platform network ——————–

/etc/hosts File:
#This file was generated by the /etc/hosts cluster manager.
#It is automatically updated as nodes are added, changed, removed from the cluster.

127.0.0.1 localhost
::1 localhost
10.48.47.136 ucm11-2.allevich.local ucm11-2
10.48.47.143 ucm11-1.allevich.local ucm11-1

3. utils ntp status

Synchronization with an NTP server is mandatory for all the devices in your network. Timestamps help with malfunction diagnostics, especially in complicated cases. Informix DB replication won’t be stable without NTP synchronization. This command can also be used to indicate the date and time when the commands in a saved text file were executed.

admin:utils ntp status
ntpd (pid 8524) is running…


remote refid st t when poll reach delay offset jitter
==============================================================================
*172.18.108.15 .GPS. 1 u 583 1024 377 106.518 0.283 1.045

synchronised to NTP server (172.18.108.15) at stratum 2
time correct to within 131 ms
polling server every 1024 s

Current time in UTC is : Mon Feb 13 21:24:23 UTC 2017
Current time in Europe/Warsaw is : Mon Feb 13 22:24:23 CET 2017

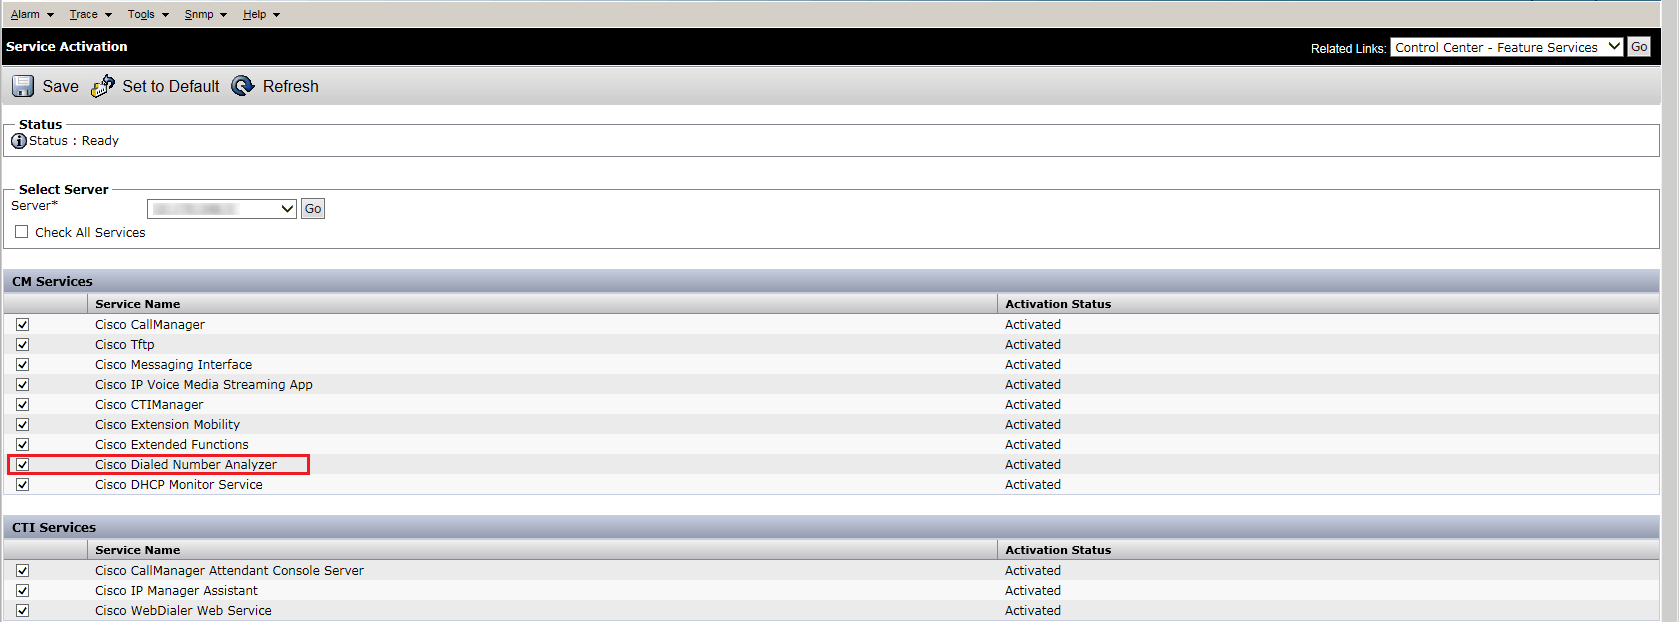
4. utils service list

This command is necessary if you need to check the state of all services running on a certain server in a cluster. This is also the simplest way to find the Publisher server in a cluster: it will have the directive “primary node=true”.

admin:utils service list
Requesting service status, please wait…
System SSH [STARTED]
Cluster Manager [STARTED]
Name Service Cache [STARTED]
Entropy Monitoring Daemon [STARTED]
Cisco SCSI Watchdog [STARTED]
Service Manager [STARTED]
HTTPS Configuration Download [STARTED]
Service Manager is running
Getting list of all services
>> Return code = 0
A Cisco DB[STARTED]
A Cisco DB Replicator[STARTED]
Cisco AMC Service[STARTED]
Cisco AXL Web Service[STARTED]
Cisco Audit Event Service[STARTED]
Cisco Bulk Provisioning Service[STARTED]
Cisco CAR DB[STARTED]
Cisco CAR Scheduler[STARTED]
Cisco CAR Web Service[STARTED]
Cisco CDP[STARTED]
Cisco CDP Agent[STARTED]
Cisco CDR Agent[STARTED]
Cisco CDR Repository Manager[STARTED]
Cisco CTIManager[STARTED]
Cisco CTL Provider[STARTED]
Cisco CallManager[STARTED]
Cisco CallManager Admin[STARTED]
Cisco CallManager SNMP Service[STARTED]
Cisco CallManager Serviceability[STARTED]
Cisco CallManager Serviceability RTMT[STARTED]
Cisco Certificate Authority Proxy Function[STARTED]
Cisco Certificate Change Notification[STARTED]
Cisco Certificate Expiry Monitor[STARTED]
Cisco Change Credential Application[STARTED]
Cisco DHCP Monitor Service[STARTED]
Cisco DRF Local[STARTED]
Cisco DRF Master[STARTED]
Cisco Database Layer Monitor[STARTED]
Cisco DirSync[STARTED]
Cisco E911[STARTED]
Cisco ELM Client Service[STARTED]
Cisco Extended Functions[STARTED]
Cisco Extension Mobility[STARTED]
Cisco Extension Mobility Application[STARTED]
Cisco IP Manager Assistant[STARTED]
Cisco IP Voice Media Streaming App[STARTED]
Cisco Intercluster Lookup Service[STARTED]
Cisco License Manager[STARTED]
Cisco Log Partition Monitoring Tool[STARTED]
Cisco Prime LM Admin[STARTED]
Cisco Prime LM DB[STARTED]
Cisco Prime LM Server[STARTED]
Cisco RIS Data Collector[STARTED]
Cisco RTMT Reporter Servlet[STARTED]
Cisco SOAP – CDRonDemand Service[STARTED]
Cisco SOAP – CallRecord Service[STARTED]
Cisco Serviceability Reporter[STARTED]
Cisco Syslog Agent[STARTED]
Cisco TAPS Service[STARTED]
Cisco Tftp[STARTED]
Cisco Tomcat[STARTED]
Cisco Tomcat Stats Servlet[STARTED]
Cisco Trace Collection Service[STARTED]
Cisco Trace Collection Servlet[STARTED]
Cisco Trust Verification Service[STARTED]
Cisco UXL Web Service[STARTED]
Cisco Unified Mobile Voice Access Service[STARTED]
Cisco User Data Services[STARTED]
Cisco WebDialer Web Service[STARTED]
Host Resources Agent[STARTED]
MIB2 Agent[STARTED]
Platform Administrative Web Service[STARTED]
SNMP Master Agent[STARTED]
SOAP – Diagnostic Portal Database Service[STARTED]
SOAP -Log Collection APIs[STARTED]
SOAP -Performance Monitoring APIs[STARTED]
SOAP -Real-Time Service APIs[STARTED]
System Application Agent[STARTED]
Cisco Dialed Number Analyzer[STOPPED] Service Not Activated
Cisco Dialed Number Analyzer Server[STOPPED] Service Not Activated
Cisco Directory Number Alias Lookup[STOPPED] Service Not Activated
Cisco Directory Number Alias Sync[STOPPED] Service Not Activated
Cisco Location Bandwidth Manager[STOPPED] Service Not Activated
Cisco Prime LM Resource API[STOPPED] Service Not Activated
Cisco Prime LM Resource Legacy API[STOPPED] Service Not Activated
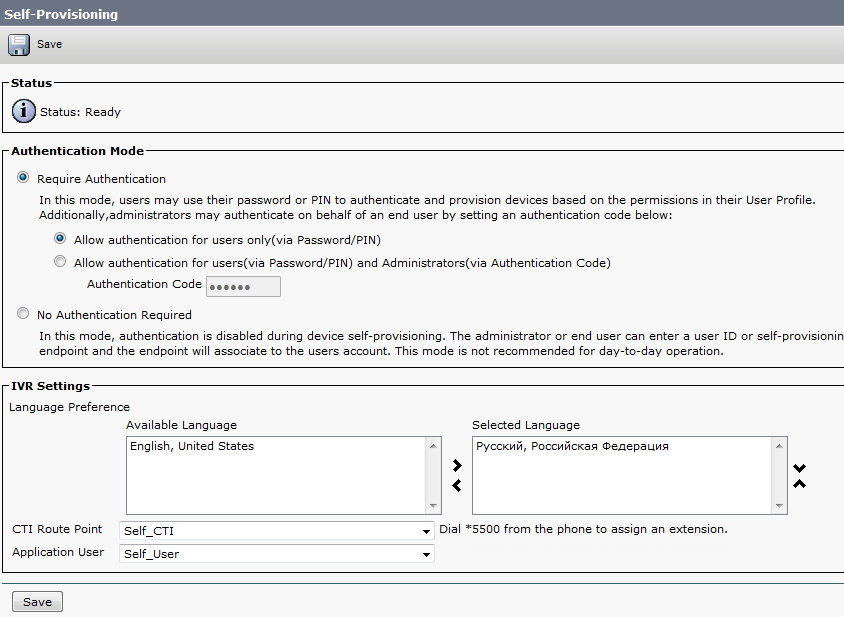
Self Provisioning IVR[STOPPED] Service Not Activated
Primary Node =true

5. utils dbreplication runtimestate

Many problems, especially the ones that are difficult to reproduce, originate from Informix database replication malfunction. To ensure that the replication is working correctly, pay attention to the marked fields. All the tables should be synchronized, basic check-ups should be successful (“Y” status), the status of each node should be equal to 2. Another useful piece of information is the timeout between the nodes in a cluster (in ms). For the servers that are located in different data centers far from each other it is usually above 10 ms.

admin:utils dbreplication runtimestate
Server Time: Mon Feb 13 22:24:51 CET 2017

Cluster Replication State: BROADCAST SYNC ended at: 2016-02-25-08-48
Sync Result: SYNC COMPLETED on 692 tables out of 692
Sync Status: All Tables are in sync
Use CLI to see detail: ‘file view activelog cm/trace/dbl/20160225_084649_dbl_repl_output_Broadcast.log’

DB Version: ccm11_0_1_20000_2
Repltimeout set to: 420s
PROCESS option set to: 1

Cluster Detailed View from ucm11-1 (2 Servers):

PING DB/RPC/ REPL. Replication REPLICATION SETUP
SERVER-NAME IP ADDRESS (msec) DbMon? QUEUE Group ID (RTMT) & Details
———– ———- —— ——- —– ———– ——————
ucm11-2 10.48.47.136 2.860 Y/Y/Y 0 (g_3) (2) Setup Completed
ucm11-1 10.48.47.143 0.038 Y/Y/Y 0 (g_2) (2) Setup Completed

6. run sql SELECT count(*) from enduser

To analyze any problem, a Cisco TAC engineer has to know the number of users in your system. It helps to understand its size and estimate the business impact of this service.

admin:run sql SELECT count(*) from enduser
(count(*))
==========
11

Other VOS-based servers usually store user data in a separate Informix DB.
Commands for other servers (CUIC, Unity Connection) are given below.

run sql SELECT count(*) from cuic_data:cuicuser
run cuc dbquery unitydirdb SELECT count(*) FROM tbl_user

7. utils core active list

Checking memory dumps of the processes is a part of the initial diagnostics. An example of Call Manager process memory dump is given below. Analyzing memory dumps is Cisco TAC engineers’ work, as it requires the knowledge of the product’s software architecture.

admin:utils core active list
Size Date Core File Name
=================================================================
233860 KB 2017-02-02 09:28:40 core.20919.6.ccm.1486023981

8. file dump install system-history.log

This command is irreplaceable for the analysis of any problem. It displays the events that have occurred on a node: restarts, installation of components (COP files, locales), successful and failed backups.


file dump install system-history.log
=======================================
Product Name – Cisco Unified Communications Manager
Product Version – 11.0.1.20000-2
Kernel Image – 2.6.32-504.12.2.el6.x86_64
=======================================
05/18/2015 17:49:21 | root: Install 11.0.0.99833-4 Start
05/18/2015 23:28:40 | root: Boot 11.0.0.99833-4 Start
05/19/2015 09:55:13 | root: Install 11.0.0.99833-4 Success
05/19/2015 09:55:17 | root: Boot 11.0.0.99833-4 Start
06/17/2015 17:51:57 | root: Shutdown 11.0.0.99833-4 Start
06/18/2015 12:37:00 | root: Boot 11.0.0.99833-4 Start
08/16/2015 08:18:19 | root: Boot 11.0.0.99833-4 Start
09/09/2015 08:47:37 | root: Boot 11.0.0.99833-4 Start
12/02/2015 16:18:19 | root: Cisco Option Install cm-locale-de_DE-11.0.1.1000-1.cop Start
12/02/2015 16:20:34 | root: Cisco Option Install cm-locale-de_DE-11.0.1.1000-1.cop Success
12/02/2015 16:22:58 | root: Restart 11.0.0.99833-4 Start
12/02/2015 16:23:32 | root: Boot 11.0.0.99833-4 Start
12/02/2015 16:31:51 | root: Restart 11.0.0.99833-4 Start
12/02/2015 16:32:15 | root: Boot 11.0.0.99833-4 Start
12/08/2015 17:33:35 | root: Shutdown 11.0.0.99833-4 Start
12/08/2015 22:47:20 | root: Boot 11.0.0.99833-4 Start
12/28/2015 21:59:19 | root: Upgrade 11.0.1.20000-2 Start
12/28/2015 22:57:54 | root: Upgrade 11.0.1.20000-2 Success
12/28/2015 22:58:22 | root: Switch Version 11.0.0.99833-4 to 11.0.1.20000-2 Start
12/28/2015 23:01:06 | root: Switch Version 11.0.0.99833-4 to 11.0.1.20000-2 Success
12/28/2015 23:01:06 | root: Product Version 11.0.1.20000-2
12/28/2015 23:01:06 | root: Kernel Image 2.6.32-504.12.2.el6.x86_64
12/28/2015 23:01:09 | root: Restart 11.0.1.20000-2 Start
12/28/2015 23:01:10 | root: Restart 11.0.0.99833-4 Start
12/28/2015 23:03:12 | root: Boot 11.0.1.20000-2 Start
01/31/2016 12:54:02 | root: Cisco Option Install dp-ffr.3-1-30.GB.k3.cop Start
01/31/2016 12:55:11 | root: Cisco Option Install dp-ffr.3-1-30.GB.k3.cop Success
02/07/2016 11:09:46 | root: Cisco Option Install cm-locale-ru_RU-11.0.1.1000-1.cop Start
02/07/2016 11:11:41 | root: Cisco Option Install cm-locale-ru_RU-11.0.1.1000-1.cop Success
02/07/2016 11:37:46 | root: Restart 11.0.1.20000-2 Start
02/07/2016 11:38:19 | root: Boot 11.0.1.20000-2 Start
03/30/2016 12:39:11 | root: Restart 11.0.1.20000-2 Start
03/30/2016 12:39:38 | root: Boot 11.0.1.20000-2 Start
04/16/2016 13:21:04 | root: DRS Backup UCMVersion:11.0.1.20000-2 Start
04/16/2016 13:23:37 | root: DRS Backup UCMVersion:11.0.1.20000-2 Success
04/28/2016 13:59:03 | root: DRS Backup UCMVersion:11.0.1.20000-2 Start
04/28/2016 14:03:06 | root: DRS Backup UCMVersion:11.0.1.20000-2 Success
05/03/2016 11:03:46 | root: Shutdown 11.0.1.20000-2 Start
05/03/2016 11:08:43 | root: Boot 11.0.1.20000-2 Start
05/14/2016 20:10:29 | root: Restart 11.0.1.20000-2 Start
05/14/2016 20:10:57 | root: Boot 11.0.1.20000-2 Start
01/17/2017 12:44:09 | root: Restart 11.0.1.20000-2 Start
01/17/2017 12:44:59 | root: Boot 11.0.1.20000-2 Start
01/22/2017 01:00:05 | root: DRS Backup UCMVersion:11.0.1.20000-2 Start
01/22/2017 01:07:36 | root: DRS Backup UCMVersion:11.0.1.20000-2 Success
01/24/2017 11:49:36 | root: Restart 11.0.1.20000-2 Start
01/24/2017 11:50:14 | root: Boot 11.0.1.20000-2 Start
01/29/2017 01:00:11 | root: DRS Backup UCMVersion:11.0.1.20000-2 Start
01/29/2017 01:21:57 | root: DRS Backup UCMVersion:11.0.1.20000-2 Success
02/05/2017 01:00:05 | root: DRS Backup UCMVersion:11.0.1.20000-2 Start
02/05/2017 01:10:58 | root: DRS Backup UCMVersion:11.0.1.20000-2 Success
02/12/2017 01:00:05 | root: DRS Backup UCMVersion:11.0.1.20000-2 Start
02/12/2017 01:12:51 | root: DRS Backup UCMVersion:11.0.1.20000-2 Success

Even if the data acquired by these commands doesn’t show the problem’s source, it significantly improves the engineer’s knowledge of the system, its current state, version, addresses and services.

P.S. This list doesn’t include the following command because it may take a long time to produce the output. If the DNS reverse records are not configured correctly, this command will take 300 seconds longer to execute.

utils diagnose test

This article is a translation of a guide originally created by Alex Levichev, a Cisco UC TAC engineer - https://gblogs.cisco.com/ru/author/allevich/
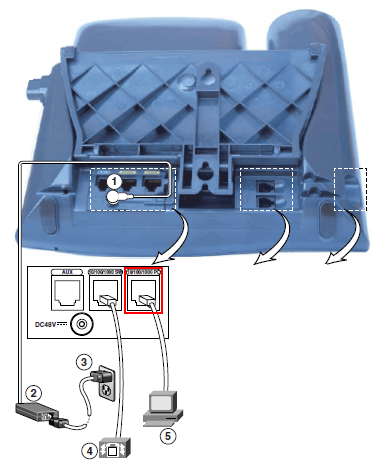
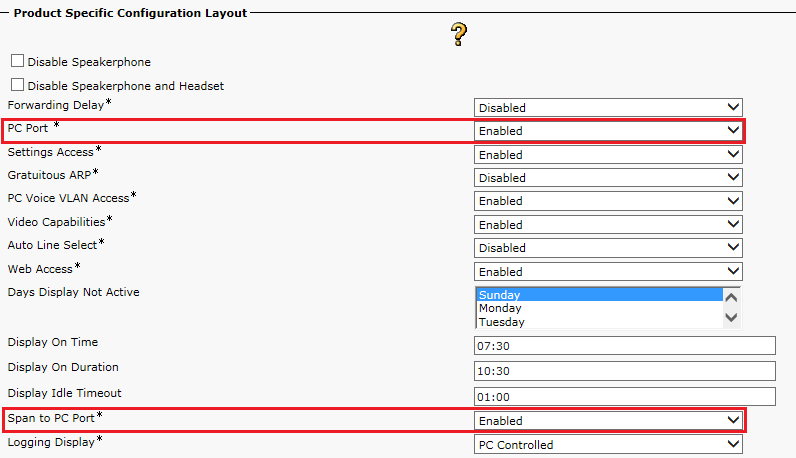
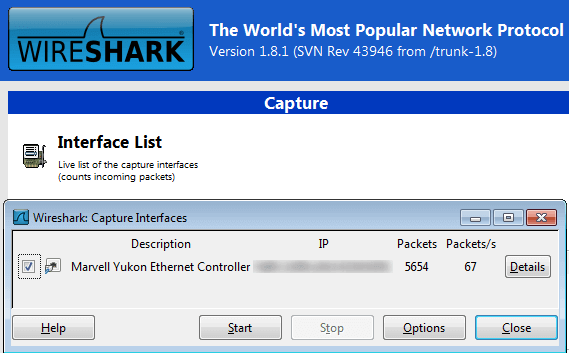
Integrating CUCM and Active Directory

Integrating CUCM and Active Directory can make administration much easier. Correct configuration may help you to automate new phone registration in the future.

This article will help you to get the most out of using CUCM in a bundle with AD.

First of all, you should activate the Cisco DirSync service.
Proceed to Cisco Unified Serviceability > Tools > Service Activation > Directory Services > Cisco DirSync

Enable synchronizing from a LDAP server.
Cisco Unified CM Administration > System > LDAP > LDAP System

Now you should configure integration with a specific LDAP directory. Let's look into this stage.

LDAP Configuration Name – a name of your choosing.

LDAP Manager Distinguished Name – an Active Directory user's name. It's recommended to create a separate user account for CUCM. The user account must have read access.

LDAP User Search Base – a user search base. In this case, the search will be performed in SMTH organizational unit in smth.int domain.

Mapping the standard fields:

We recommend you to map Directory URI to mail attribute. It will help you to avoid some problems while configuring XMPP Federation through Expressway later.

Access Control Group – a list of groups an imported user will be automatically added to.

Feature Group Template – a set of additional features to be enabled for a user, for example, IM & Presence, Conference Now and some user parameters.

The template itself can be configured here: Cisco Unified CM Administration > User Management > User/Phone Add > Feature Group Template

Apply mask to synced telephone numbers to create a new line for inserted users – a mask for automated DN creation for imported users. The information will be obtained from the Phone Number field.

LDAP Server Information – a server to synchronize with. It's recommended to add several servers, because when LDAP Authentication is on, all users’ authorization requests are redirected to AD. So if the server is down, the users won't be able to authorize.

When the configuration is over, click Perform Full Sync Now.

Now you can see your users listed here: Cisco Unified CM Administration > User Management > End users.

And the automatically created DNs should be here: Cisco Unified CM Administration > Call Routing > Directory Number.

The users are already configured according to your settings.

The users have been created. All you need to do now is configure authentication through Active Directory.

Cisco Unified CM Administration > System > LDAP > LDAP Authentication

Now you can proceed to Auto-Registration and Self-Provisioning settings.

Integrating ASTERISK and CUCM

Integrating Asterisk and CUCM via SIP makes it possible to combine several phone pools or, for instance, to use Asterisk as an IVR (interactive voice response system). This article gives instructions on connecting Asterisk and Cisco Unified Communications Manager through a SIP trunk.

Configuring CUCM

First of all, proceed to Cisco UCM configuration page. To create a new SIP trunk, select Device -> Trunk in the menu and click Add New. We are creating a SIP trunk, so fill out the Trunk Type and Device Protocol fields, as the screenshot shows:

After the parameters are specified, click Next. On the page that appears, fill out the following fields:

  • Device Name – enter the name of the SIP trunk to be created. This field is required.
  • Description – describe the connection to be created.
  • Device Pool – select a device pool for the SIP trunk. It should coincide with the devices routed through this trunk. This field is required.

Scroll down to the section titled Inbound Calls and fill out the following field:

  • Calling Search Space – CSS name for the SIP trunk. It should coincide with the devices routed through this trunk.

To finish the system configuration, proceed to the section titled SIP Information, sub-section Destination. Fill out the following fields:

  • Destination Address – enter the IP address of your Asterisk server. This field is required. Note that the default destination port is 5060. If your Asterisk server has a different SIP listen port, enter it in the Destination Port field.
  • SIP Trunk Security Profile – select Non Secure SIP Trunk Profile. This field is required.
  • Rerouting Calling Search Space – select the same CSS that you have selected in Inbound Calls section.
  • Out-Of-Dialog Refer Calling Search Space – similarly to the previous item, select the same CSS.
  • SUBSCRIBE Calling Search Space – select the same CSS.
  • SIP Profile – select Standard SIP Profile.

Click Save. You can use patterns (see Route Pattern settings) to configure routing to the SIP trunk.

Configuring Asterisk

You can carry out SIP trunk configuration process on the side of Asterisk through the FreePBX 13 graphical environment. To configure a trunk, proceed to Connectivity -> Trunks. Click Add Trunk to create a new SIP trunk.

On the General tab, enter the trunk name. Then proceed to the pjsip Settings tab. We don’t use username/password authentication to configure a SIP trunk between Asterisk and CUCM, so select the following options:

  • Authentication – select None. As mentioned before, we won’t need username/password authentication.
  • Registration – select None.
  • SIP Server – enter the Cisco UCM IP address.
  • Context – enter from-internal context

Proceed to the Advanced tab:

  • Qualify Frequency – enter 60. This is the delay (in seconds) between the keep-alive messages being sent to check the trunk’s state.
  • From Domain – enter your CUCM IP address.

Click Submit and then Apply Config.

As the final step, you should configure call routing for this trunk.

The end-of-life for Cisco TMS in 2018?

Guys, I bet we'll hear the end-of-sale and end-of-life announcement for Cisco TelePresence Management Suite till the end of 2018. Here's the thing…

  • CMS (former Acano) has nothing to do with TMS.

    When Cisco acquired Tandberg back in 2010 TMS (former Tandberg Management Suite) and hardware Cisco MCU (former Tandberg MCU) were inseparable components of a single unified offer.

    In 2014 Cisco introduced the virtual offer "Telepresence Servers + Conductor" which was replaced by CMS offer after the acquisition of Acano. So Cisco Meeting Server is a completely different platform that has nothing to do with the obsolete TMS.

  • Video endpoints don't need TMS.

    Again, Tandberg video-conferencing worked on its own having video endpoints registered to TMS. But later the registration and provisioning functions were transferred to Cisco UCM.

  • TMS conference control center doesn't support CMS.

    And it's not going to change. Instead, Cisco is developing a new software to control meetings.

So, seems like the only important TMS feature left is the meeting scheduler, but….

  • Meeting schedulers are dying.

    For years we used special applications to schedule upcoming conferences and reserve the necessary volume of ports on the conference bridge. But the world is moving to the new paradigm of "personal meeting rooms" – personal, persistent and secure. Cisco supports this model for both audio meetings (the CUCM "Conference Now" feature) and video conferences (CMS). The Cisco Meeting Server licensing is not even based on "ports".

So, IMHO, TMS doesn't have much time left. Cisco will continue offering video-endpoints (both software and hardware) with the registration to CUCM, Cisco Meeting Server acting as conference bridge and XYZ application they're developing to kill the Cisco Meeting App.

Those who need more (like meeting scheduling app, integration to some enterprise software etc) are welcome to use the CMS API which is great thanks to Acano legacy.

How to clean out the CUCM HDD common partition

As you go through RTMP logs on a Call Manager server, sometimes you can come across a critical warning of the following type: LogPartitionLowWaterMarkExceeded.

Despite the critical status, in most cases this problem doesn't affect the system's functioning, but the disk overfill may interfere with some installation or upgrade.

Common (log) partition is mostly filled with traces, CDRs and files from TFTP server. LogPartitionLowWaterMarkExceeded alarm is generated when the used disk space percentage in Log partition reaches the configured Low WaterMark value. This alarm should be taken as an early notification for an administrator to clean up the disk space. CUCM won't start an automated cleanup process until the High WaterMark value will be reached.

To free some space in the Common partition, you can try to:

  • Reduce the values of LogPartitionLowWaterMarkExceeded to 40% and LogPartitionHighWaterMarkExceeded to 45%, restart "Cisco Log Partition Monitoring Tool" service and after 2-3 hours check whether the used space decreased;
  • Use RTMT Trace/Log Central to collect logs/traces with "Delete Collected Log Files from Server" option (for active and inactive partitions);
  • Delete the old unused files from the TFTP server (old phone software);
  • Use ciscocm.free_common_space_v1.1.cop.sgn – this file runs a script that deletes all files from an inactive Common partition. After using it you won't be able to switch CUCM version to the previous one.

To reduce the partition usage, you can try to:

  • Deactivate Detail/Debug trace level;
  • Reduce the number of trace files to be stored;
  • For CDR: reduce the High Water Mark, reduce the occupied disk space, reduce the number of preservation days.

How to clear the hung calls on CUBE

There are different reasons that can cause call getting hung on CUBE. It was noticed that the calls get hung more often in case of a sudden loss of connection. They have an "incomplete" state, having one or two call legs.

cube#show call active voice compact
A/O FAX T Codec type Peer Address IP R:
Total call-legs: 2
126523 ANS T74411 g711ulaw VOIP P79033956416 188.234.136.49:18724
126524 ORG T74411 g711ulaw VOIP P3500 172.16.127.50:21284

To go into the details:
show sip calls

Now delete the call:
clear call voice causecode 17 calling-number 79033956416

Auto attendant implementation based on Cisco solutions

When we call almost any company, we usually can hear a sweet (or not so sweet) voice naming the company we have reached and asking us to perform certain actions. That means we’ve reached an automated attendant. An auto attendant (AA) usually is the simplest form of Interactive Voice Response (IVR) system that allows you to enter the extension number, leave a voice message, send a fax, or connect to a secretary.

In this article I'd like to introduce you to the possible implementations of an auto attendant based on Cisco solutions. There are at least four of them, and people often ask what exactly this feature should be implemented on while deploying Cisco unified communication solutions. Let's go through the advantages and disadvantages of each of them.

1. Developing or using existing TCL and VXML scripts

This is a software-only solution. The required features are built into Cisco IOS. The solution is supported on routers with Unified Communications (UC) features enabled. There are many examples of IVR scripts for Cisco equipment.

The advantages of this solution are the following:

  • No hardware needed, except for a Cisco router with UC features.
  • A long line of supported platforms:1861, 2800, 3800, 2900, 3900, 4000, AS5000.
  • You can create a script implementing any algorithm you need — branching, submenu, multiple languages, working/nonworking hours, etc. It supports integration with speech recognition and synthesis systems (ASR, TTS) and much more.
  • This solution has the largest number of supported codecs for greetings in case you use VXML. There's another supported feature that is almost never used: greetings created with different codecs can be combined inside one application.
  • Direct access to the gateway and its resources. For example, you can detect fax tone during an incoming call and switch over to a fax straightaway, or find out (with some probability) who answers the phone during an outbound call: a human or an auto attendant.
  • VXML is an open standard widely supported by VoIP solution developers (Audiocodes, Huawei, D-Link, Digium).
  • There already exists quite a functional Cisco script based on TCL: Basic automatic call distribution (B-ACD) and auto-attendant (AA) service.


If its algorithm is suitable to you, take it, set it up and use.

The disadvantages of this solution:

  • If you are using TCL, you need programming skills and knowledge of Cisco Voice Gateway API (VGAPI). For VXML, the threshold of programming skills is way lower, especially if you are already familiar with XML, and knowledge of Cisco VGAPI is not required.
  • Cisco IOS doesn't use transcoder for the calls processed by TCL applications, so you have to use the same voice codec for the application input and output both.
  • Relatively low scalability: from 7 (2800 series) to 360 (AS5400XM) simultaneous sessions (calls).
  • No fault tolerance.
  • Cisco IOS Voice XML Browser licensing limits the number of simultaneous calls (the price* for one session FL-VXML-1 = $150, for 12 sessions FL-VXML-12 = $1440). FL-VXML license type is Right to Use, which means that you only get a document on usage rights, without any serial numbers and activation codes ("honor based";).

* all the prices in this article are from Cisco GPL

This solution is suitable for minor load (small number of simultaneous calls) and can be integrated with any PBX (not only Cisco).

2. Using Cisco Unity Express (CUE)

This version is implemented as a module (for example, SM-SRE-700-K9) for the following Cisco router series: 1861, 2800, 2900, 3800, 3900. IVR script can be created in Cisco Unified Communications Express Editor. This solution is quite functional, and the process of script creation is pretty much similar to the old UCCX-based solution that will be analysed below. Cisco Unity Express can be integrated with Cisco Unified Communications Manager and Cisco Unified Communications Manager Express, and it also can work as an auto attendant in standalone mode.

The advantages of this solution are the following:

  • A handy web-interface Cisco Unity Express — Administration.
  • A rich feature set.
  • Convenient scheduling with holidays.


  • IVR script development in Cisco Unified Communications Express Editor is quite simple and similar to visual programming with moving the required blocks around and configuring their properties.


  • There is a web-editor for scripts that's even more simple: Editor Express. It supports basic actions:


  • There are built-in system phrases in multiple languages, as well as a ready-to-use auto attendant script (aa.aef).
  • Cisco Unity Express is a voice mail server, so in addition to the auto attendant features, CUE deployment also provides voice mail features for a router.

The disadvantages of this solution:

  • Low scalability. A hard limit on the number of sessions (10 for ISM-SRE-300-K9 and 32 for SM-SRE-700 — SM-SRE-910).
  • The only supported codec for greetings is G.711 u-law.
  • No fault tolerance.
  • Setup, configuration and integration are required.
  • Prices for the module and for the licenses for voice ports (simultaneous calls):
    • The module itself: for example, ISM-SRE-300-K9=$1000, including a non-portable license for 2 voice ports FL-CUE-NR-PORT-2.
    • License for 5 mailboxes: FL-CUE-MBX-5=$100.
    • License for 2 additional voice ports: FL-CUE-PORT-2=$500.
    • License for IVR voice ports: FL-CUE-IVR-2=$1400 (it is only necessary if you use advanced IVR features, such as sending emails and faxes, accessing external databases, running VXML scripts inside of CUE IVR scripts, etc.).

This solution is the most suitable one for the companies that use Cisco Unified Communications Manager Express for PBX, or for branch offices, if the head office uses Cisco Unified Communications Manager for PBX and fault tolerance for the branch offices is being ensured by Cisco Unified Survivable Remote Site Telephony (SRST). Like the TCL/VXML variant, this solution can also be integrated with any PBX as a standalone auto secretary.

3. Using Cisco Unity Connection (CUC)

This solution is a voice mail server. It should be deployed on a separate virtual machine. Two VMs with CUC can be united into a fault tolerant cluster. CUC tools allow you to implement auto attendant logic. There are also built-in call handlers.

The advantages of this solution are the following:

  • High scalability and fault tolerance — up to 250 simultaneous sessions (calls) for a single server, up to 500 in an active/active cluster.
  • Relatively large set of supported codecs (G.711 a/u-law, G.722, G.729, iLBC) and built-in transcoding tools. It's worth noticing that transcoding is always performed in CUC.
  • Convenient scheduling with holidays.
  • Built-in ASR and TTS in multiple languages.
  • Cisco Unity Connection is a voice mail server, so in addition to the auto attendant CUC deployment enables voice mail features in a VoIP system.
  • Integration with third-party (non-Cisco) PBX is possible.

The disadvantages of this solution:

  • Poor functionality. Auto attendant utilizes built-in default handlers, so you can only implement limited functionality.
  • Built-in phrases (e.g. "called party is busy";) can't be replaced.
  • Setup, configuration and integration are required.
  • License price for one voice mail user (mailbox): UNITYCN11-STD-USR=$78.75

This solution is suitable for companies that need a heavy load (in terms of the number of simultaneous calls) and fault tolerance.

4. Based on a contact center (Cisco Unified Contact Center Express or Cisco Unified Contact Center Enterprise)

This is the most functional and flexible solution. UCCX, as well as CUC, should be deployed on a separate virtual machine. Two VMs can be integrated to create a fault tolerant cluster. You only need to configure IP IVR features to set up an auto attendant. You can create an IVR script in Cisco Unified CCX Editor. UCCX should be integrated with Cisco Unified Communications Manager. The number of simultaneous sessions is limited by the virtual server capacity (VM template) and the number of acquired licenses.

The advantages of this solution are the following:

  • High scalability and fault tolerance.
  • Support of the most widely used codecs G.711 a/u-law, G.729.
  • Rich feature set.
  • Management web interface: Cisco Unified CCX Administration.
  • Developing an IVR script in Cisco Unified CCX Editor is relatively easy and resembles visual programming.


  • Built-in system phrases in multiple languages and a ready-to-use auto attendant script (aa.aef).

The disadvantages of this solution:

  • Setup, configuration and integration are required.
  • Price of the solution: minimal promo set of 5 contact center agents (operators) and 100 voice ports (simultaneous calls): $1044.75

UCCX is a full-blown contact center that supports progressive contact center building technologies, so using it only to create an auto attendant is like using a sledge-hammer to crack a nut. This solution is for companies with high demands on functionality, performance and reliability.

We have examined different means of auto attendant creation. The choice in many respects depends on the solution that is being used or deployed (CUCMe, CUCM, BE6K or a third-party PBX), and on the functionality, performance and reliability requirements.

Conclusion

The most simple choice is an IVR based on TCL/VXML, and the most functional and productive choice — based on Cisco Unified Contact Center Express/Enterprise.

Cisco Unity Connection solution undeservedly often gets ignored. Usually Cisco Unity Connection comes with acquired licenses on Cisco unified communication products (for example, it comes with UWL licenses, as well as with Cisco Business Edition family). In this case, auto attendant implementation won't require any additional purchases.

Cisco Unity Express solution helps you to reduce (comparing to the TCL/VXML-based solution) the call processing load on the router. It takes the middle position between IOS scripting solutions and standalone server solutions. It is quite simple and handy, suitable for creating an auto attendant by the company's IT department, as it has a simple built-in web-editor for scripts with basic actions.

There are also auto attendant solutions for Cisco VoIP systems integrated with third party software, but that's another story.

SIP gateway monitoring. SIP Trunk. CUBE.

This article is about practical monitoring that helps answering such questions as call activity, the calls passing through a trunk, etc.

Call activity on CUBE

  • Active calls:
        show call active voice compact
  • The active calls summary by the number of call legs:
        show call active voice summary
  • Recent calls:
        show call history voice compact

Call activity on CUBE from the point of view of CUCM

You can view the CUBE load in CAR:
https://cucm_ip:8443/car
Proceed to: Device Reports -> Trunk -> Utilization
Find your trunk and specify the report.
This report can only give you the notion about the trunk load in general, without any details.

Monitoring CUBE activity through SNMP

This is a very useful feature that allows you to perform online monitoring without any commands and reports. You can monitor the calls and connections through SNMP and view this information in PRTG. The most useful MIB is:
CISCO-VOICE-DIAL-CONTROL-MIB
We are interested in the following OIDs here:

  • CISCO-VOICE-DIAL-CONTROL-MIB/cv call volume/cv call vol conn total active connections
  • CISCO-VOICE-DIAL-CONTROL-MIB/cv call vol if: Loopback0/cv call vol media incoming calls
  • CISCO-VOICE-DIAL-CONTROL-MIB/cv call vol if: Loopback0/cv call vol media outgoing calls

Loopback0 is an inside interface on which all internal dial peers are bound, for example, like this:

dial-peer voice 500124 voip
description internal to CUCM
preference 3
destination-pattern [1-4]...
session protocol sipv2
session target ipv4:10.190.65.12
voice-class codec 1
voice-class sip bind control source-interface Loopback0
voice-class sip bind media source-interface Loopback0
dtmf-relay rtp-nte
ip qos dscp cs3 signaling
no vad

Directory numbers in trunk calls

Suppose that after PRTG monitoring a call activity surge aroused our interest. There are two ways to know what subscribers took part in it:

  • RTMT
    Proceed to: Call Manager -> Call Process -> Session Trace
    Here we can specify the time period and determine the gateway we are interested in using Called Named Device field.
    Session Trace is useful for obtaining up-to-date information on all the calls in cluster nearly in real time.
  • CDR
    And, of course, we always can get the information on the calls from a CDR file.
    - Log in to Cisco Unified CallManager CAR interface: https://:8443/car/
    - CDR > Export CDR/CMR
    - Select the time period and click Export to file.
    - On the next screen you can download the file.
    - Then open the file in MS Excel to analyze it.
    For your convenience you should do the following:
    - Select the first line (legend), then in MS Excel menu click Data -> Filter -> AutoFilter, and then Format -> Column -> AutoFit.

The fields of interest are:
origDeviceName
destDeviceName
You can also find the trunk by its name.

You can find the field descriptions here: Cisco Call Detail Records Field Descriptions

Notice the date and time format in dateTimeOrigination field. This is the number of seconds beginning from the midnight (00:00:00) of January 1, 1970. To make this readable, you can insert a column, format it as Date and use the following formula: =((E2 + 14400) / 86400) + 25569.

CUCM Traces Analysis: CUCM Architecture

This is another guest post that we find quite useful for our readers. The author discusses briefly the CUCM architecture in order to understand better the CUCM traces.

CUCM is a C++ application working on the Red Hat Linux OS.

There are SDL (Signal Distribution Layer) processes within the application interacting with each other. Some of these objects exist permanently while some of them are being created and destroyed as needed.

All SDL processes can be classified into several logical layers:

  • Feature Layer
  • Call Control Layer
  • Media Control Layer
  • Device Layer

As the figure shows, there also are Aggregator Layer and Link Layer. For the purpose of this article we'll consider the first one as a part of the Call Control Layer. The Link Layer is responsible for network interaction on TCP/UDP level, which isn't our concern here.

CUCM Process Classification

Let's explain the CUCM process classification by the example of the Feature Layer.

  • Parent Processes live in the system permanently. They are being created at the Call Manager application launch. These processes are: Transfer Manager, Forward Manager, Conference Manager, Recording Manager. They are responsible for ALL conferences and transfers in the system.
  • Child Processes are being created during a certain operation. For example, the Forward operation creates a Forwarding sub-process that lives until the transfer is over (then this process will be destroyed).

Device Layer Processes

  • Edge Processes. are responsible for signaling protocols. These processes are Parent Processes and each of them exists in a single copy on each node. For example, if we have 50 SCCP phones, then all of them will interact with a single StationInit process.
    • StationInit (SCCP)
    • SIPHandler (SIP)
    • H225Handler (H323)
    • MgcpHandler (MGCP)
    • MgcpBhHandler (MGCP PRI)
  • Control Processes exist in several instances. For example, for each registered SCCP phone a separate StationD process will be created that controls this phone. So, there will be 50 StationD processes created for 50 phones.
    • SipStationD
    • SIPD
    • StationD

If there are 20 SIP phones, then one SipHandler process, an intermediate SipStationInit process and 20 SipStationD processes will be created on the node. SIPD processes are used for SIP Trunks (one for each trunk).

Now let's look into what happens when a user picks up the phone:

The phone transmits a message to CUCM, and then the following events occur: StationInit transmits a message to the phone StationD process. StationD creates StationCdpc process. StationCdpc process is responsible for a single call from a certain phone (CallDependent) and will be destroyed after the call is over.

Similarly, if the phone is turned off and its registration is lost, its StationD process will be destroyed.

Call Control Layer Processes

Call Control layer processes come into play to process the dialed phone number. These processes take part in establishing the call and handling it:

  • Call Control (CC) is responsible for all the calls passing through the CUCM node (1 process for a node).
  • Call Dependent Call Control (CdCc) is responsible for a single call. Every new call creates a new process.
  • DA - Digit Analysis: here all the translations are being performed, the corresponding CSS and Partitions applied, and the destination for a particular call to be routed to is being defined.
  • Device Manager (DM) – contains the tables with all the devices connected to a CUCM cluster (phones, trunks, gateways, route lists). DM makes it possible to define where the call should be physically routed.
  • Line Control process is responsible for all the DNs registered in the system.

Let's look into how a call is handled, step by step:

Call Control (CC) creates a separate Call Dependent Call Control (CdCc) process for the call. The dialed digits are passed to this process.

CdCc passes the numbers to DA for the necessary translations to be performed and the privileges to be defined for this call.

Then the call is passed to the Device Manager (DM) which determines the device the call should be transferred to.

The information from the DM is sent back to DA and then to CDCC.

Then the call establishment will begin (CcSetupReq) and the end device will be chosen through the RouteListControl > RoutelistCdrc chain.

Notice the Line Control process here – it is responsible for all the DNs registered.

So, the phone starts ringing, the user picks it up, and the next step is setting up a media or RTP stream. Now we're moving one layer lower and pass the call to the Media Layer.

Media Layer Processes

As we have already mentioned, this layer hosts the processes that are responsible RTP streams.

There are permanent processes: ConnectionManager and MediaCoordinator.

And there are MediaManager and MediaExchange processes are being created and destroyed along with the calls. They are responsible for all the call parameters - DTMF, codecs etc.

There are also Int processes - interfaces that interact with the devices directly. These processes are responsible for the interaction between the Media Layer and Device Layer: they pass the codecs, IP addresses, ports, etc., to the devices.

Codec mismatch

When the "codec mismatch" happens the MediaManager and MediaExchage processes define the transcoder to be used. Then the separate MediaExchange (MX) process is created to ensure the connection between the first phone and the transcoder and between the transcoder and the second phone.

After the call is over, all the processes will be destroyed, except for ConnectionManager and MediaCoordinator.

Process Identifier (PID)

Each process in SDI and SDL Traces is marked in a certain way:

Process Type is the process type identifier (37 for a StationD process)

Process Instance is the process ID. In this case "50" means there are at least 50 phones registered, and the current phone is the 50th. This value is always equal to 1 for Parent Processes.

CUCM Architecture Summarized

Suppose that the phone A is calling the phone B.

  • The Device Layer hosts the StationD and StationCdpc processes that are responsible for the interaction with the phone directly.
  • After the handset is picked up (the Device Layer process this), the call info is being passed to the Call Control Layer where the Digit Analysis is located. Here all the translations are being performed and the corresponding CSS and Partitions applied to identify the destination the call. At the same time a request to the Feature Layer will be sent to transfer the call to user B.
  • The Call Control Layer passes a message to the Device Layer - this time to the phone B process. Phone B rings.
  • Phone B is picked up and the Media set up begins. To define the codec the Connection Manager and the Media Coordinator create Media Manager and Media Exchange processes that will interact with the phones through Interfaces.
  • The conversation begins.

Configuring CUCM Single Number Reach feature

This article is about configuring Single Number Reach (aka Mobile Connect) feature in Cisco Unified Communications Manager (CUCM).

When you receive an incoming call on an extension number in a cluster, the Single Number Reach (SNR) enables rerouting the call not only to a DN, but also to a remote number. For example, that can be an employee's cell phone. If needed, you can configure rerouting to a group of remote numbers that belong to an employee.

This explains the name of this feature: Single Number Reach. After you dial the employee's extension number, you can reach this employee even if he or she is not in office. The SNR enables call routing to a specified group of numbers, so a subscriber can answer any of them.

Let's have a look at how SNR (Mobile Connect) actually works.

Let's assume that the subscriber with the number 479-555-15-55 dials the number 151-15-55-2001. The call is routed to a voice gateway and then to a CUCM cluster. Suppose that the last 4 digits of a public number correspond to an employee's extension number. After that the phone with the extension number 2001 will ring. Besides, if the number has the SNR feature configured, the call will be redirected to another number as well, for example, to the employee's cell phone number 408-555-10-01.

Basically, Mobile Connect provides functionality similar to Shared Line. The difference is that in this case a shared line is organized between an office phone and some remote device that isn't necessary in a cluster, not between the phones within a cluster.

The figure below illustrates this configuration:

On this figure you can see that Mobile Connect creates a shared line between an office phone and a Remote Destination Profile (RDP). RDP reflects remote numbers in CUCM configuration. You can bind several Remote Destination numbers to a single DN using RDP. Note that Remote Destination Profile and Remote Destination are essential parts of Mobile Connect. Apart from them we'll also use the following entities: User, IP phone, Softkeys, Access list.

The User entity defines an end user registered in CUCM with Mobile Connect features enabled. Generally, the most important thing in CUCM is a user, not a device, because the services are provided to people, not to devices. That's why in the system a user is associated with an office phone and RDP.

Next, IP phone and Softkeys. A phone has to be associated with a certain user. The Mobile softkey provides an employee with an opportunity to redirect an active call to an office phone, if this call is coming to a cell phone. To add the Mobile button to the phone interface in on-hook mode, you'll need a Softkey Template.

Access list enables filtering incoming calls by the caller's phone number. This feature isn't necessary, but it can be handy. At first an Access list is created in the configuration parameters and then it is bound to a certain RDP.

Configuring Mobile Connect is relatively easy. First of all, you should create an End User that will be the center of all the system logic. There are several ways to create a user, but in any case the Enable Mobility option should be checked, as the figures show.

Here you can also define a limit for the quantity of remote phone numbers associated with this user. After that you should associate the user with the office phone number that he or she uses. For that purpose you can use Owner User ID in the phone parameters.

Now you can configure the entities that are essential for Mobile Connect. At first, you should create a Remote Destination Profile. To do this, proceed to Device -> Device Settings -> Remote Destination Profile.

You must specify the same End User (User ID field). Note the Rerouting Calling Search Space field. Here you can specify CSS that will be used for outgoing calls to Remote Destination numbers while processing an incoming call to an office phone. This CSS will ensure Route Pattern availability while routing an outgoing call to a Remote Destination.

Please save the RDP information. After that you'll be able to create lines. Specify the number used on the office phone that should have the calls redirected via Mobile Connect as one of the lines.

Follow the "Add a New Remote Destination" link. The Remote Destination Configuration form will appear.

Let's have a look at the parameters we can specify. "Answer Too Soon Timer" defines the minimal time for a call to be transmitted to a Remote Destination before the user answers. This parameter helps to prevent the call from being sent to voice mail when the user's cell phone is switched off or out of coverage area. "Answer Too Late Timer" defines the maximum response timeout for a call to a Remote Destination. "Delay Before Ringing Timer" defines the delay before the CUCM redirects an incoming call to a Remote Destination. All these parameters are specified in milliseconds. It is necessary to set the Line Association mark for the number that will be associated with a remote number. It is also necessary to switch the Enable Mobile Connect option on. The Mobile Connect option enables redirecting an active incoming call from a mobile phone to a landline office phone by clicking the Mobility button on the office phone.

If needed, use the Access List Configuration to configure the filtering for the calls to a Remote Destination. To do this, proceed to the menu: Call Routing -> Class of Control -> Access List. Select the access list type: blacklist or whitelist (Blocked or Allowed). Then use the Add Member button to fill the list with the corresponding numbers.

Now you should bind the Access List on the Remote Destination Configuration page. You can select one of the following options: transmit the call to a remote device if the subscriber is on the list, or the opposite. You can also specify the Ring Schedule, which can permit redirecting calls to a remote number during the working hours only, for example.

You should remember that if you configure both the schedule and call filtering, then the schedule will be checked first. So if the time is inappropriate, the access list won't be even checked.

As you can see, configuring Single Number Reach presents no great difficulty. After you configure this feature, your employees will be able to accept incoming calls on the office phone numbers not only in the office, but on their mobile and home phones as well, no matter where the call is coming from.

Video Chat – the Wrong Name for a Contact Center Channel

Have you already seen the 2016 Global Contact Centre Benchmarking Report Summary by Dimension Data? Almost a third of contact centers plan to deploy the "Video Chat" channel within 1 year.

I'll put my comments on this figure in the next post, but in this one I want to talk about the terminology. The thought I want to share today is this – the "Video Chat" is the completely wrong and obsolete name for the channel we're talking about.

It's not about the "video" and it's not about the "chat", it's about Live Online Assistance. Now, a bit more in details…

Where did the "Video Chat" came from?

Back in the 2000s the contact center industry adopted the text chat technology that provides online assistance to users of a website. This software typically consists of a text box on the website and an operator console, which allows contact center agents to respond to the chat. There are several names used for this channel, like "live help", "live support" etc but the most useful ones are "live chat" or "web chat". This is where the "chat" came from.

Now, what about the "video"? As far as I remember the "Video in Contact Center" topic was started about 4-5 years ago when several world leaders in communication solutions started making bets on business video. At the same time (in May 2011) Google released an opensource project for browser-based communication known as WebRTC.

As it often happens, some vendors decided to merge these two hot trends to introduce the super-killer-feature. They failed because you cannot mix the text chat with voice communications in contact center (some agents speak well but have poor writing skills while the other ones are vice versa). But since then we have the "video chat" channel. And as I said earlier…

…it's not about the "video" and it's not about the "chat"

You can find a lot of marketing texts about the body language and the video increasing trust and confidence. Rubbish. The PURE video in contact center is still a solution looking for a problem (Dimension Data) and the technology that searches for relevance in the contact center (No Jitter).

It's not about the chat either – you will hardly type something when you can say that (except rare text messages with credit card numbers, various IDs, emails, addresses etc).

What really matters is the Live Online Assistance

My point is that the most important part of the "video chat" are web-collaboration options like co-browsing, application and screen sharing, remote control. These are the features used in real life examples, like:

  • customer support
  • sales support
  • IT troubleshooting

Can the videocall without the web-collaboration improve FCR? Or reduce the abandonment rate? Or minimize the channel escalation? Not sure.

But, I can easily imagine:

  • an agent guiding a website visitor through the complex online process,
  • a sales person pushing product photos and videos to new client,
  • a consultant performing tech support with app sharing and remote control features.

Bulk Change Cisco IP Phone Background Image

The company my friend works for has changed its logo recently, so he was asked to update the logo on all the users' phones.

In general, this is an easy task with the solution described in many places, but almost always that's a description of a manual update using a TFTP server.

Besides that, there is a native Cisco utility Cisco Phone Designer that can be downloaded from the official site. It makes the process easier, but you still have to choose the phone and the picture manually, push the button and so on.

What we needed to do is to update the picture on a large number of Cisco IP phones.

There are third-party software products that provide this function but you can do it on your own.

There is a great article here – http://www.netcraftsmen.com/pushing-backgrounds-to-a-cisco-ip-phone-using-xml/
It gives an example of a script for doing this and we only had to modify this script a little.

So, the solution was as follows...

Requirements:
PC with Windows OS and any web-server.
Images that will be uploaded to the phones. Here you can find the image file parameters (file format and resolution, depending on the IP phone model).
You will also need a text file with a list of IP addresses of the phones that should have the image updated.
You'll have to sort the phones by model manually. You should run the script once for each model with the proper image file specified.

The steps are:
1. Enable personalization on all IP phones that should have the image updated. This can be done manually on each phone (Device->Phone->Phone Personalization = Enable), but it would be better to use the Common Phone Profile.
2. You'll need an End user created in CUCM. The "Controlled devices" list of this user should contain all the phones that should have the image updated.
3. Upload the image files to the web-server.
4. Run the script with the following parameters:

  • File name of the list of Cisco IP phones
  • URL of the http server where the image files are located
  • Icon file name
  • Image file name
  • User name
  • Password

5. Now the script is running in the background. You'll get a message when the process is over. The results will be available in a log file.

Useful CUCM CLI SQL Queries for DN and CSS

Recently I needed to collect the detailed information on Cisco IP phones, extension numbers, CSS and other parameters. The communication network was really huge but no inventory had been performed for years.

Lots of phones and extension numbers with no common attributes. Actually, I was given the list of extensions for which I had to return the detailed info.

This is where the CLI SQL Queries can hardly be underestimated. With CLI you can query the CUCM database directly. A query can be executed from the command line if you access the CUCM server via SSH.

To execute the SQL query, run the following command:
run sql <query body>

For example:
run sql select dnorpattern from numplan where dnorpattern like '1%'

The result will contain all the directory numbers, route patterns and translation patterns beginning with "1".

More examples:

Show the DNs assigned to the phones on the list:
run sql select n.dnorpattern as DN from device as d, numplan as n, devicenumplanmap as dnpm where dnpm.fkdevice =d.pkid and dnpm.fknumplan = n.pkid and d.tkclass = 1 and (d.name in ('SEP7C96F3C9ACDC' , 'SEPB8BEBA229A9E';))

Show the CSS configured for the DNs on the list:
run sql select css.name from numplan as np join callingsearchspace as css on np.fkcallingsearchspace_sharedlineappear=css.pkid where np.dnorpattern in ('6229' , '3118';)

Check if the DNs on the list are members of any Line Groups:
run sql select lg.name as LineGroup,n.dnorpattern,dhd.hlog from linegroup as lg inner join linegroupnumplanmap as lgmap on lgmap.fklinegroup=lg.pkid inner join numplan as n on lgmap.fknumplan = n.pkid inner join devicenumplanmap as dmap on dmap.fknumplan = n.pkid inner join device as d on dmap.fkdevice=d.pkid inner join devicehlogdynamic as dhd on dhd.fkdevice=d.pkid where n.dnorpattern in ('2480' , '1601';)

Check if the DNs are members of any Call PickUp Groups and show that groups:
run sql select np.dnorpattern, pg.name from pickupgrouplinemap as pgl join numplan as np on pgl.fknumplan_line=np.pkid join pickupgroup as pg on pg.pkid=pgl.fkpickupgroup where np.dnorpattern in ('' , '3118' , '5109';)

Find out if there is a line assigned to a phone and if the line has an External Phone Number Mask configured:
run sql select dnpm.e164mask as EPNM from devicenumplanmap as dnpm join device as d on dnpm.fkdevice=d.pkid where d.name in ( 'SEP1CAA07E2060D' , 'SEPF07F06B8D6B2';)

You can obtain the information as well as modify the data in the database. For example, you can modify the device description:
run sql update device set description = 'MARK_PHONE' where name in ('SEPD8CB8A379237', 'SEP80E86F23F5E7';)

This list of examples can go on endlessly. Actually, the direct access to the database is a tool of almost unlimited flexibility, suitable for obtaining information and making massive data changes.

LinkedIn as a Global Directory for Skype?

Satya Nadella and Jeff Weiner on Microsoft Acquiring LinkedIn Satya Nadella and Jeff Weiner on Microsoft Acquiring LinkedIn

The LinkedIn acquisition by Microsoft opens up the endless possibilities for speculations for the IT world including collaboration experts and I can't stop myself from sharing my thoughts.

LinkedIn – over 430 million accounts (see more facts below).

Skype – over 300 million of active users (see more facts below).

Just imagine that each LinkedIn account is matched to a Skype user. Its gonna be the whole new collaboration universe for professional with LinkedIn as a global directory for Skype and Skype as a collaboration tool for LinkedIn members.

You’ll be able to share your presence status to your network. LinkedIn messaging will be substituted by Skype chat, which can be escalated to video call, and then to conference call.

You will have the ability to make impromptu calls to your network and even to those you’re not connected to (of course after the approval of some sort). For example… a service team rep may send a call request to the client who has posted a complaining message in the LinkedIn group, a recruiter may call the candidate he is interested in, and so on.

Some features will be available for all, another one will likely be part of the paid Premium offering as one of the ways to monetize the acquisition.

LinkedIn facts:

  • 433,000,000+ registered members;
  • Over 200 countries and territories;
  • Revenue: $2.99 billion;
  • Net income: $166 million;
  • LinkedIn Common Stock: $190.80 (June 20, 2016);
  • Employees: 9,732 (March 2016);
  • Founded: December 14, 2002; 13 years ago;
  • Headquarters: Mountain View, California, U.S.

Skype facts:

  • Active users: 300,000,000+;
  • Initial release: 29 August 2003; 12 years ago;
  • Type: Videoconferencing, VoIP and Instant messaging;
  • Available in 38 languages.
Pages: Prev. | 1 | 2 | 3 | Next