 In this article we’ll discuss the task of smooth transitioning from Skype for Business to Cisco Jabber and/or Cisco Webex without overloading the company’s technical support and creating excessive distress for the users. In our case, we needed to implement the scheme of calls, conferences of all types, messaging and screen sharing between Cisco Jabber / Cisco Webex and S4B users via SIP URI, digital numbering was not important.
Let’s suppose that CUCM, IM&P, Expressway-C and CMS clusters are already configured.
CUCM 12.5 SU6
IM&P 12.5 SU6
Expressway 14.0.6
CMS 3.3.2
S4B FE Standard
S4B Edge
Transition Options

Instantly disable S4B for users and immediately transition to Cisco Jabber/Webex
Advantages and disadvantages:
The advantages of this approach are that there is no need to waste your time and resources on configuring integration between S4B and Cisco Jabber.
The disadvantages are: immense strain on the technical support of the organization (especially if there are thousands of users), a flurry of requests and users’ discontent.
Smooth transition with an additional dedicated domain for Cisco Jabber/Cisco Webex users
In many organizations domain names are a mess. Sometimes an organization has a bunch of third-level domains, or even different domains, and users are hosted anywhere. And in order to level this condition, you can perform the transition within those domains (not necessarily two of them), but Cisco Jabber will require one more additional domain.
Advantages and disadvantages:
The advantages of this approach are: simplicity of the transition (both Cisco Jabber / Cisco Webex and S4B clients can work for one user), there is no flurry of requests from users, and the load on the technical support of the organization is low.
Disadvantages: first of all, the future task of moving users to a single domain (it is assumed that Cisco Jabber will initially have a second-level domain) with the cost of reconfiguration and service failure during this transition, which is critical in itself. Another huge disadvantage is that it is impossible to add an additional user contact to the client card on S4B, which basically prevents S4B users from calling since no one wants to dial anything manually. However, you can simply “disable” users on S4B and “enable” them on Cisco Jabber / Cisco Webex while changing in the user accounts in Active Directory the required field (e.g. MSRTCSIP or IPPHONE) which is used to form the Directory URI in CUCM (configured in the LDAP settings), setting a new value for Cisco Jabber/Cisco Webex, which is used to generate the SIP URI.
Smooth transition without an additional dedicated domain for Cisco Jabber/Cisco Webex users
Advantages and disadvantages:
The advantage of this approach is the simplicity of transition. Disable S4B for a user and enable Cisco Jabber/Cisco Webex. And you don’t even need to change anything in user accounts in Active Directory.
The only disadvantage is the impossibility to exchange messages between Cisco Webex and S4B clients due to architectural features. Enabling the hybrid messaging service does not solve the problem, and setting up SIP Federation is impossible due to the fact that the same domain is being used everywhere. However, everything works fine between Cisco Jabber and S4B clients.
In this article we’ll talk about the last option (transition without an additional domain), inline.com has been chosen as a test domain.
Calls
Call signaling will work according to the following diagram.
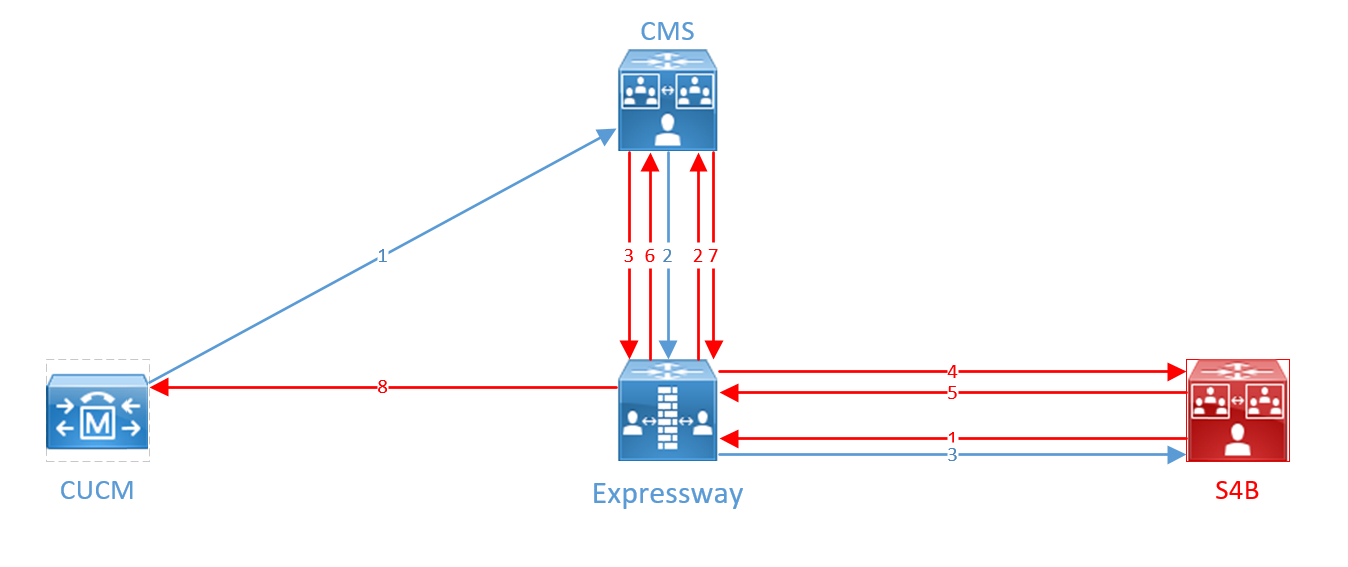
A call from Cisco Jabber/Cisco Webex comes from CUCM to CMS in the standard SIP format, then it is translated into a Microsoft standard call and sent to Expressway-C, then to Skype for Business (blue arrows on the diagram).
A call from Skype for Business in Microsoft SIP format is sent to Expressway, then to CMS, which sends the call back to Expressway, and Expressway routes it back to S4B. S4B does not find the recipient and re-sends it to the Expressway, which sends it to the CMS again. CMS understands this is a loop and breaks it, sending the call in the Standard SIP format to the Expressway according to the second rule, and the Expressway sends the call to CUCM. This transitions are marked in red on the diagram.
The scheme has been made so complex because we couldn’t find another way to resolve Standard and Microsoft SIP calls, provided that users with the same domain can be located both in S4B and on CUCM.
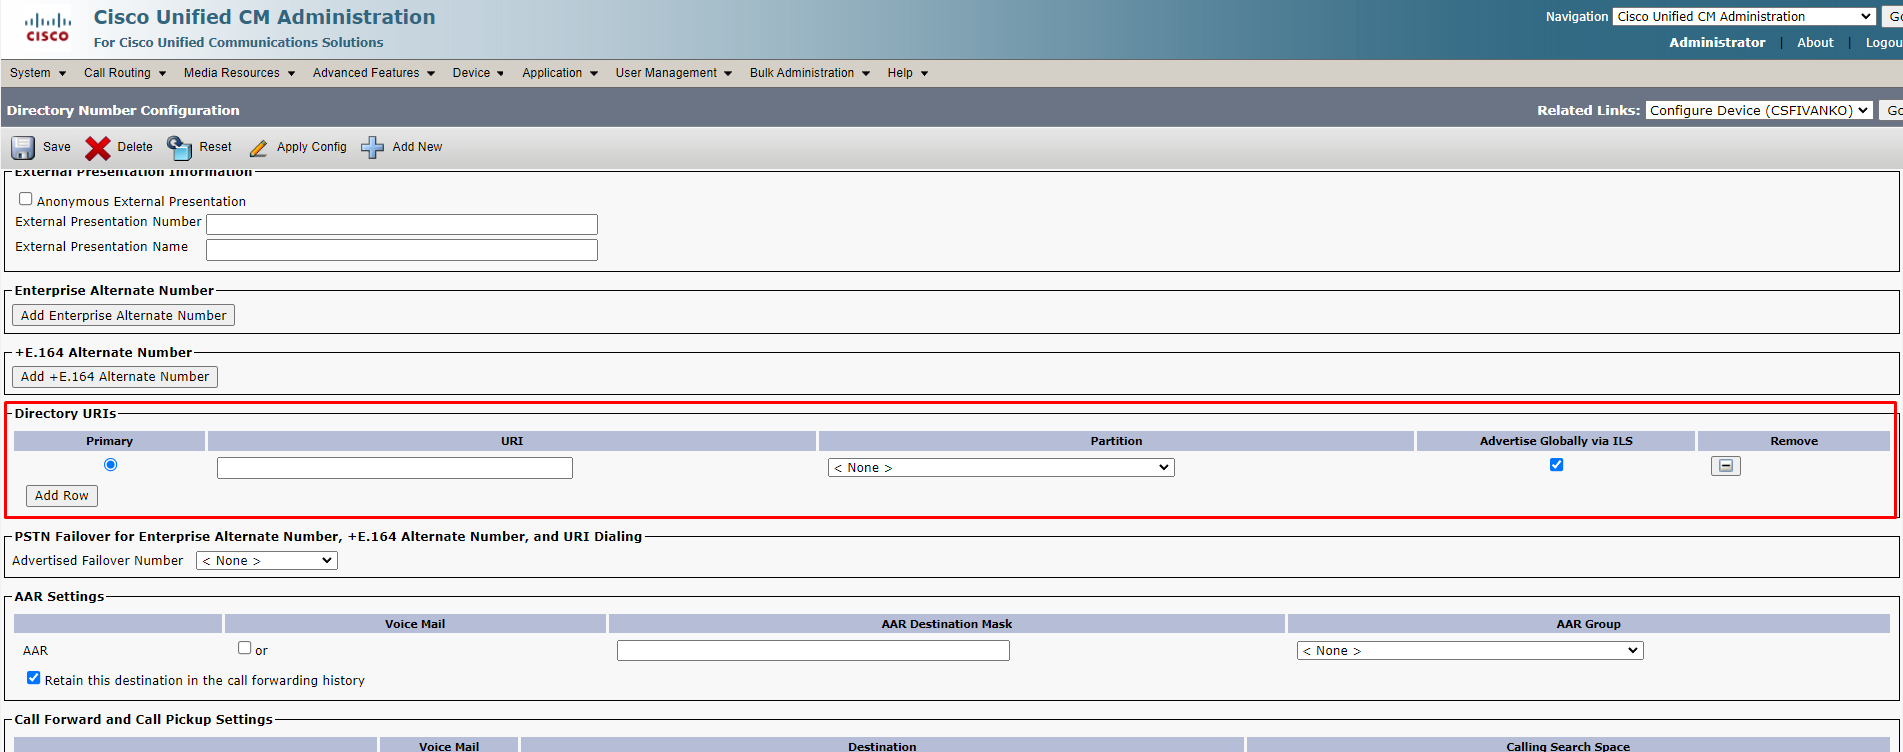
The logic is that if the Cisco Jabber profile on CUCM does not have a Directory URI specified, then the user with the correct SIP URI is in S4B. In this case, it is impossible for a user with the same SIP URI to work in both S4B and CUCM at the same time.
Generally, you can also create a direct SIP Trunk between CUCM and S4B to route SIP URI calls through it, and route Dual-Home conferences through CMS. This would simplify routing because Dual-Home conferences are always call-by-number, i.e. one Route Pattern towards CMS and one SIP Route Pattern towards S4B would be enough, but we are not looking for easy ways.
Next, let’s set up:
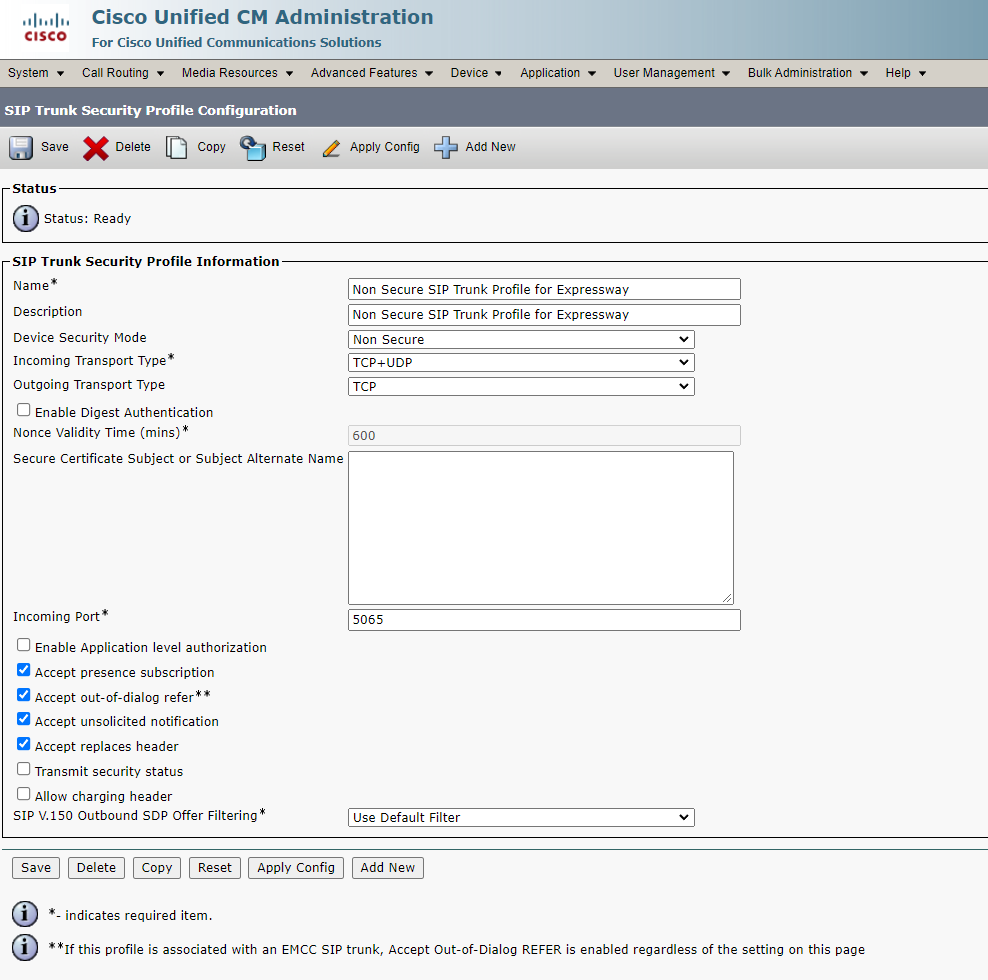
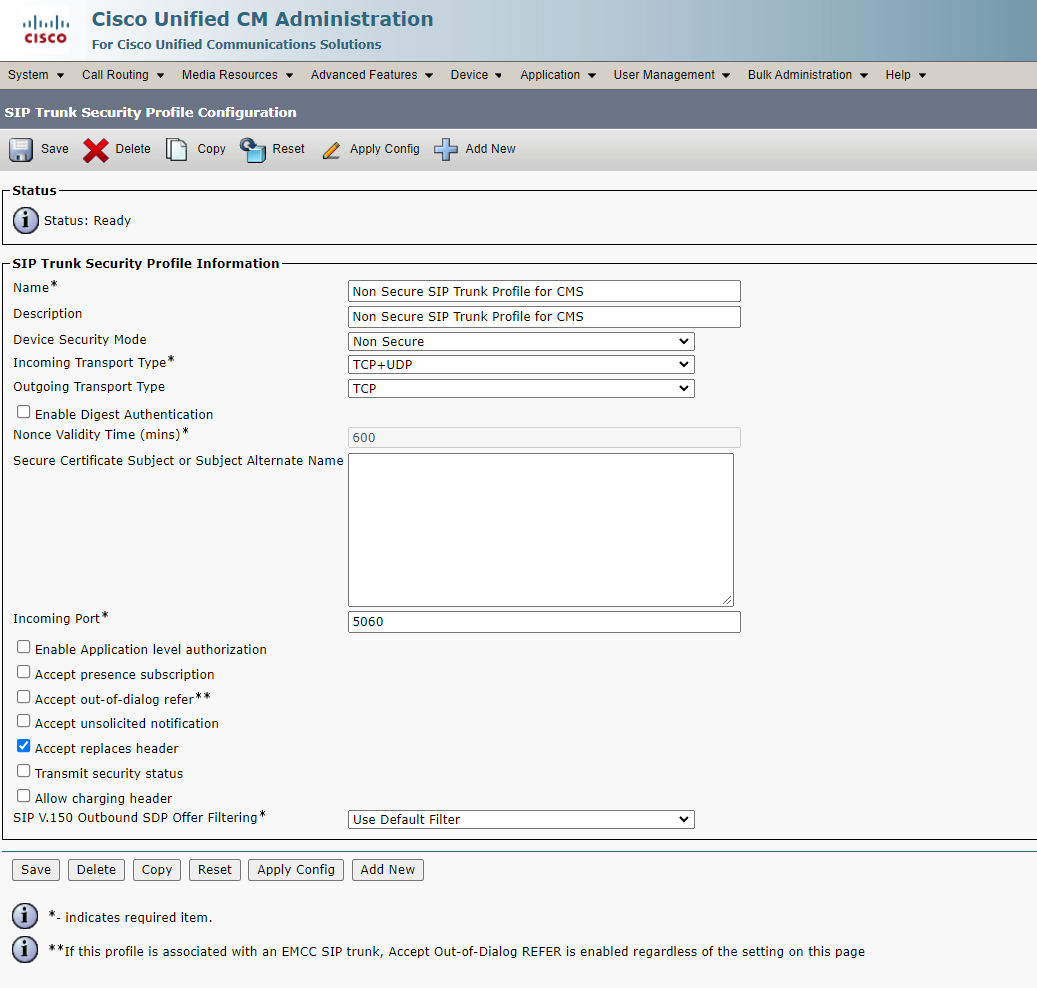
1. Create SIP Trunk Security Profiles
For Expressway:
For CMS:
For IM&P:
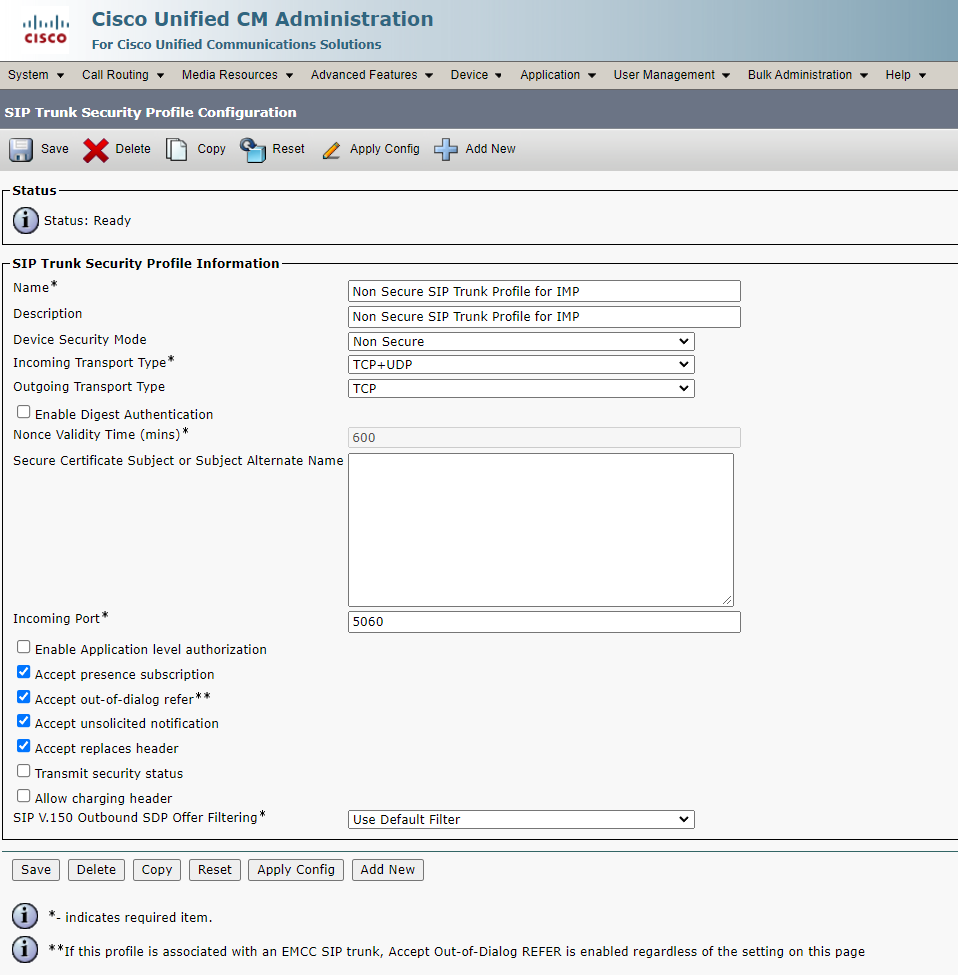
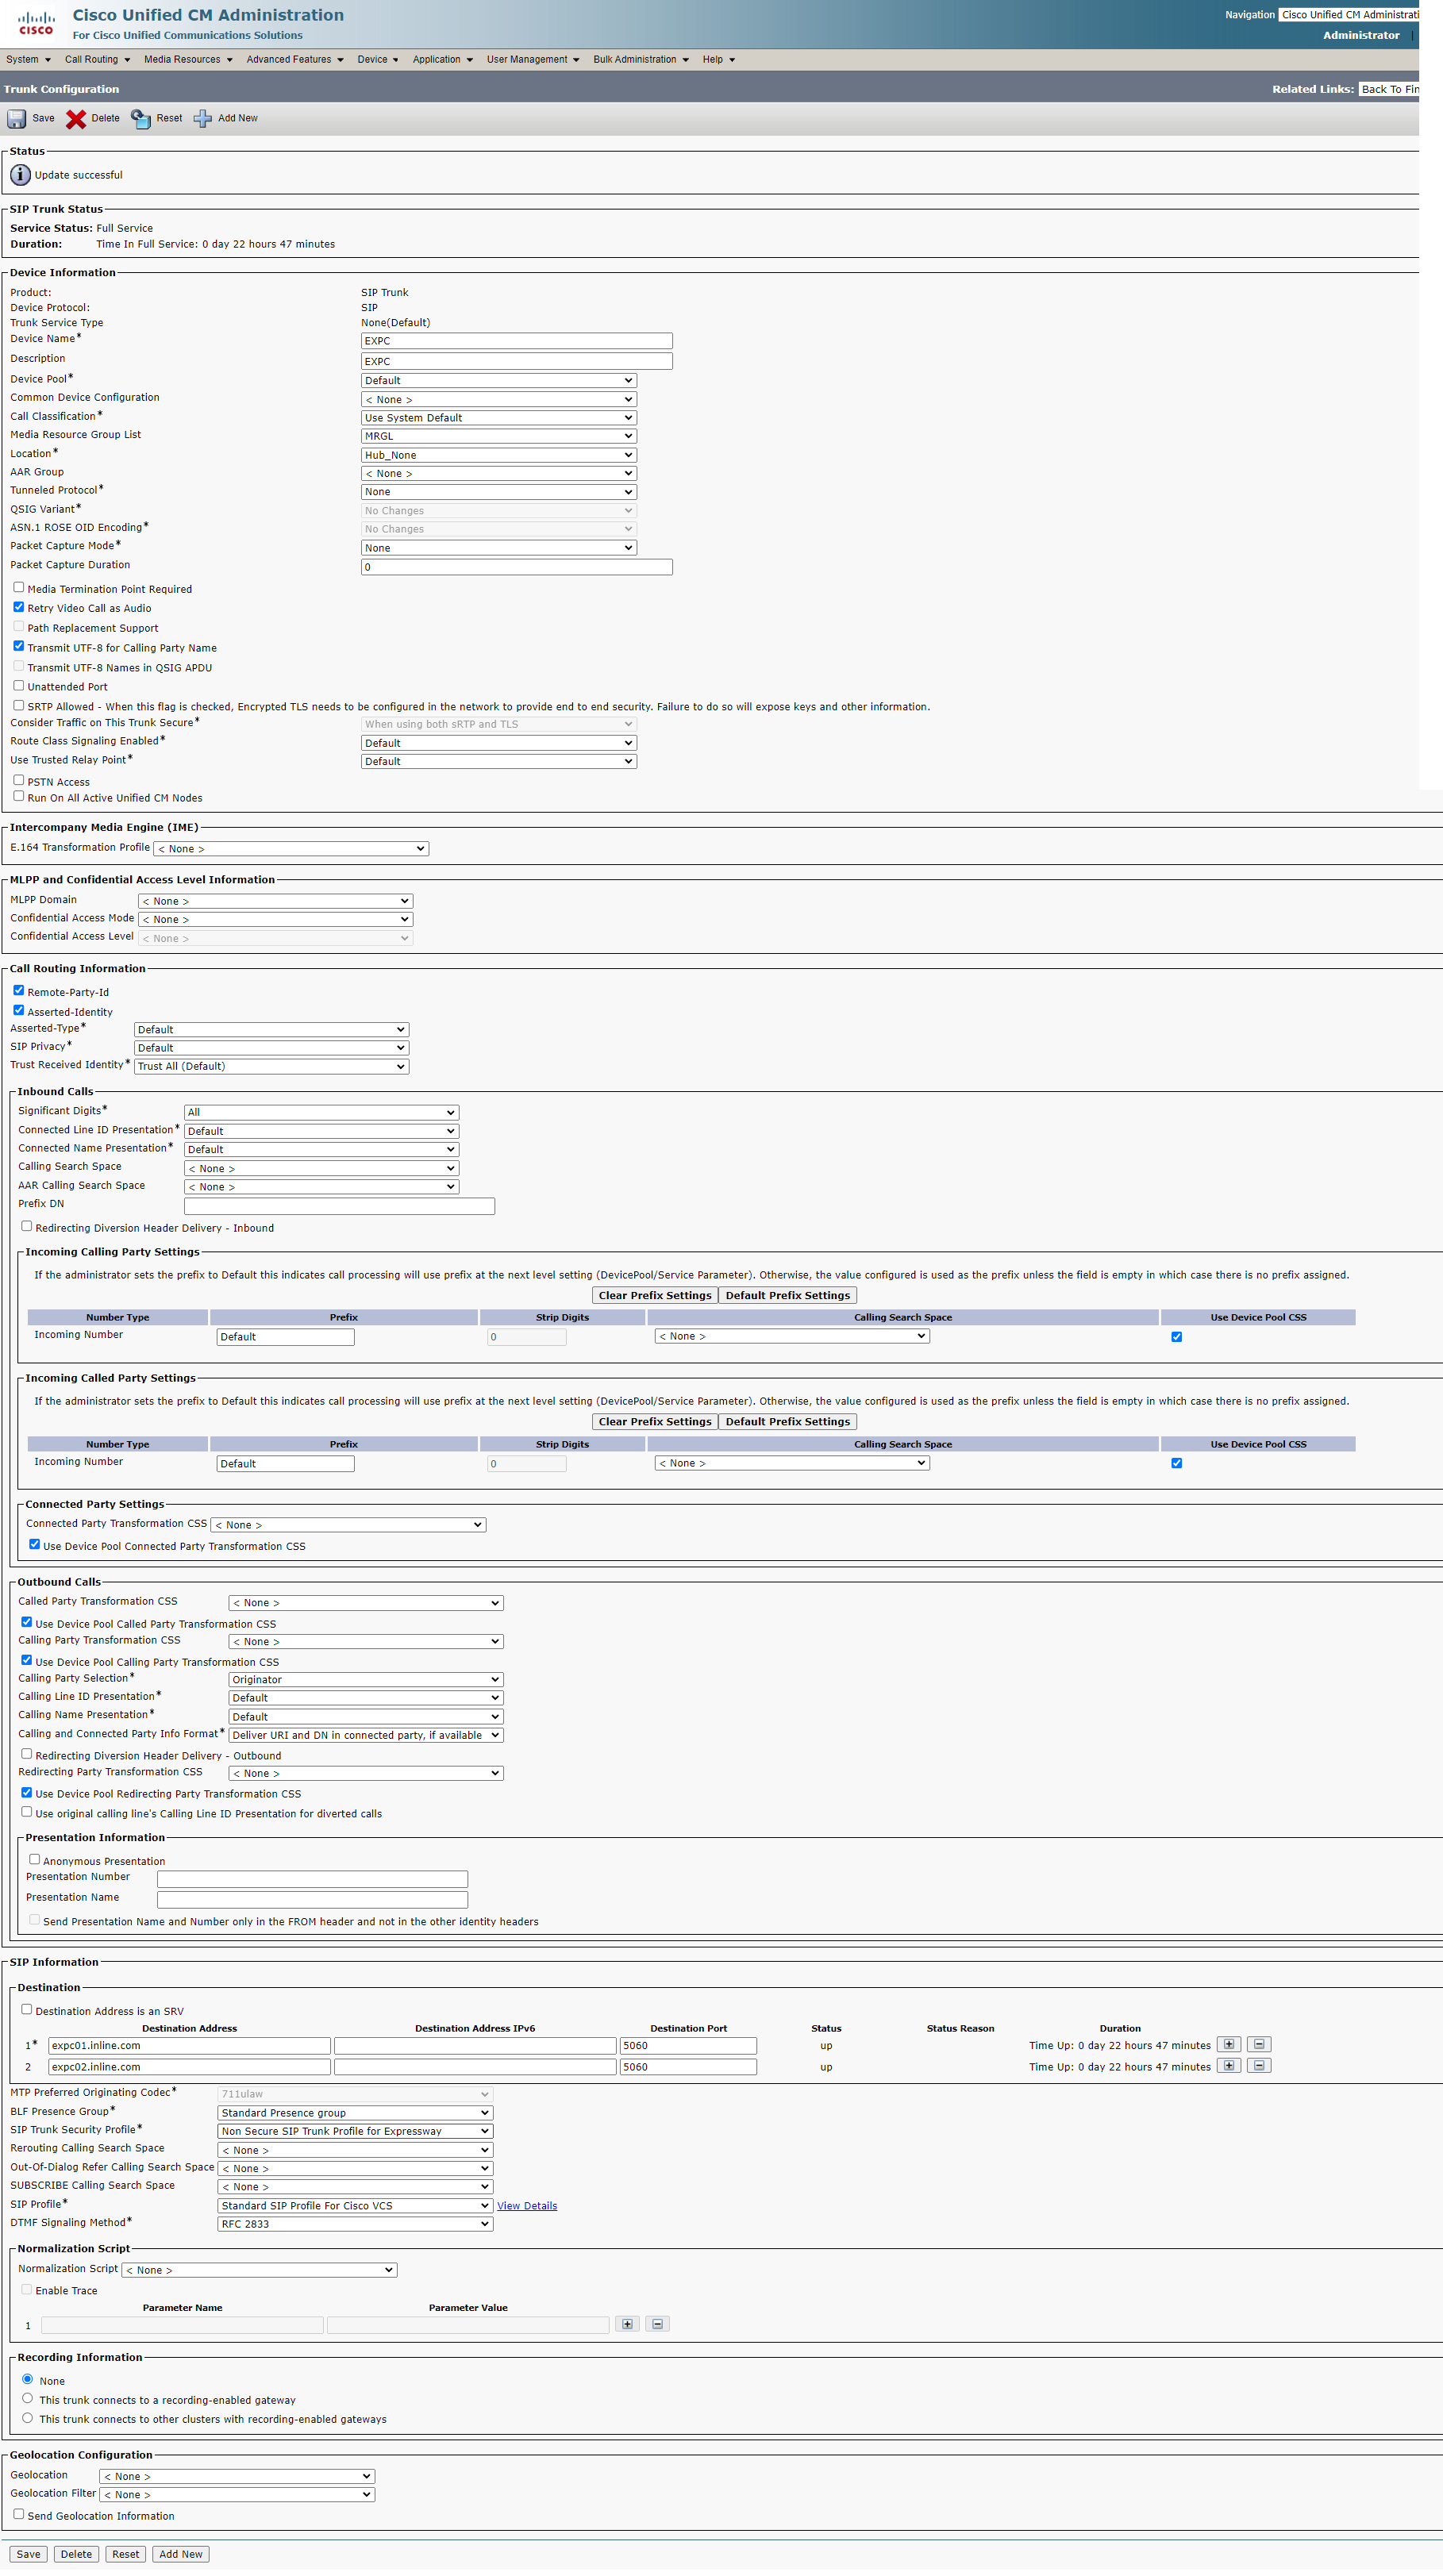
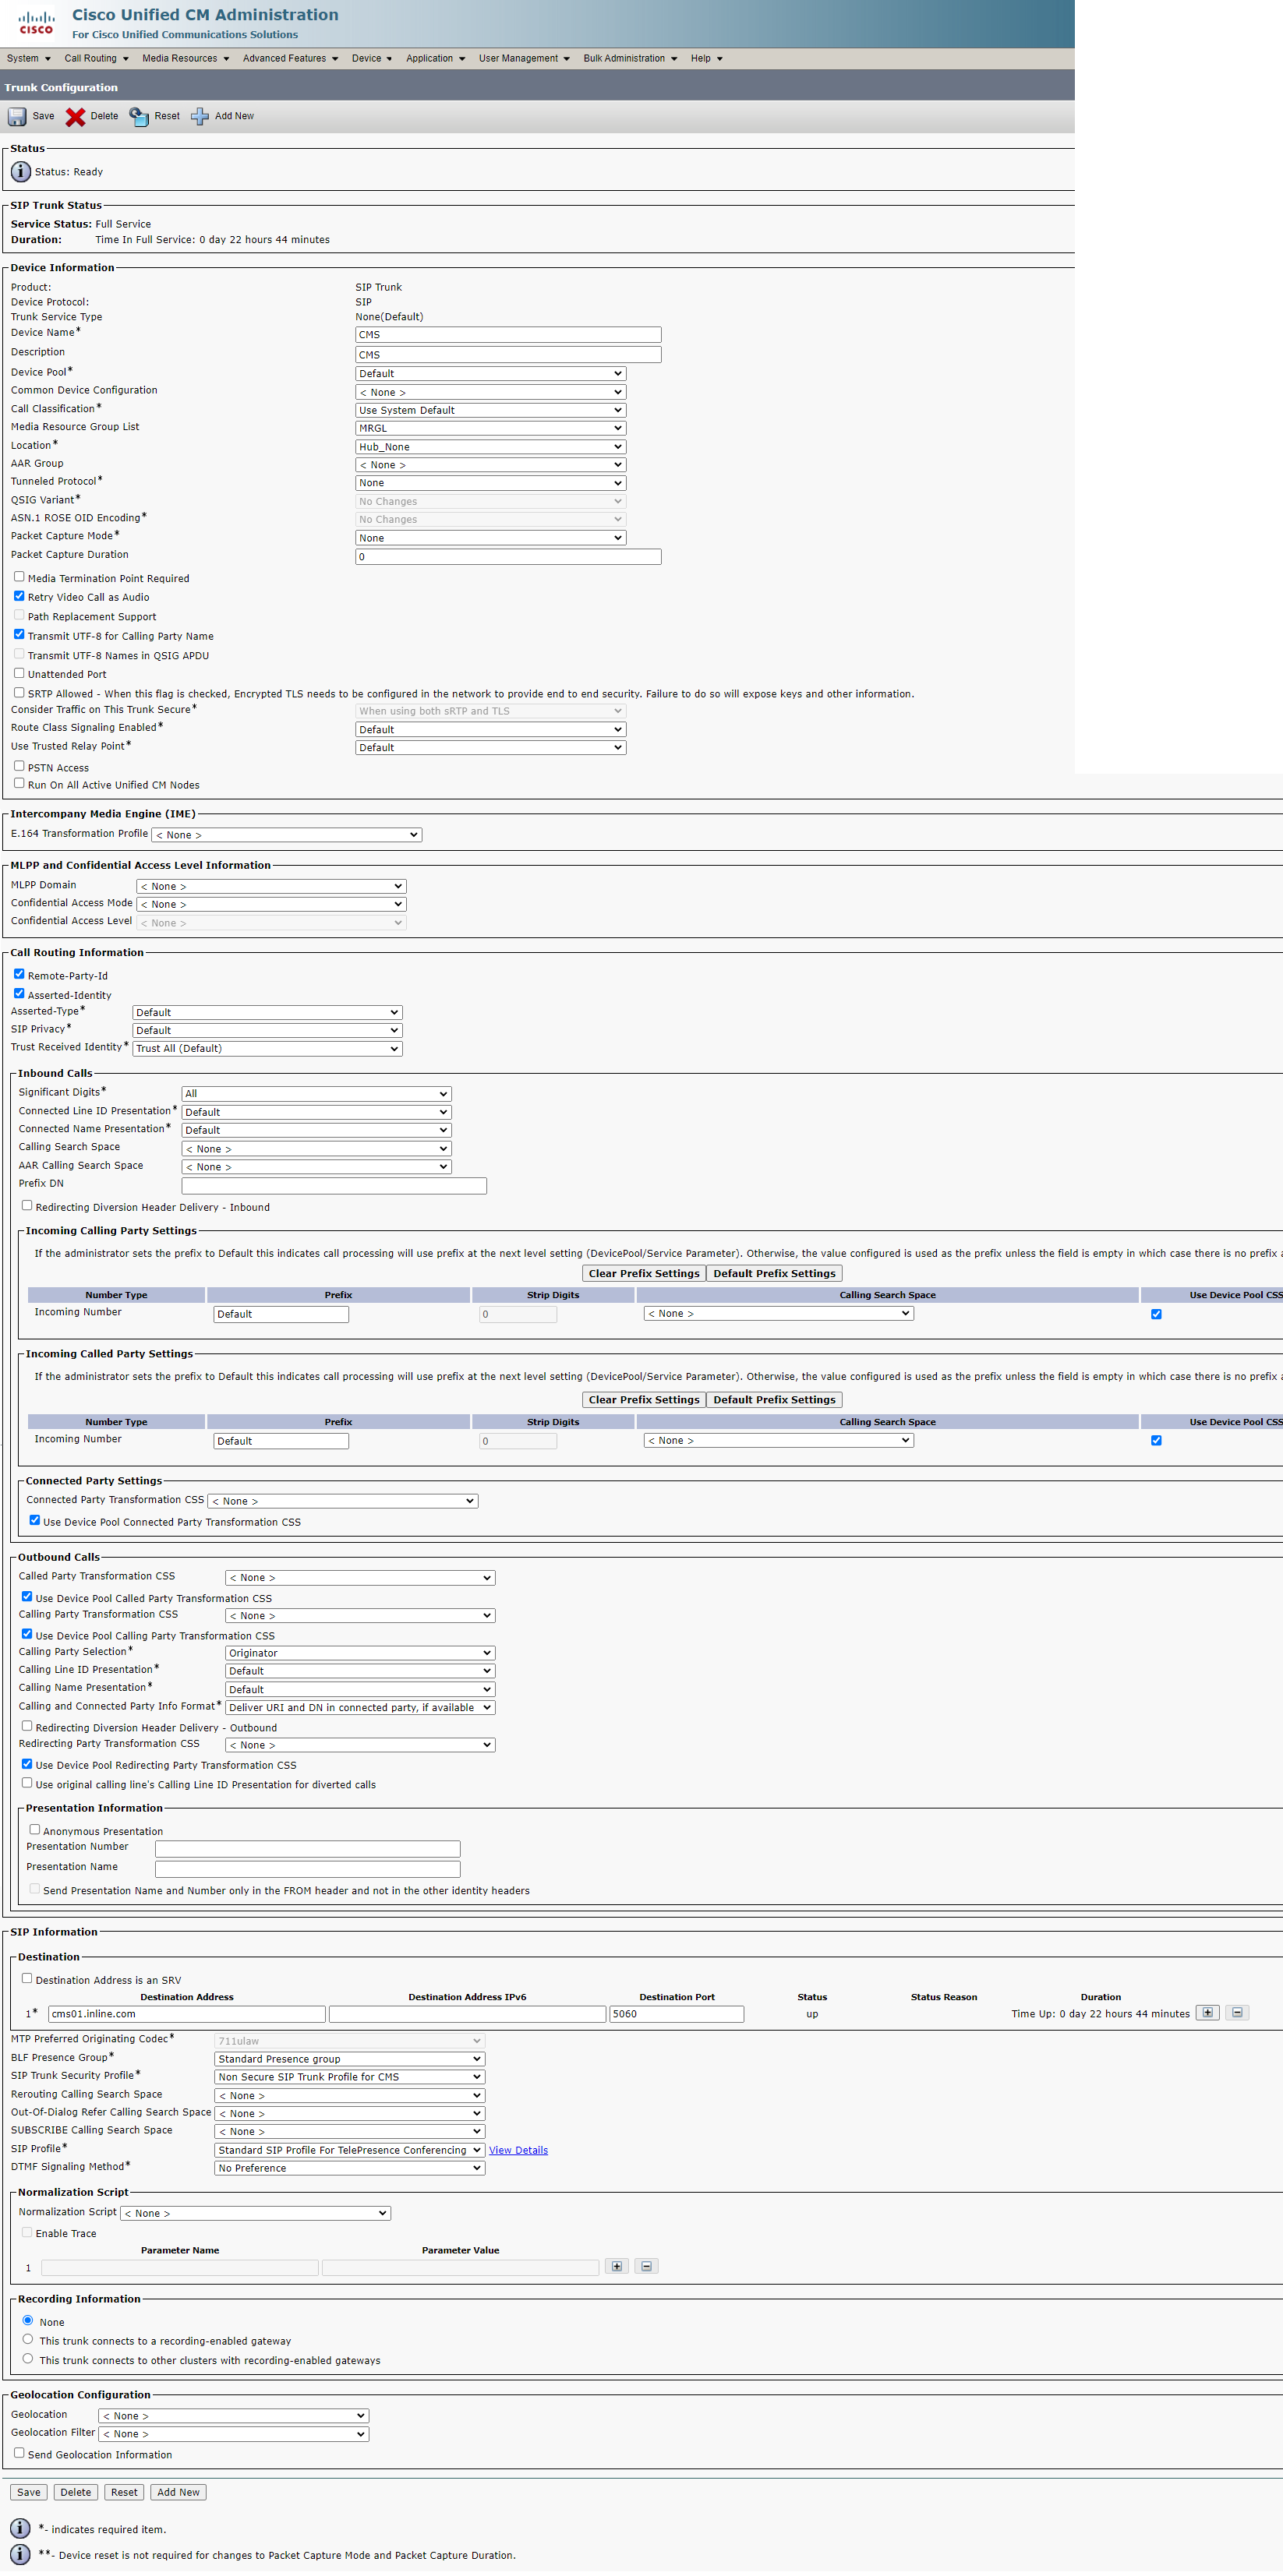
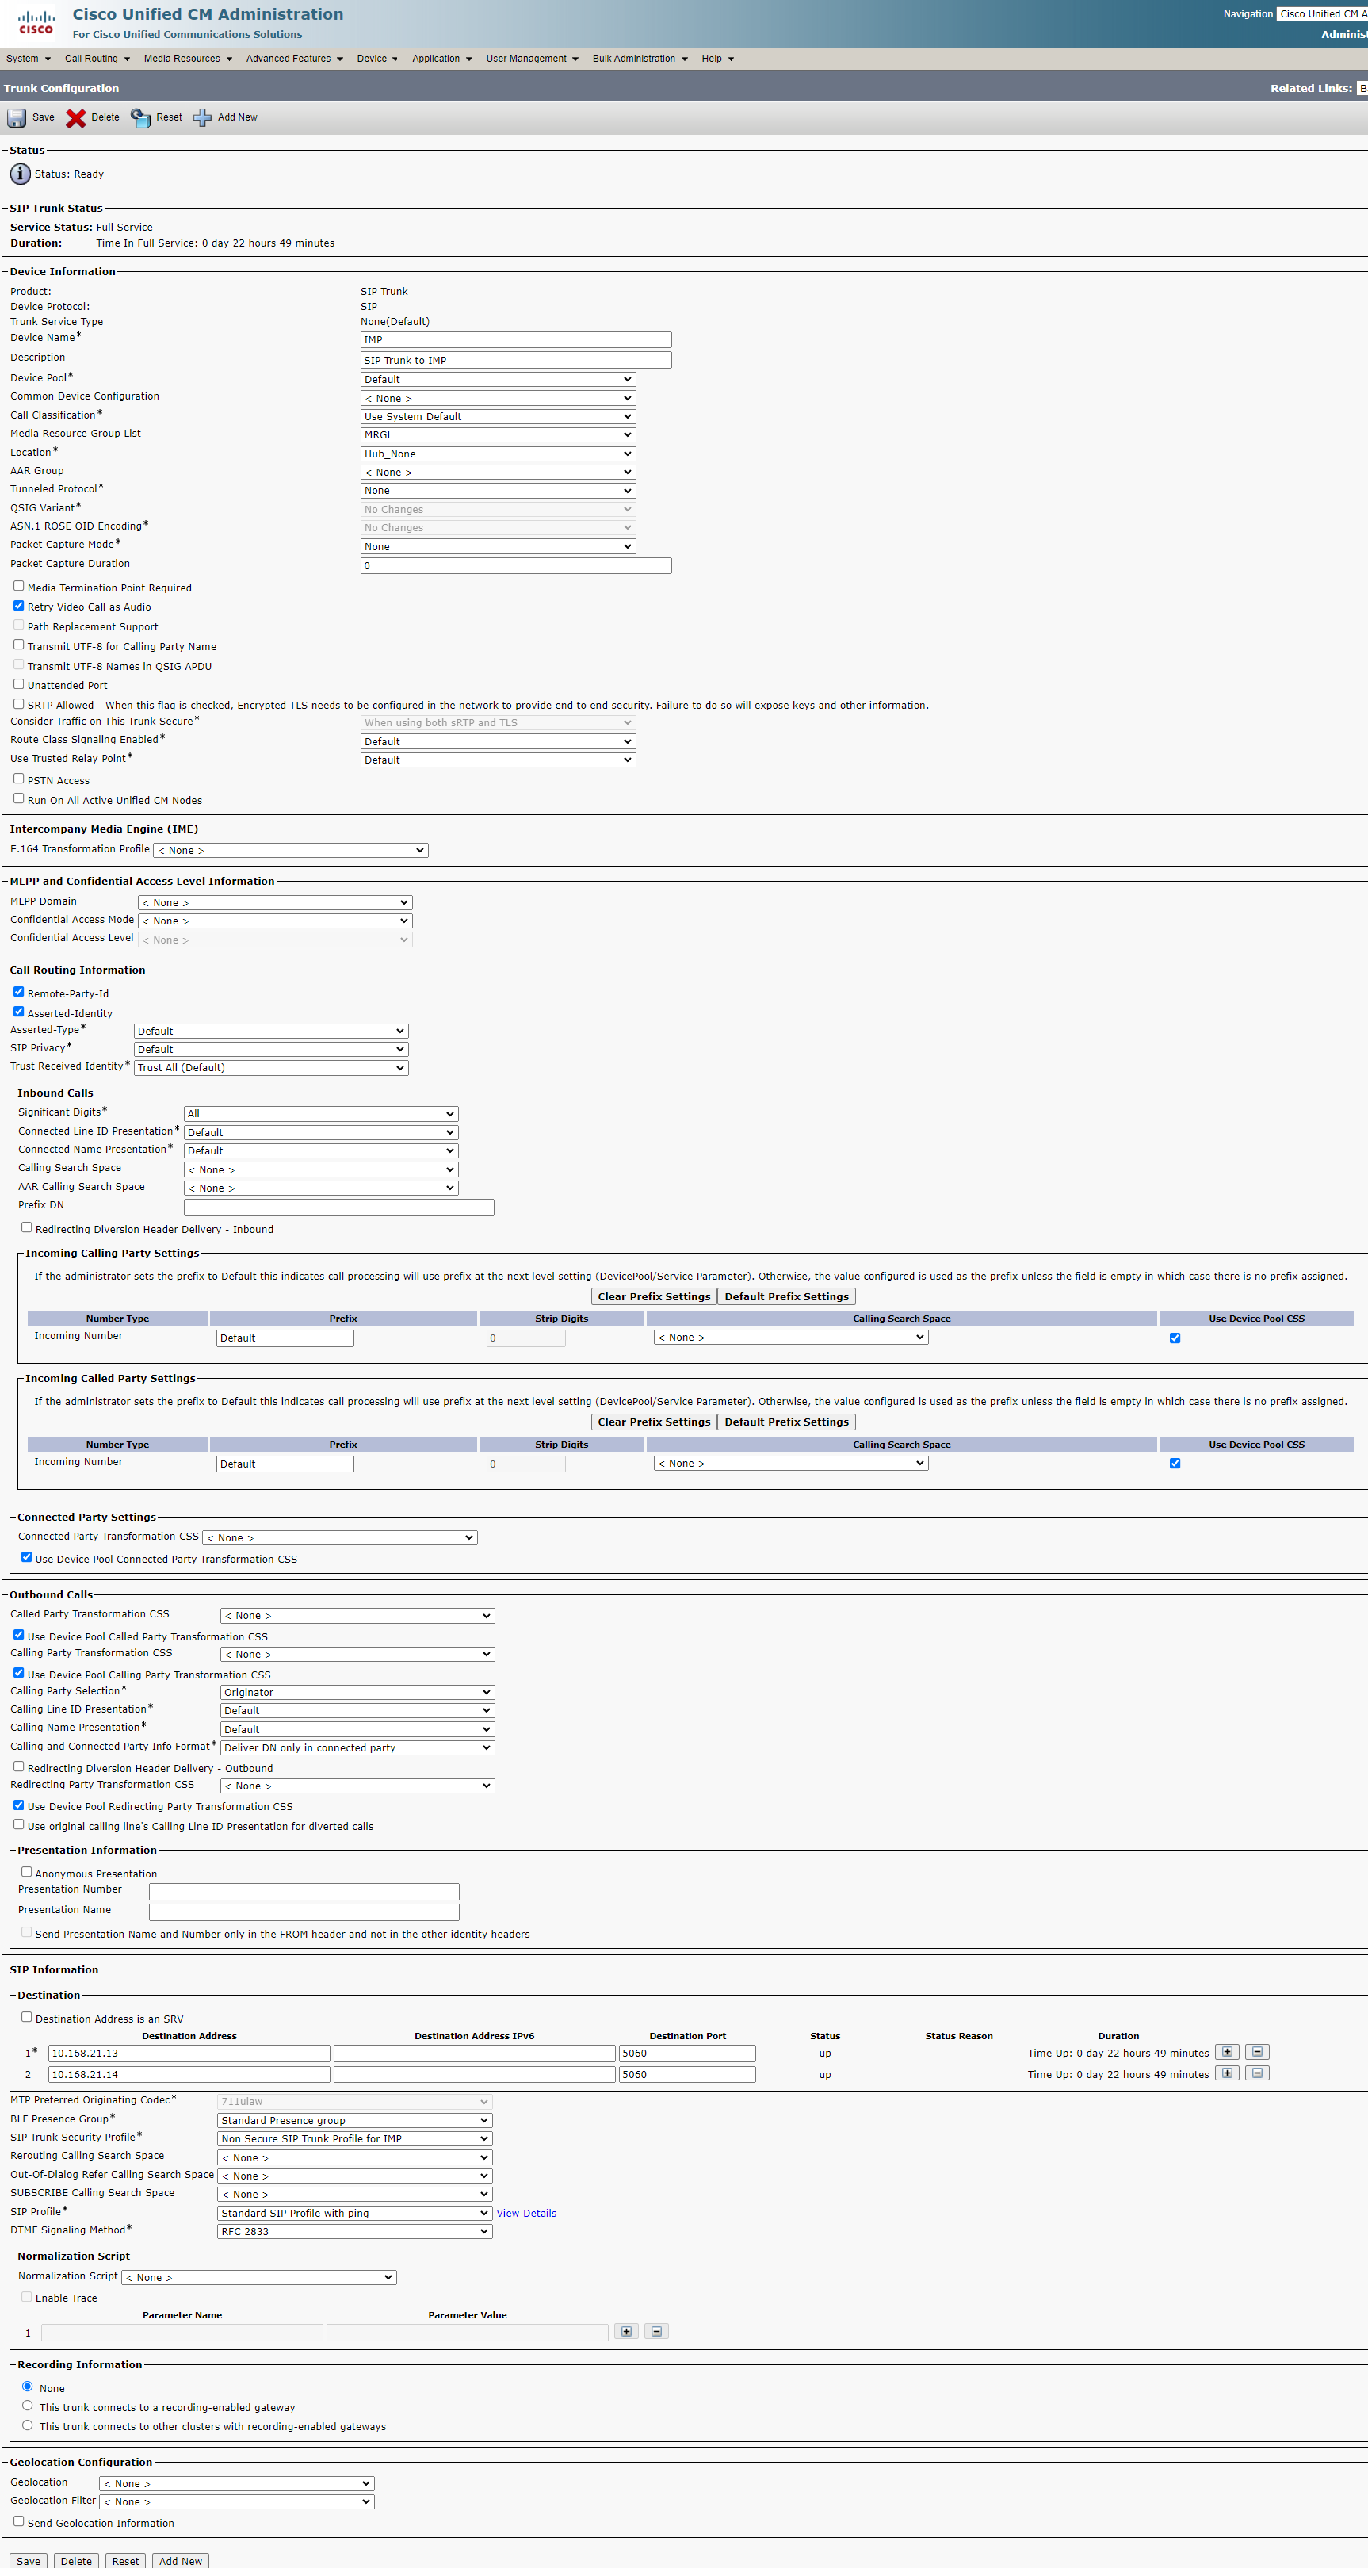
2. Create SIP Trunks

For Expressway:
For CMS:
For IM&P:
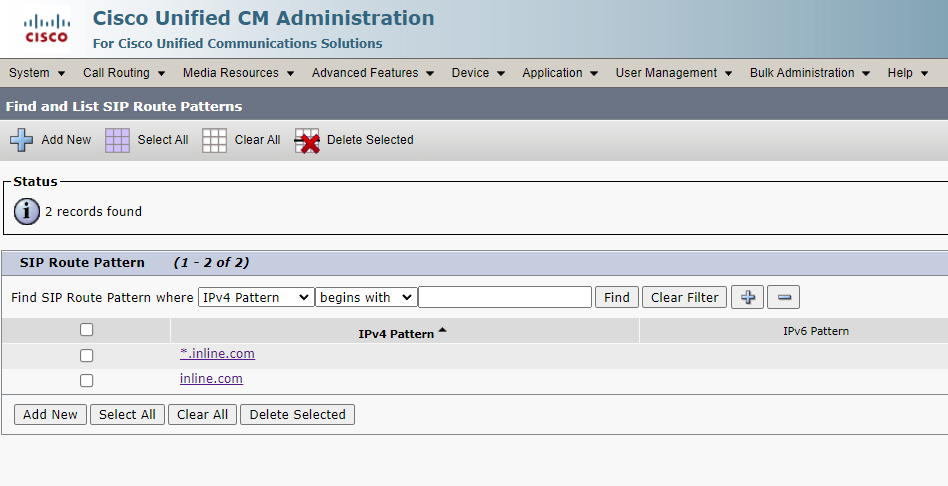
3. Create SIP Route Patterns on CUCM
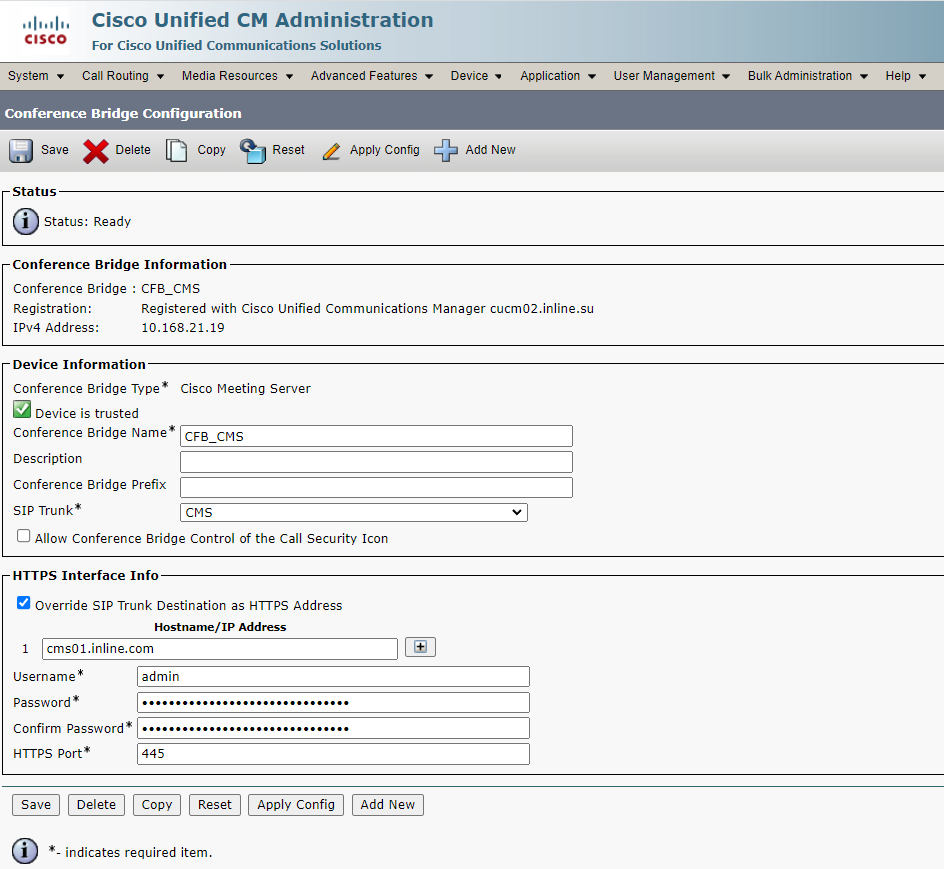
4. Create a CMS Conference Bridge
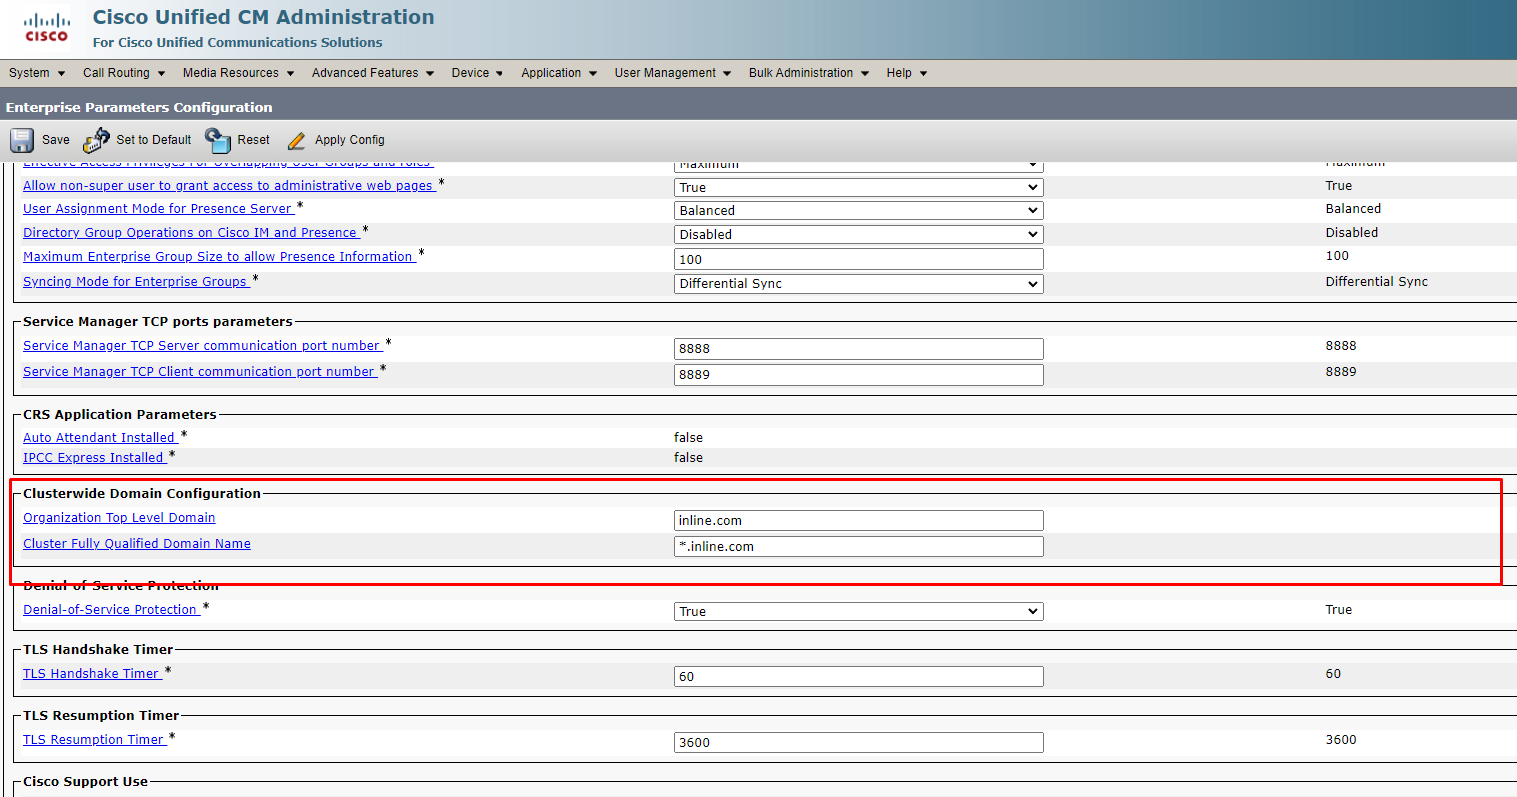
5. Fill in the Organization Top Level Domain for Enterprise
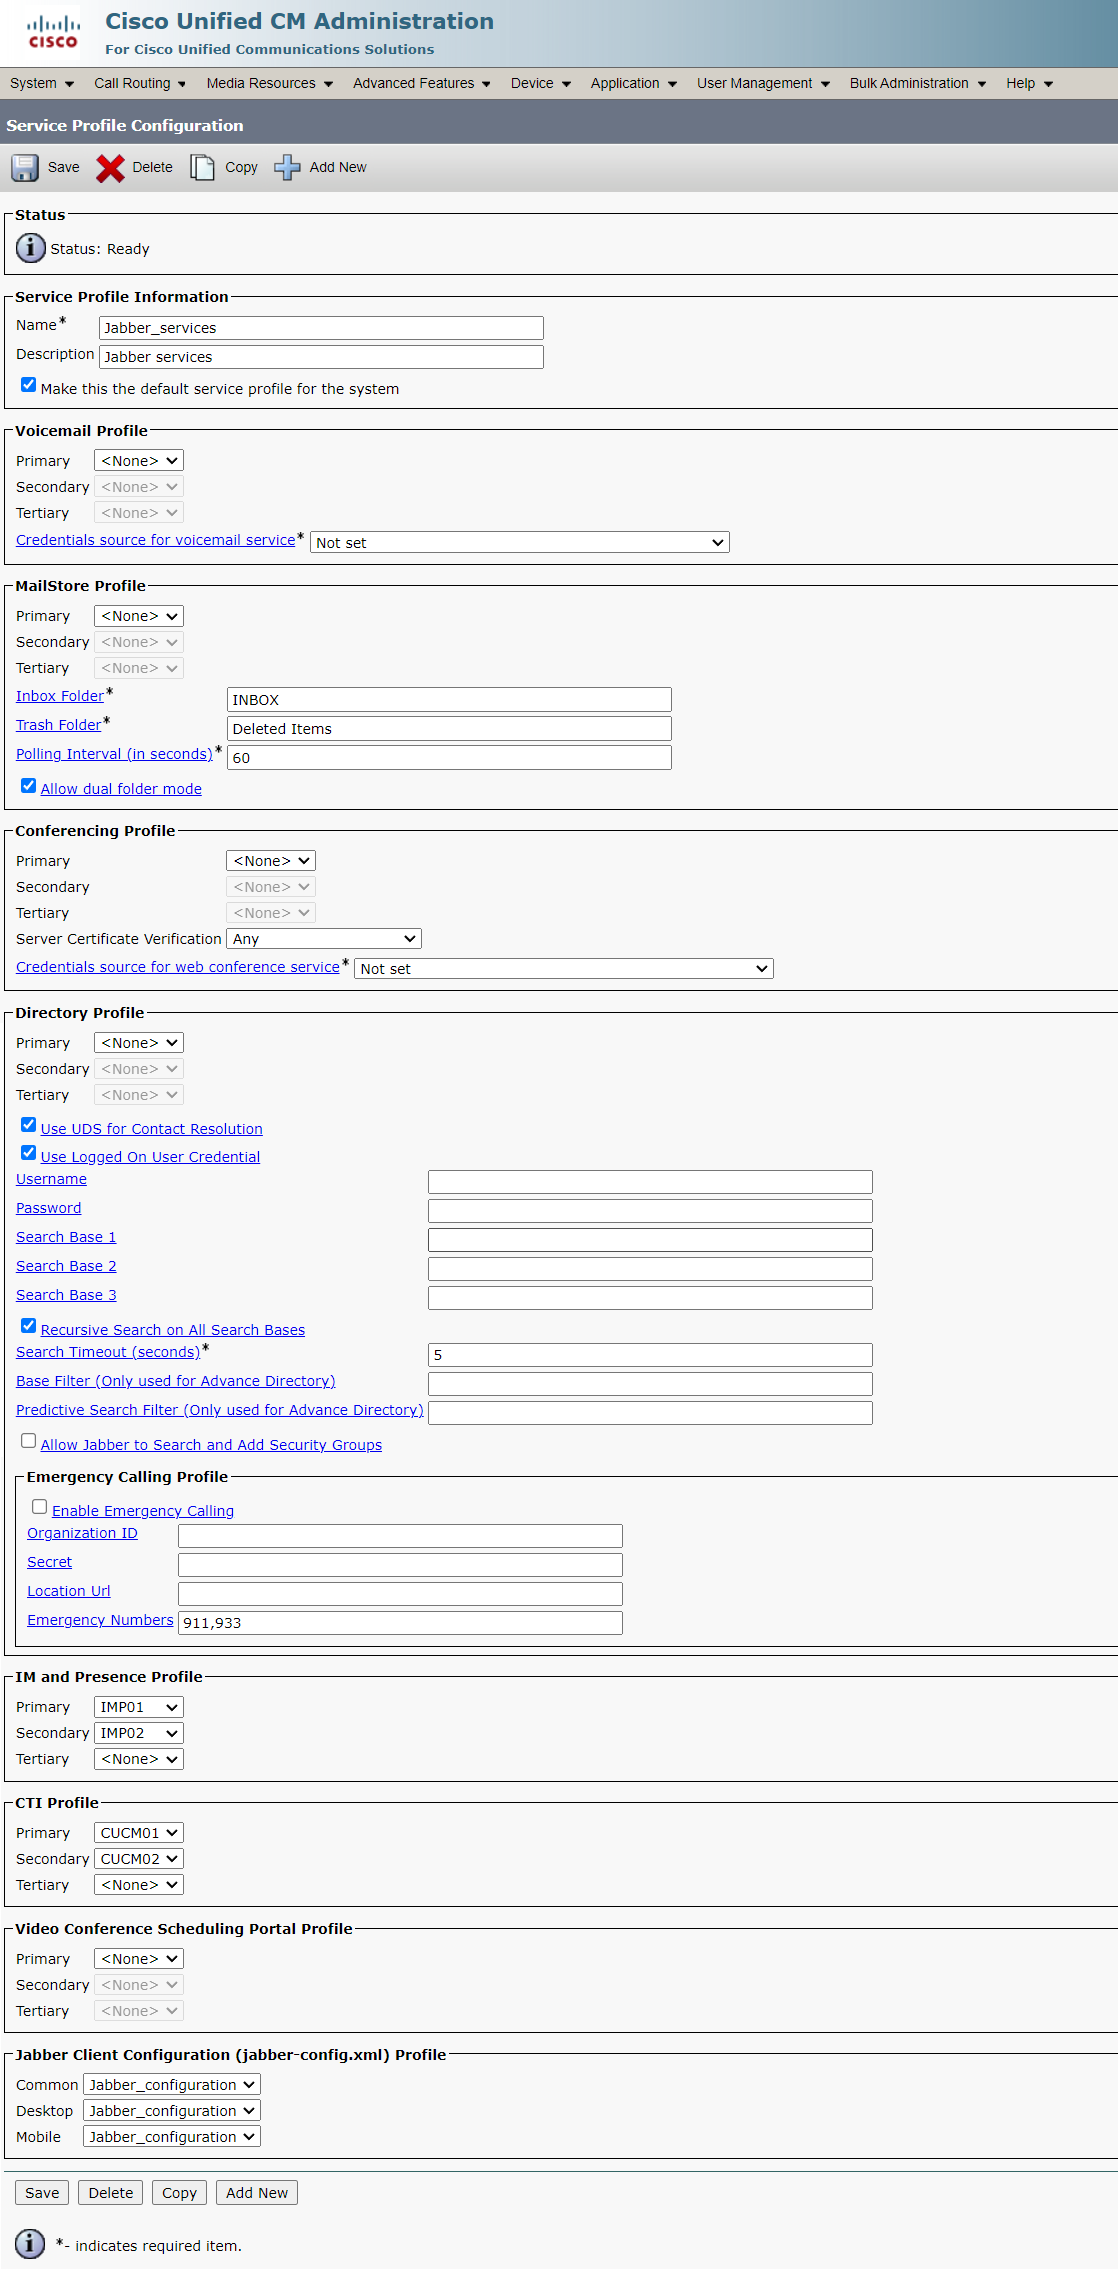
6. Create UC Services and Service Profile

7. Set up the Cisco Jabber Configuration File
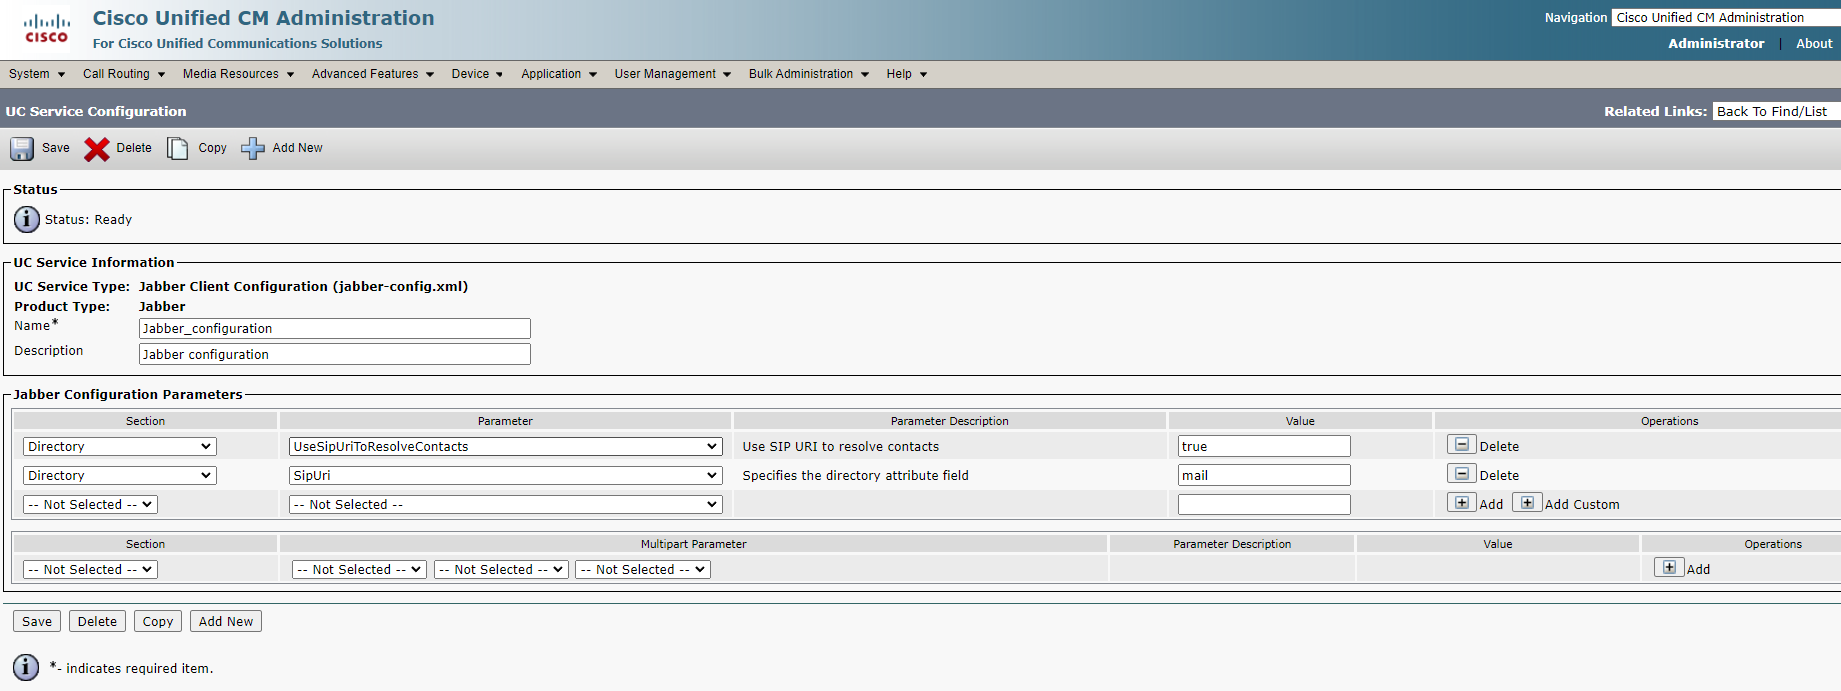
You need to add these parameters, otherwise, when you add a contact to the Cisco Jabber contact list, the chat address in the added contact card will be incorrect, the contact suffix will contain the user domain this contact adds to itself, and, as a result, messaging and status transfer won’t work.
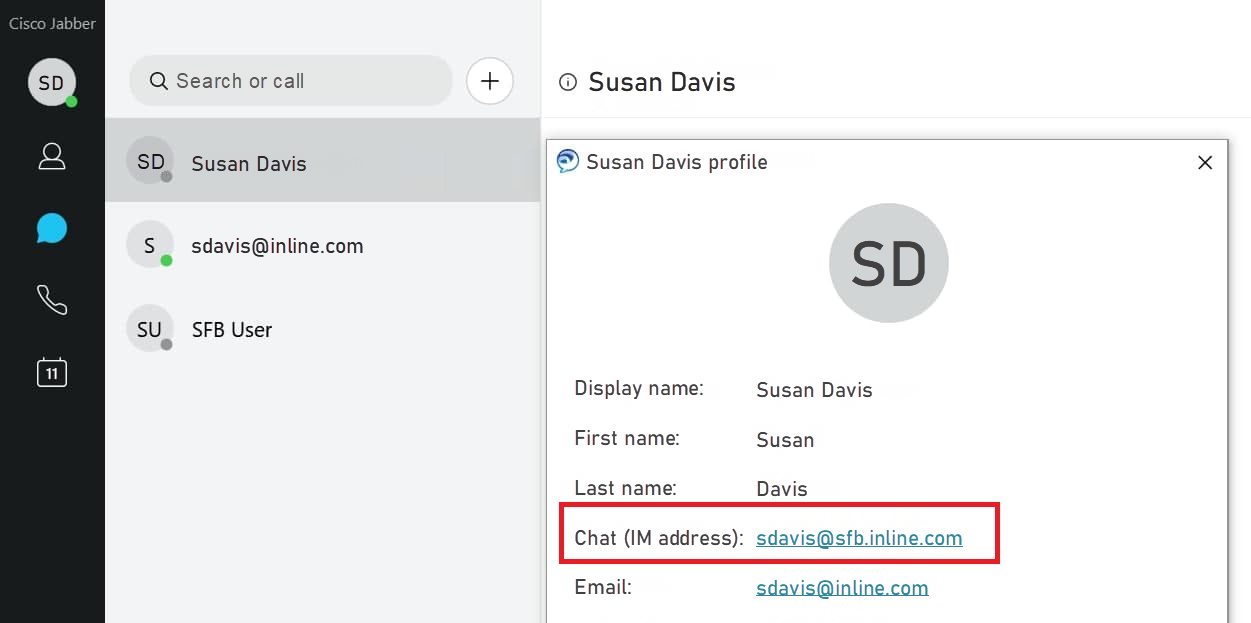
8. Import MS AD Users to CUCM
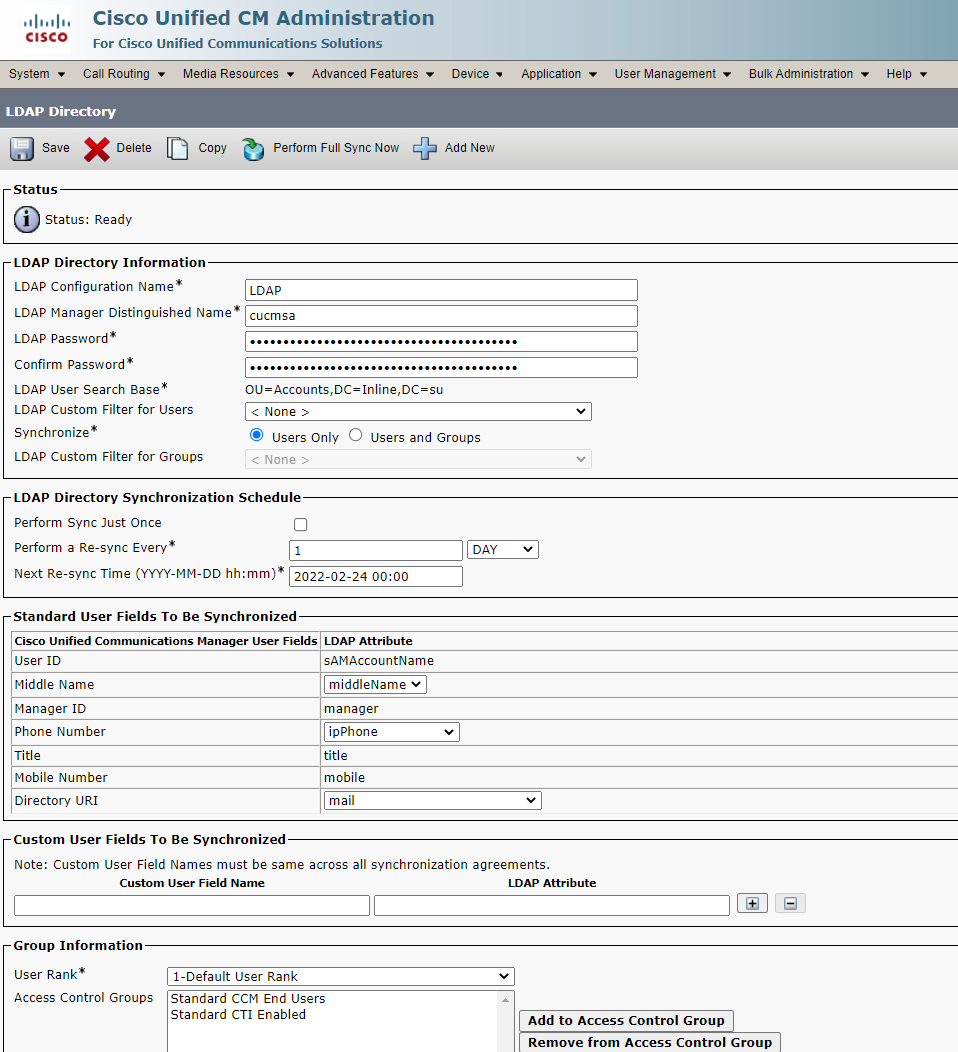
In our case it doesn’t matter which LDAP fields to import Directory URI and Phone Number from.
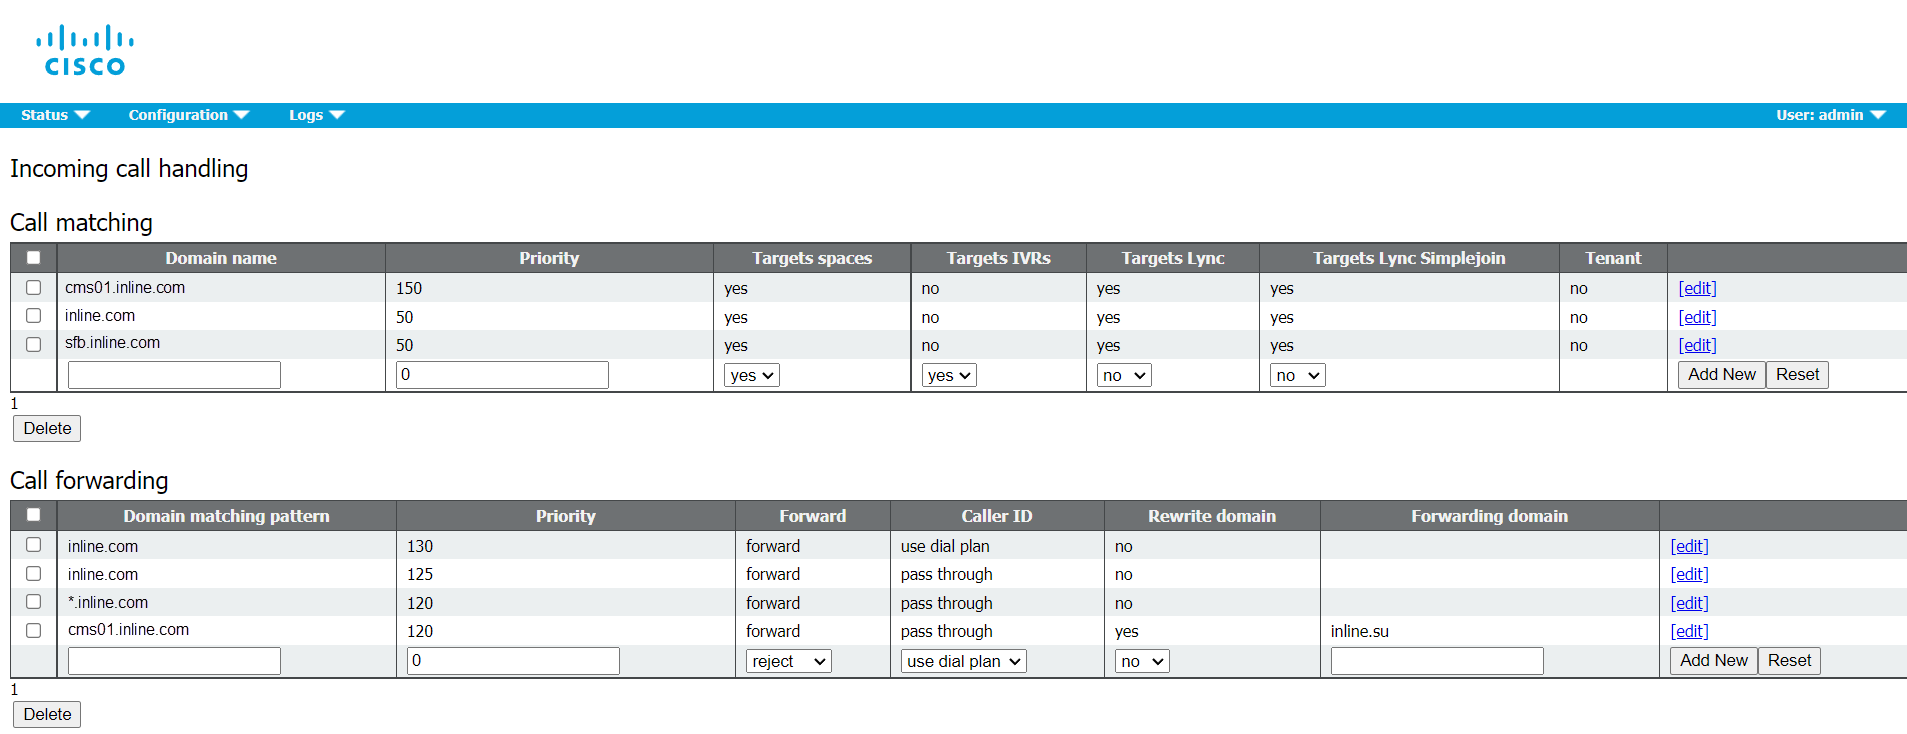
9. Create Rules for Incoming Calls and Call Forwarding on CMS
10. Create Rules for Outgoing Calls with Corresponding Priorities
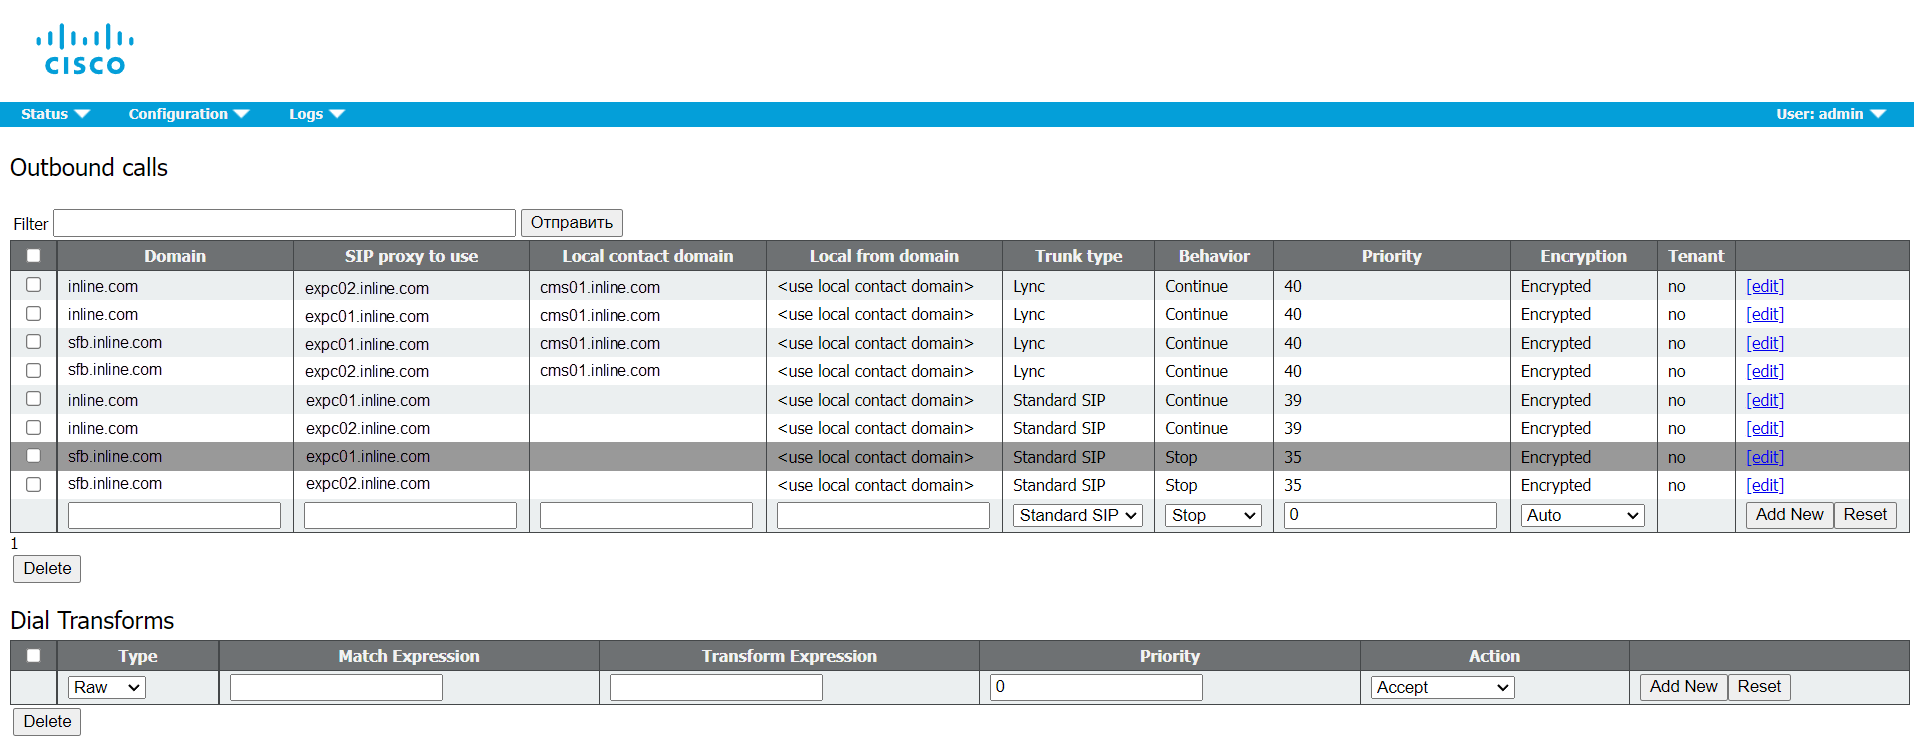
11. Set up Microsoft Interoperability on Expressway
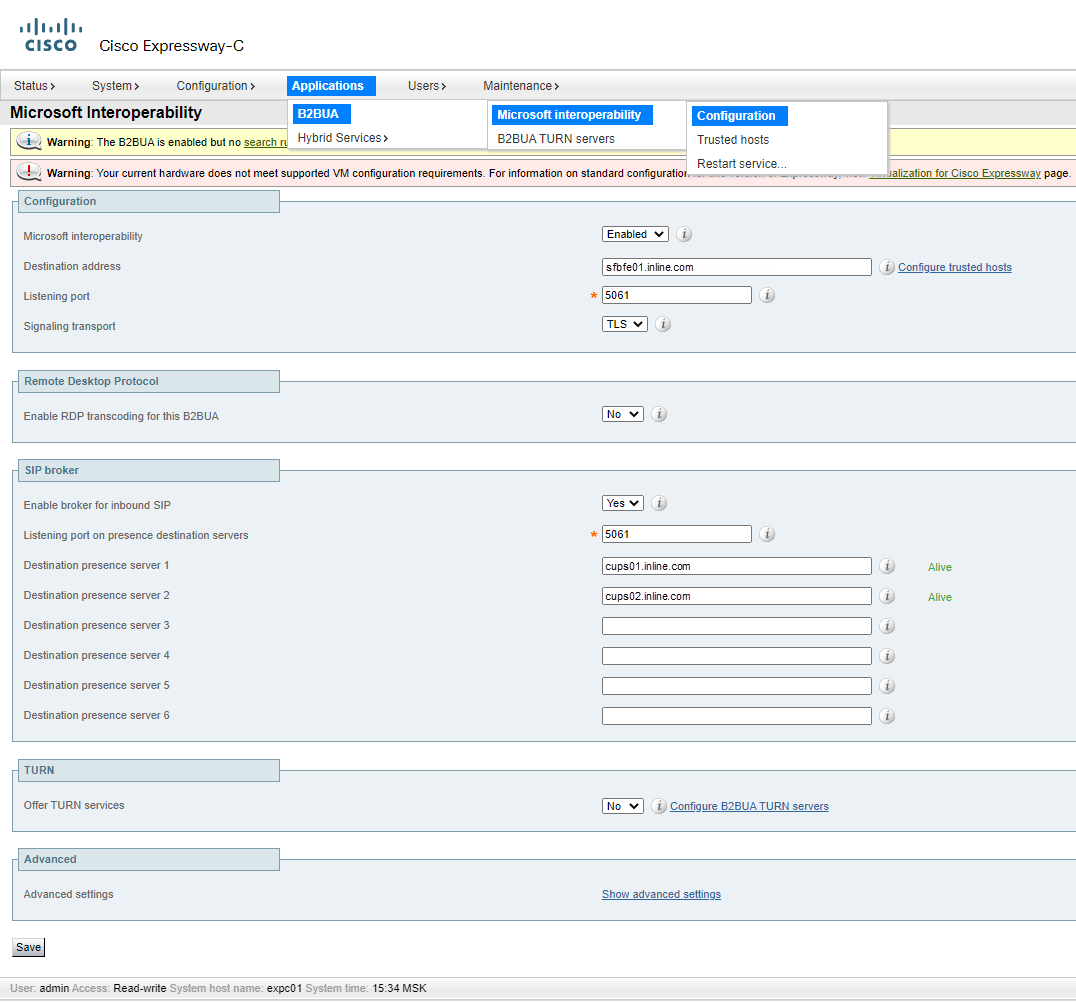
12. Create Zones on Expressway

13. Create Search Rules on Expressway

Sending Messages and Presence Statuses
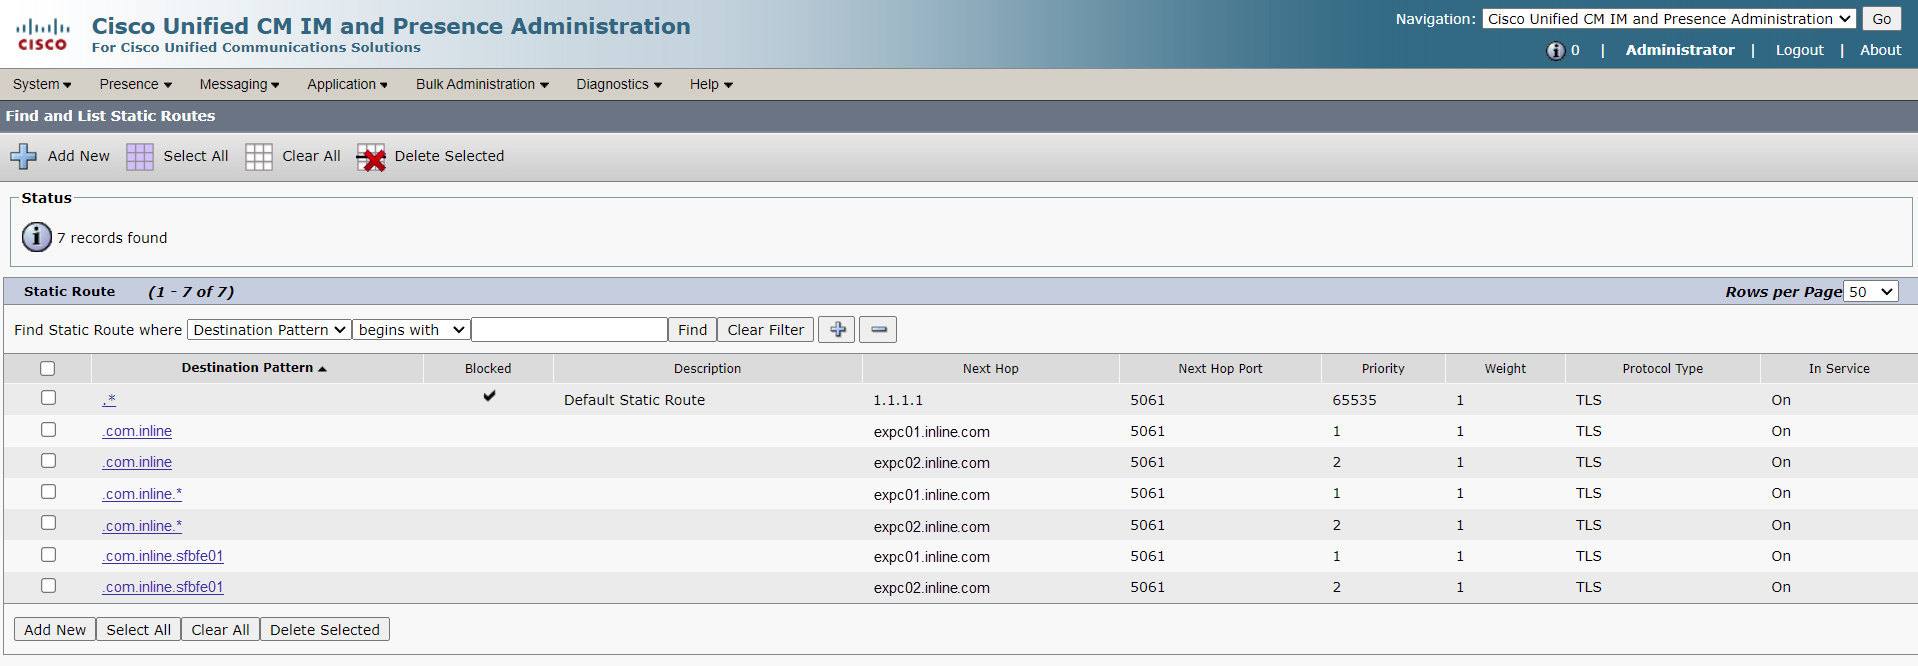
Messaging between Cisco Jabber and S4B users will work through so-called IntraDomain federation. However, we manually change the route that is automatically created on IM&P servers towards S4B directly, redirecting it towards Expressway.
IMP&P also requires an address scheme in the Directory URI form.
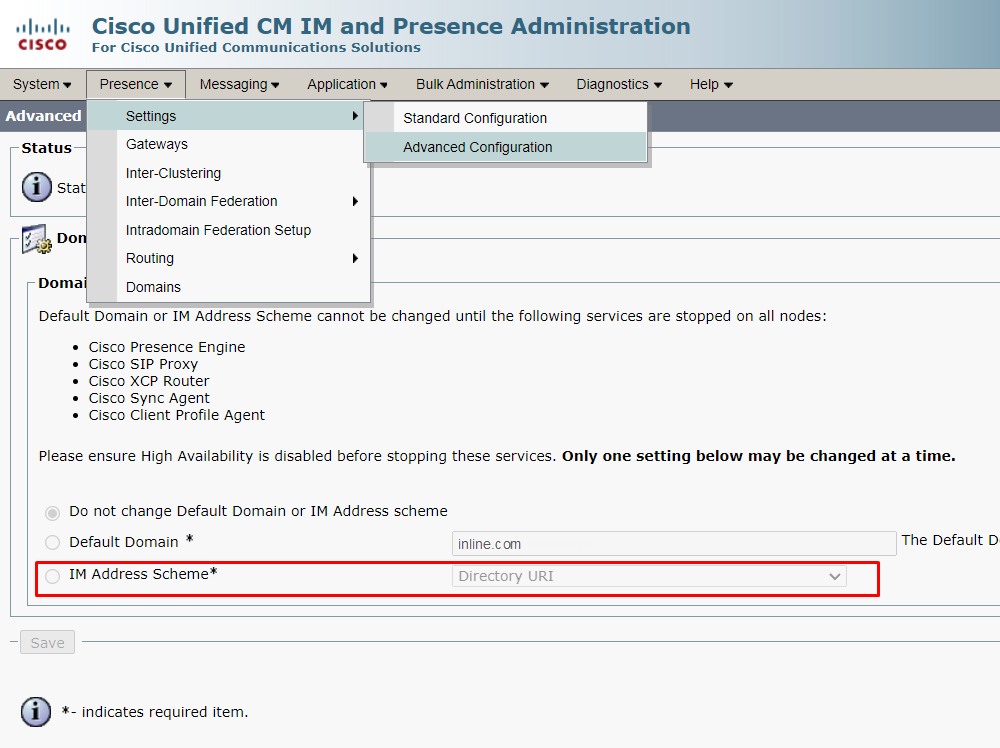
Now configure IM&P:
1. Security Settings
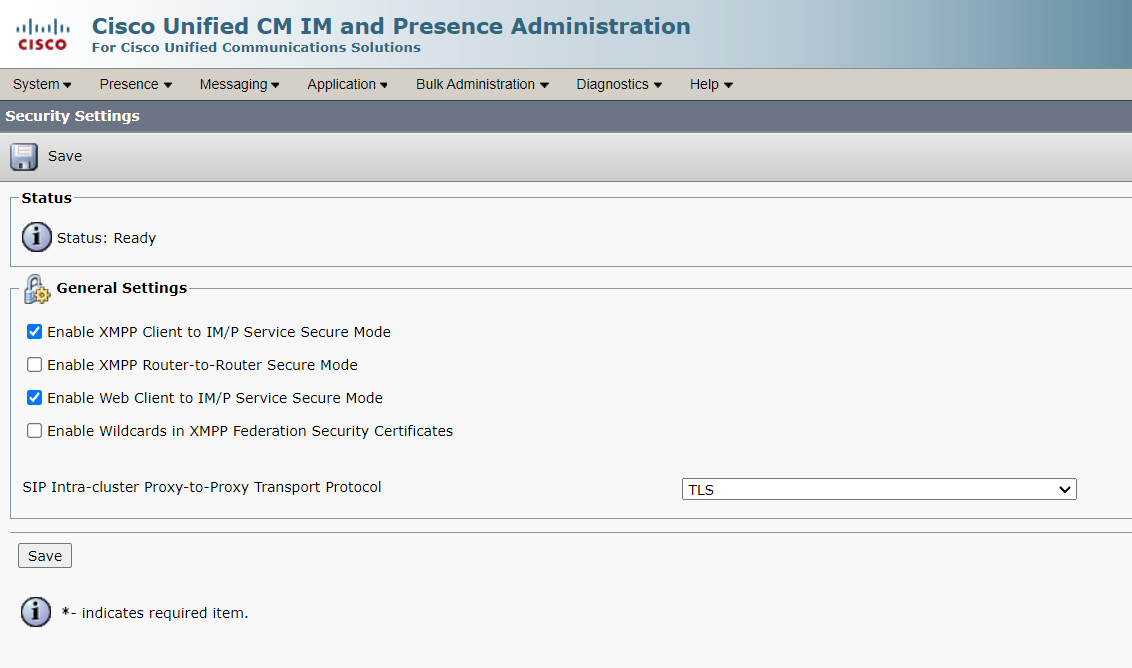
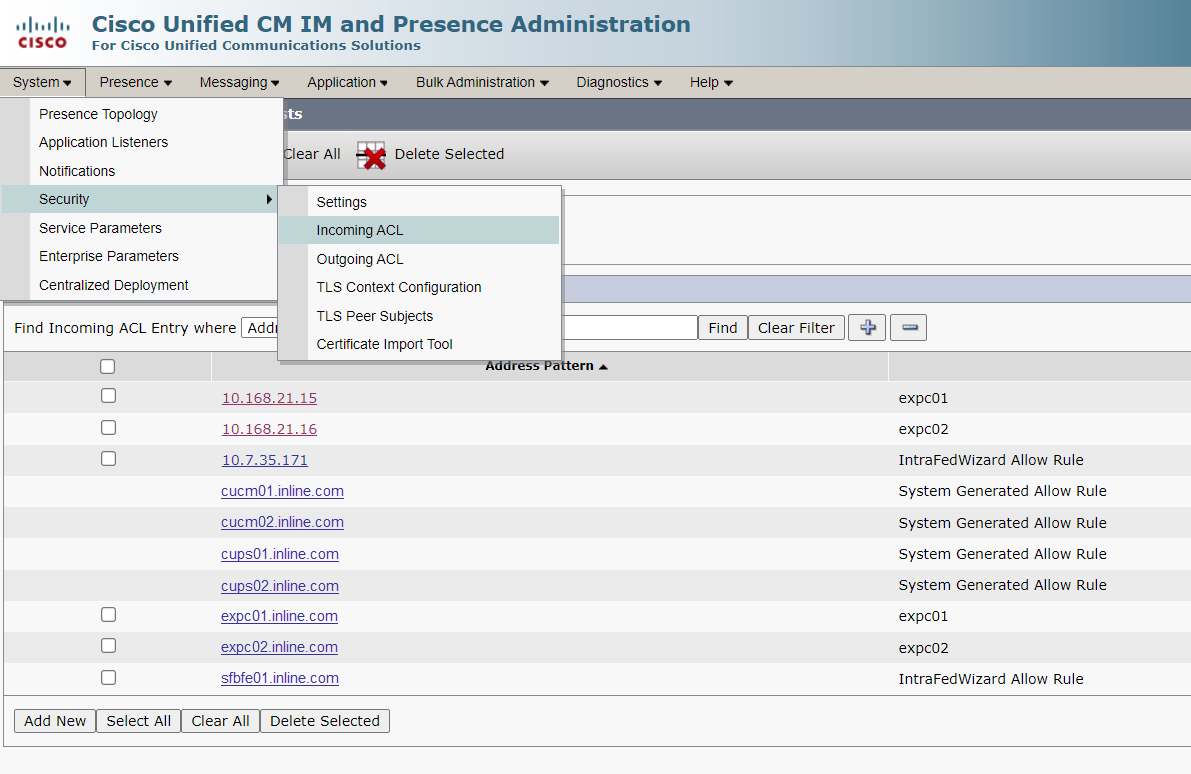
2. Incoming ACL
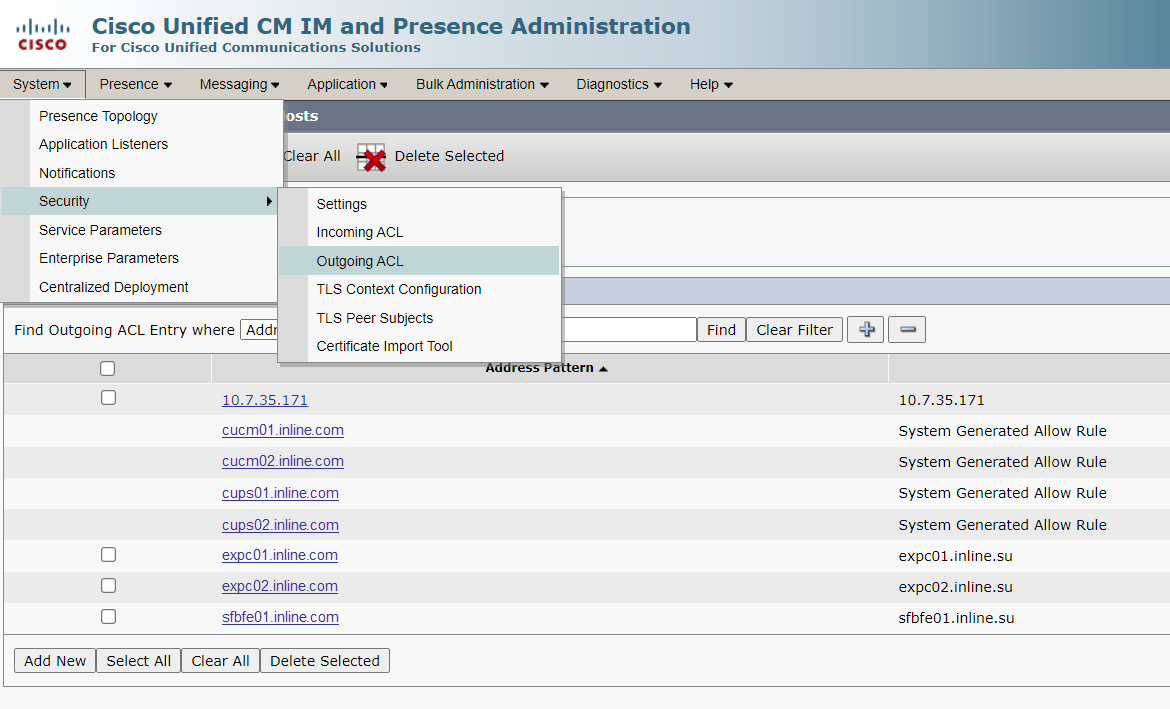
3. Outgoing ACL
4. Application listeners

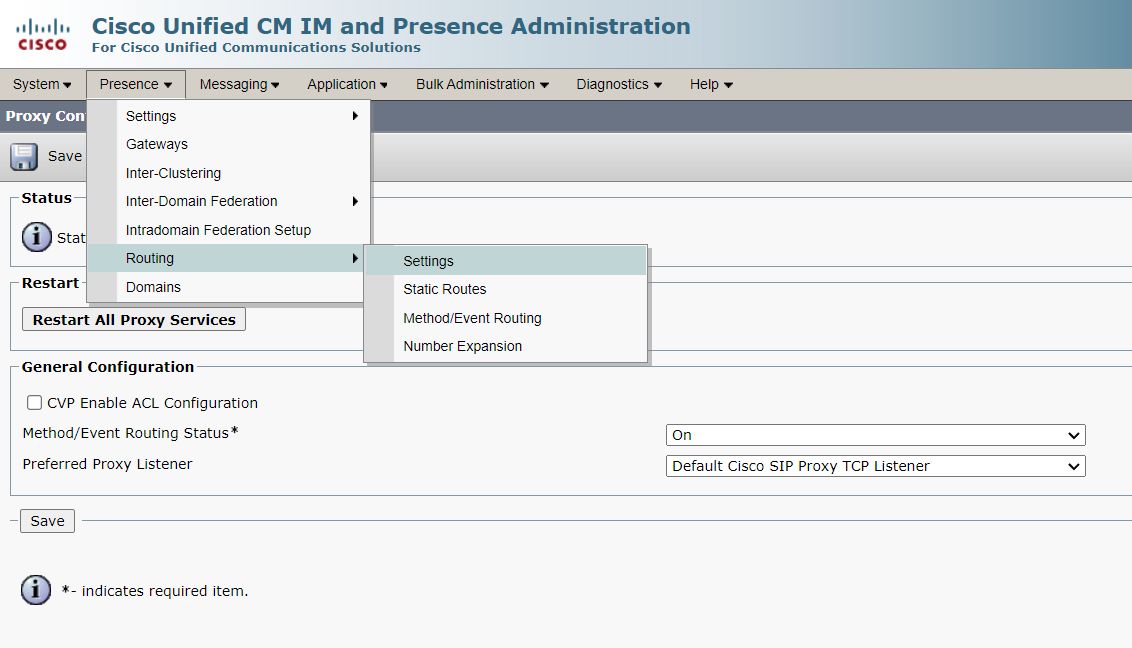
5. Routing Settings
6. Static Routes
7. TLS Context Configuration

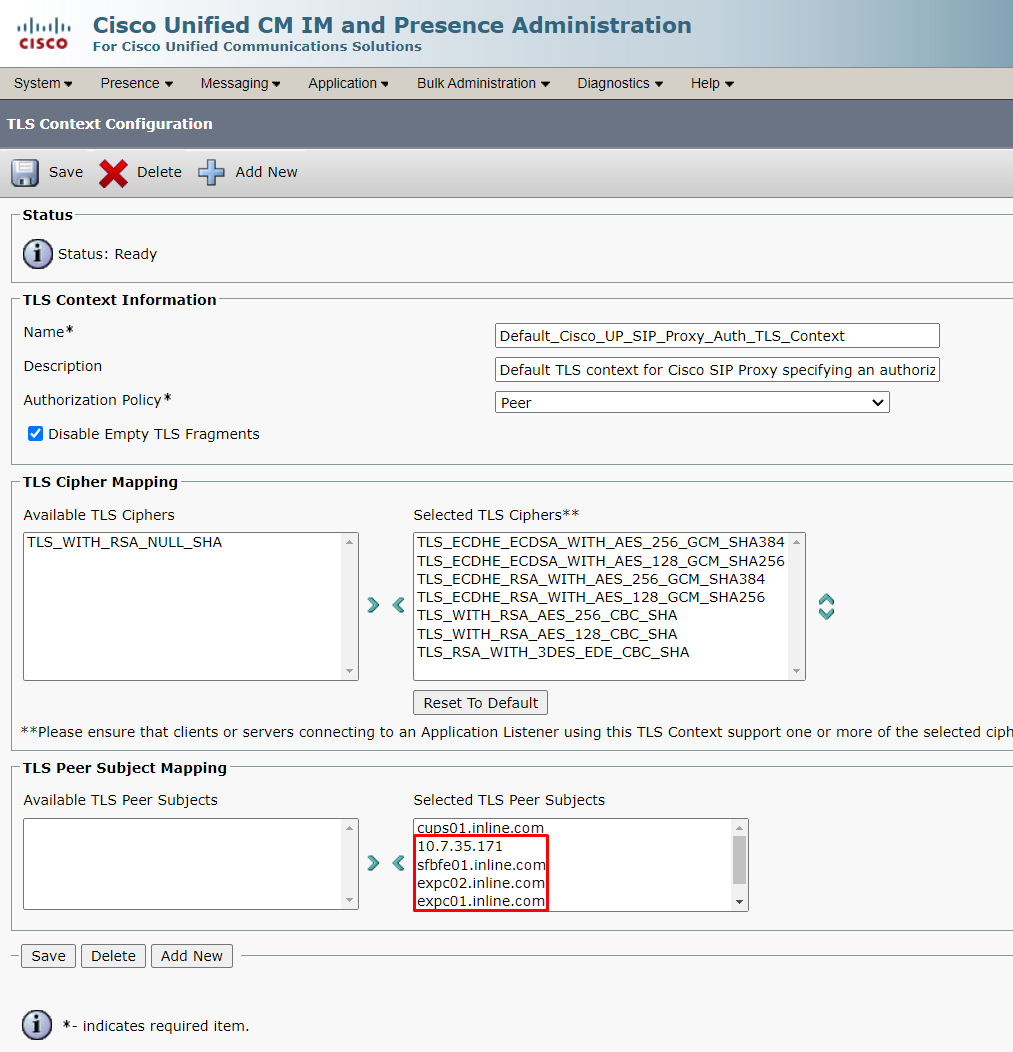
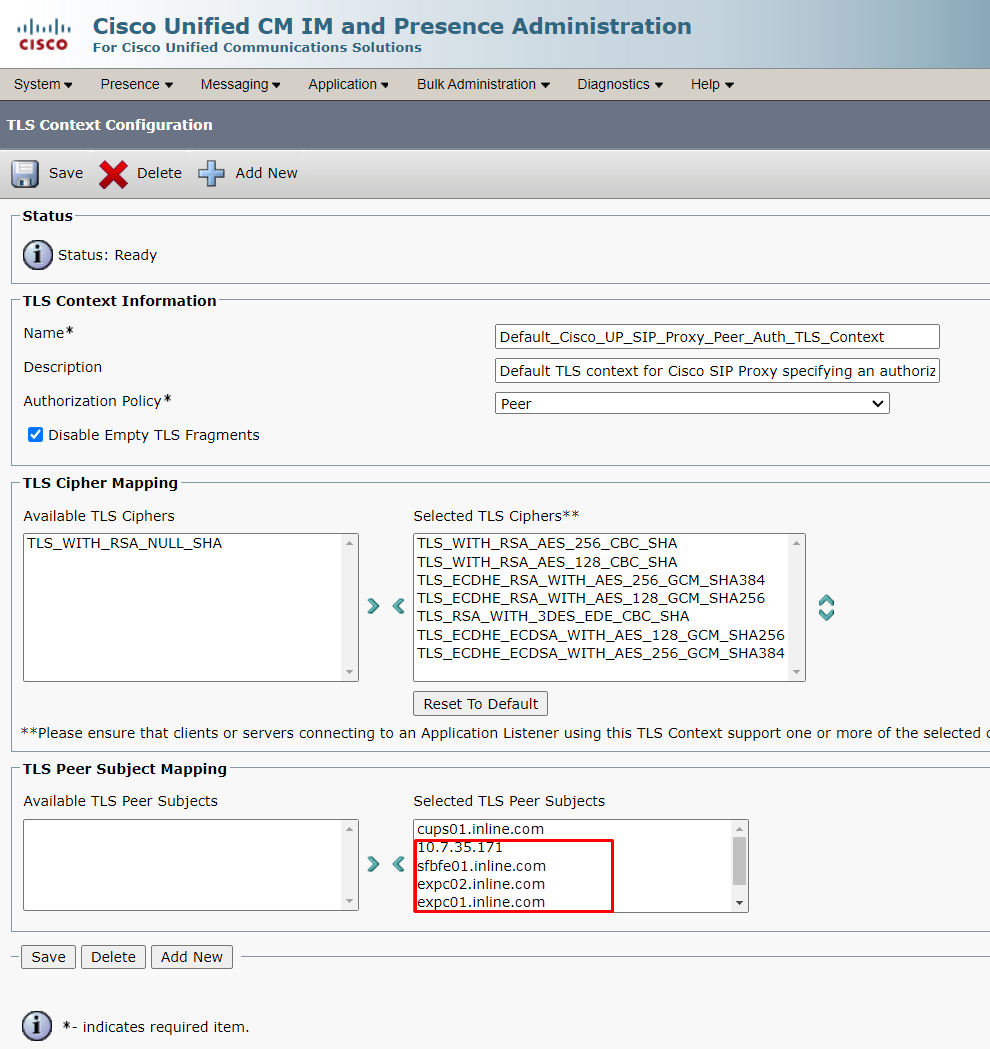
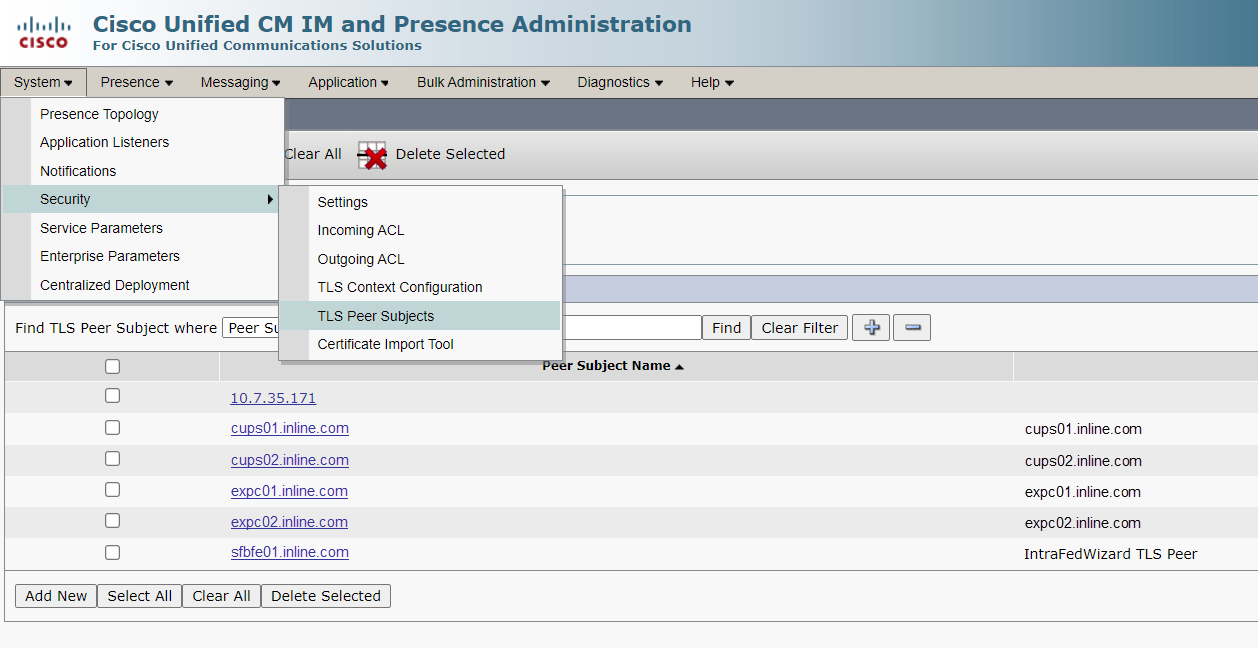
8. TLS Peer Subjects
Setting up Skype for Business
Setting up trust relationships with Cisco servers
1.1. Setting up trust with CMS
Create a CMS pool:
New-CsTrustedApplicationPool -Identity cms.inline.com -Registrar sfbfe01.inline.com -Site 1 -RequiresReplication $false -ThrottleAsServer $true -TreatAsAuthenticated $true -ComputerFqdn cms01.inline.com
Add CMS servers to the pool:
New-CsTrustedApplicationComputer -Identity cms02.inline.com -Pool cms.inline.com
New-CsTrustedApplicationComputer -Identity cms03.inline.com -Pool cms.inline.com
Create a CMS application:
New-CsTrustedApplication -ApplicationId CiscoCMS -TrustedApplicationPoolFqdn cms.inline.com -Port 5061
1.2. Setting up trust with CUPS
Create a CUPS pool:
New-CsTrustedApplicationPool -Identity cups.inline.com -Registrar sfbfe01.inline.com -Site 1 -RequiresReplication $false -ThrottleAsServer $true -TreatAsAuthenticated $true -ComputerFqdn cups01.inline.com
Add CUPS servers to the pool:
New-CsTrustedApplicationComputer -Identity cups02.inline.com -Pool cups.inline.com
Create a CUPS application:
New-CsTrustedApplication -ApplicationId CiscoImPres -TrustedApplicationPoolFqdn cups.inline.com -Port 5061
1.3. Setting up trust with Expressway-C
Create an Expressway-C pool:
New-CsTrustedApplicationPool -Identity expc.inline.com -Registrar sfbfe01.inline.com -Site 1 -RequiresReplication $false -ThrottleAsServer $true -TreatAsAuthenticated $true -ComputerFqdn expc01.inline.com
Add Expressway-C servers to the pool:
New-CsTrustedApplicationComputer -Identity expc02.inline.com -Pool expc.inline.com
Create an Expressway-C application:
New-CsTrustedApplication -ApplicationId CiscoExpWay -TrustedApplicationPoolFqdn expc.inline.com -Port 5061
1.4. Applying settings
Save topology settings:
Enable-CsTopology
Restart services on Front End servers:
Stop-CsWindowsService
Start-CsWindowsService
Setting up routes
2.1. Setting up the root domain
$x1 = New-CsStaticRoute -TLSRoute -Destination 'expc.inline.com' -MatchUri 'uc.inline.com' -Port 5061 -UseDefaultCertificate $true
Set-CsStaticRoutingConfiguration -Identity Global -Route @{Add=$x1}
2.2. Setting up additional domains
If it is necessary to add routes to additional domains, change the MatchUri field value:
$x2 = New-CsStaticRoute -TLSRoute -Destination 'expc.inline.com' -MatchUri '' -Port 5061 -UseDefaultCertificate $true Set-CsStaticRoutingConfiguration -Identity Global -Route @{Add=$x2}
2.3. Applying settings
Saving topology settings:
Enable-CsTopology
Restarting services on Front End servers:
Stop-CsWindowsService
Start-CsWindowsService
Configuring trusted certificates
3.1. On Front End servers, open the MMC Certificates snap-in (Computer).
3.2. Proceed to the Trusted Root Certification Authorities section.
3.3. Make sure that the certificate of the root CA that issued the certificate for Cisco servers is present.
3.4. If it is missing, import the required root certificate.
Checking SFB Server Settings
4.1. Address book settings
It is recommended to make the address book policy settings WebSearchOnly. View the current settings:
Get-CsClientPolicy | ft Identity,AddressBookAvailability
Change settings:
Set-CsClientPolicy Global –AddressBookAvailability WebSearchOnly
4.2. Media traffic encryption support settings
It is recommended to set the media traffic encryption settings to SupportEncryption. View the current settings:
Get-CsMediaConfiguration | ft Identity,EncryptionLevel
Change settings:
Set-CsMediaConfiguration global -EncryptionLevel SupportEncryption
Moving a user to another UC system
5.1. Disabling a user on SFB.
Use PowerShell (or any other method) to prepare lists of user IDs. The ID can be UPN, SIP Address, sAMAccountName, Display Name:
$SfbUsers = Get-CsUser –ResultSize Unlimited | ?{$_.SipAddress –like "*@uc.inline.com" –and $_.Enabled –like «True»} | select sAMAccountName,SipAddress,Enabled
Disable those users:
foreach($UcUser in $SfbUsers) {Disable-CsUser –Identity $UcUser.sAMAccountName –Confirm:$false}
5.2. Enabling msRTCSIP-PrimaryUserAddress attribute
After disabling users on SFB servers, fill in their msRTCSIP-PrimaryUserAddress attribute with the appropriate address that is used on the Cisco servers:
foreach($UcUser in $SfbUsers) {Set-AdUser –Identity $UcUser.sAMAccountName –Replace @{«msRTCSIP-PrimaryUserAddress»='sip:'+$($UcUser.sAMAccountName)+'@uc.inline.com'}}
The configuration process is complete.
Lets talk.


