 UCCX is possibly the only commercial call center platform that never makes you say “sorry, this is technically not feasible”. But it also has its disadvantages.
One of them is the caller’s number. Instead of the caller’s phone number, a call center phone gets the number of the CTI port that accepted the call. Actually, this behavior is correct: a call in a queue is placed on hold. As soon as an operator connects, the call is forwarded from the CTI port to the operator’s phone. When the operator picks it up, the caller’s phone number is already displayed. It often confuses contact center employees.
Since the version 10, UCCX has a function that helps to pass the caller’s number to a phone in a pop-up window. To do this, connect to UCCX via ssh (or connect to a terminal session directly) and enter the following command:
- utils uccx icd clid enable
You can change the pop-up window title:
- utils uccx icd clid header HEADER_LINE
And the prefix text to be displayed in front of the caller’s number:
- utils uccx icd clid prefix PREFIX_LINE
After these changes you should restart Cisco Unified CCX Engine. It is located in Cisco Unified CCX Serviceability\Tools\Control Center - Network Services.
If you are using an HA environment, these actions should be repeated for each node in a cluster.
Actually, this function meets the requirements of a call center working with external clients. However, what shall we do if a contact center works with the company’s internal users and the operators want to see the names the numbers are resolved into?
There is a certain number of requests for this function on supportforums.cisco.com, but at the time of version 10.6 it wasn’t even declared as planned, so we’ll create workarounds.
There are two options: one is easier, the other is more difficult.
We can either use a CUCM function: Corporate Directory (this is the easy option), or create a phone directory of our own based on CUCM DB (this is more difficult).
Create the following variables in the UCCX script:

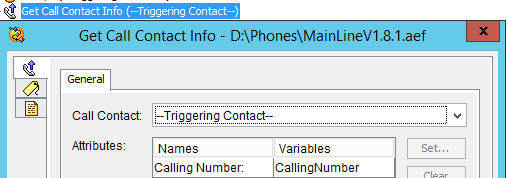
Add “Call Contact\Get Call Contact Info” action to the script:
Set the CUCMDirURL variable to the following value:
- http://CUCM_address:8080/ccmcip/xmldirectorylist.jsp – if you are using Corporate Directory;
- http://web-server/output_phone_directory_list.xml – if you are using your own directory.

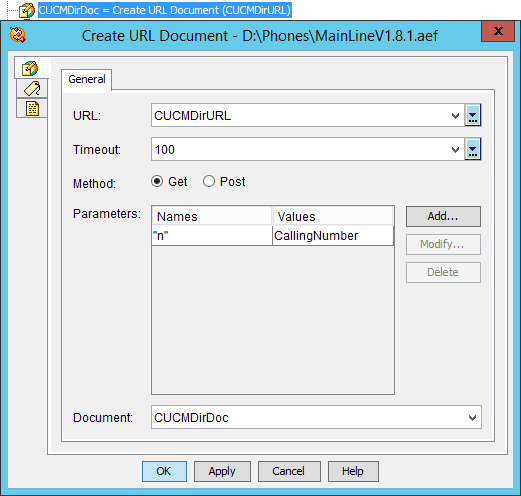
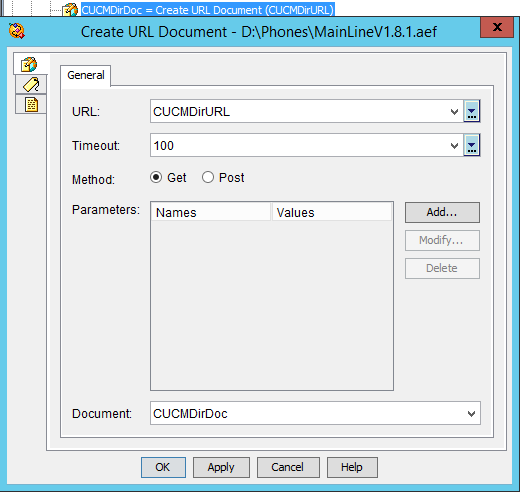
Create a URL document: Document\Create URL Document.
For Corporate Directory (pass a parameter named “n” with a value of “CallingNumber”):
You don’t have to pass any parameters for your own directory:
Create an XML document: Document\Create XML Document.

Assign a name that corresponds to the phone to the AlertingName variable (Document\Get XML Document Data). The XML request for Corporate Directory: ″//DirectoryEntry/Name″

For your own directory: ″/return/row[dn='″+CallingNumber+″‘]/alertingname″

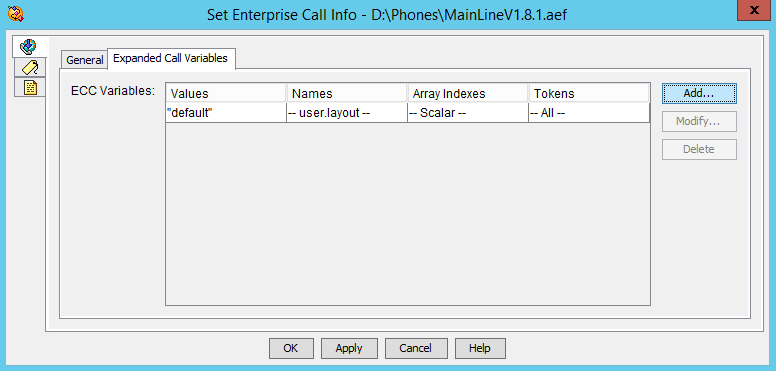
All output information will be displayed in CAD. First, create a variable for the name of the agent’s template: Settings\Expanded Call Variables…
Create a Scalar variable named user.layout.
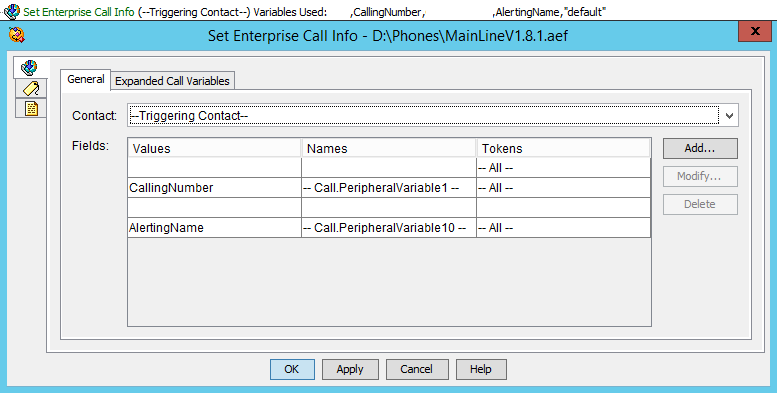
Then, after our XML manipulations, you should add a Call Contact\Set Enterprise Call Info action. On the General tab, add two variables named Call.PeripherialVariable (with numbers that have never been used in the script before). Assign the following values: CallingNumber and AlertingName. On the Expanded Call Variables tab, add a variable named “user.layout”. Set Array Indexes to Scalar, set the value to the name of the displaying template for CAD.
We’re done with the script now.
Now proceed to Cisco Desktop Administrator\Services Configuration\Enterprise Data\Fields. Find the Call Variables with the numbers you have set in Set Enterprise Call Info. Change the Display Names to something meaningful (for example, Calling Number for 1, Name for 10).
Proceed to Cisco Desktop Administrator\Services Configuration\Enterprise Data\Layout List and create a new Layout with the name specified in Set Enterprise Call Info. Add Call Variable 1 and Call Variable 10 to the Selected field.
If you are using Corporate Directory, then everything is ready for use. However, you should keep in mind that CUCM gets the data from your directory server. If it doesn’t contain all the data on the company’s phones or the data is cluttered for some reason, then your only option is to create an XML phone directory using the data downloaded from the CUCM database. You may also want to use a “directory or your own” if you have a database with your external clients’ numbers and other data that can be used to display specific information about the calling party in CAD.
The required data will be obtained through a SOAP request. Create an XML file with the following contents:
<?xml version=″1.0″ encoding=″UTF-8″?>
<soapenv:Envelope xmlns:soapenv=″http://schemas.xmlsoap.org/soap/envelope/″ xmlns:ns=″http://www.cisco.com/AXL/API/10.5″>
<soapenv:Header/>
<soapenv:Body>
<ns:executeSQLQuery>
<sql>
select distinct n.alertingname, n.dnorpattern as DN
from device as d, numplan as n, devicenumplanmap as dnpm
where dnpm.fkdevice = d.pkid and dnpm.fknumplan = n.pkid and d.tkmodel != 72 and ( d.tkclass = 1 or d.tkclass = 20 or d.tkclass = 254);
</sql>
</ns:executeSQLQuery>
</soapenv:Body>
</soapenv:Envelope>
The SQL request is marked in yellow. Basically, we pick alertingname and number fields. We only use the active phone numbers with associated IP phones, device profiles or remote destination profiles (d.tkclass = 1 or d.tkclass = 20 or d.tkclass = 254) and make sure that the device model is not a CTI Port (d.tkmodel != 72).
Make sure that Cisco AXL Web Service is activated on your CUCM (Cisco Unified Serviceability\Tools\Service Activation\Database and Admin Services).
Create a user on CUCM (Cisco Unified CM Administration\User Management\End User) with the “Standard AXL API Access” role.
Now you can use cURL to send the following request to CUCM:
curl -k -u username:password -H ″Content-type: text/xml;″ -H
″SOAPAction:CUCM:DB ver=10.5″ -d @/path/to/xml/file/with/request.xml
https://cucm.local:8443/axl/ | awk ‘{print substr($0,202,length-264)}’
As a result, every phone number is going to look like:
<row>
<alertingname>Name</alertingname>
<dn>8800</dn>
</row>
CUCM forms the output enclosed in tags:
<?xml version=″1.0″ encoding=″UTF-8″?>
<soapenv:Envelope xmlns:soapenv=″http://schemas.xmlsoap.org/soap/envelope/″>
<soapenv:Body>
<ns:executeSQLQueryResponse xmlns:ns=″http://www.cisco.com/AXL/API/10.5″>
<return>
//output
</return>
</ns:executeSQLQueryResponse>
</soapenv:Body>
</soapenv:Envelope>
In fact, everything is correct, but UCCX’s built-in XML parser crashes while working with namespaces. These tags will be cut out by the awk script marked in yellow.
You can add this command to the scheduler, so it will be executed automatically, and redirect the output to an XML file available via http.
That’s it.