Cisco Collaboration and Contact Center Solutions - Messages with tag "Cisco Meeting Server"

Aurus Blog

This blog is to share our expertise in Cisco UCM, UCCX/UCCE and Cisco Meeting Server

  • Archive

    «   March 2024   »
    M T W T F S S
            1 2 3
    4 5 6 7 8 9 10
    11 12 13 14 15 16 17
    18 19 20 21 22 23 24
    25 26 27 28 29 30 31
                 

Notes on Cisco Meeting Server Setup

In this article I’ll gather some notes and tricks on Cisco Meeting Server setup.

Cisco Meeting Server Web Client

Web Client makes it possible for persons without any client at all (except for web browser) to join a conference. In a room you can get an invitation link and a PIN to be transferred to a meeting participant. However, this feature won’t work immediately after the installation. You have to add callbridge certificate to webbridge’s trusted services. Use the following command:

webbridge trust <CallBridge certificate>

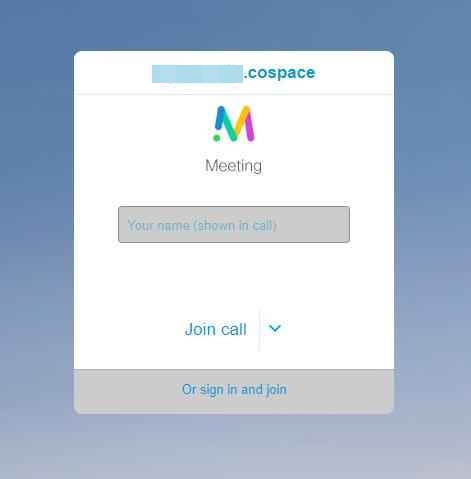
Then you’ll be able to pass links from CMS client to your partners, and they will be able to enter a conference room using just their names.

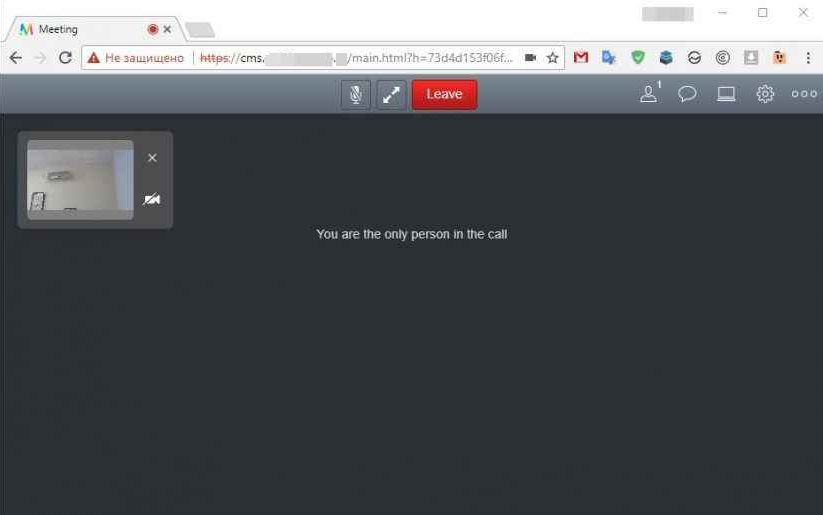
The clients will see the following form:

And then, the “contents” of the room.

The connections number restriction in Skype for Business

During a regular conference, we faced a restriction to the number of external Skype for Business participants. New participants ended up disconnected before entering the room. After we consulted specialists, we decided to increase the number of CMS registration at S4B servers.

To achieve that, we created 5 AD users for CMS and registered that accounts in Skype for Business. The pattern is username[1-9]. So, if we increase the number of connections up to 5, we have to add 5 users (username1, username2, username3, username4 and username5) and register the corresponding accounts in S4B.

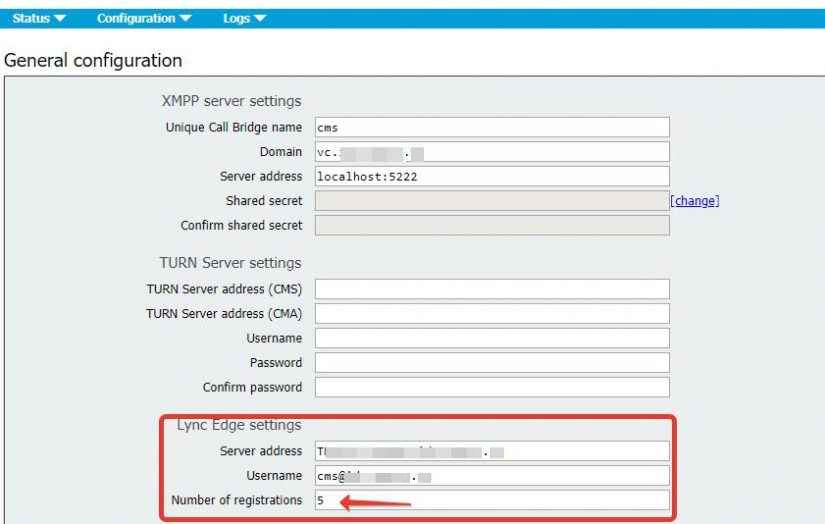
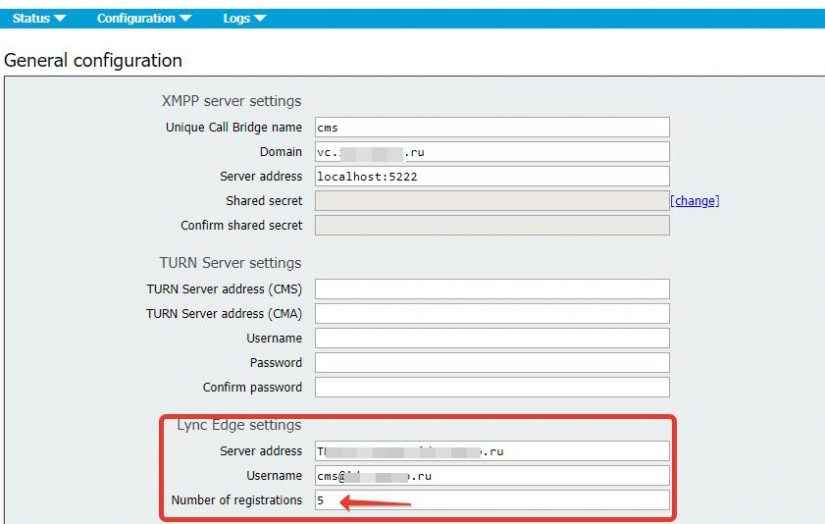
After that, enter the required number of connections in CMS settings.

As you can see on the picture above, we have created 5 users: cms1, cms2 .. cms5. After this simple operation we have never faced restrictions to the number of connections in a room again. We have had up to 25 participants.

Cisco Meeting Server Setup

Cisco Meeting Server is an audio and video conferencing solution. You can join clients from different software products (SIP, Cisco UCM, Skype for Business (Lync), etc.) in a single conference. This article includes some notes based on the results of the work done, with no claim to comprehensiveness.

Cisco Meeting Server Usage Scenario

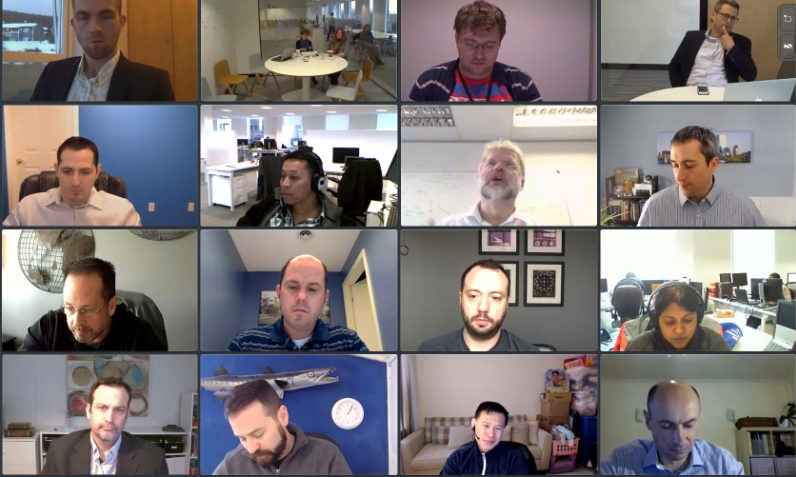
Our environment includes Skype for Business (S4B) and federations with several external partners. We often have to conduct meetings with many remote participants. S4B can only provide 5 simultaneous video streams in a conference, which is not enough. Cisco Meeting Server (CMS) can bypass that restriction, with additional possibility to adjust the layout of video streams in S4B interface for the clients. Like that, for example:

CMS virtual rooms allow not only to invite participants, but also to add clients that don’t have any compatible software at all, using a WebRTC client or a plain telephone call.

Cisco Meeting Server Installation

CMS can be deployed as a standalone piece of hardware as well as a VM. We used a template to deploy a VM on VMWare ESXi. There is also a Hyper-V template. The deployment process is trivial. The only trick, recommended in CMS documentation, is to set the required number of CPU cores (vCPU).

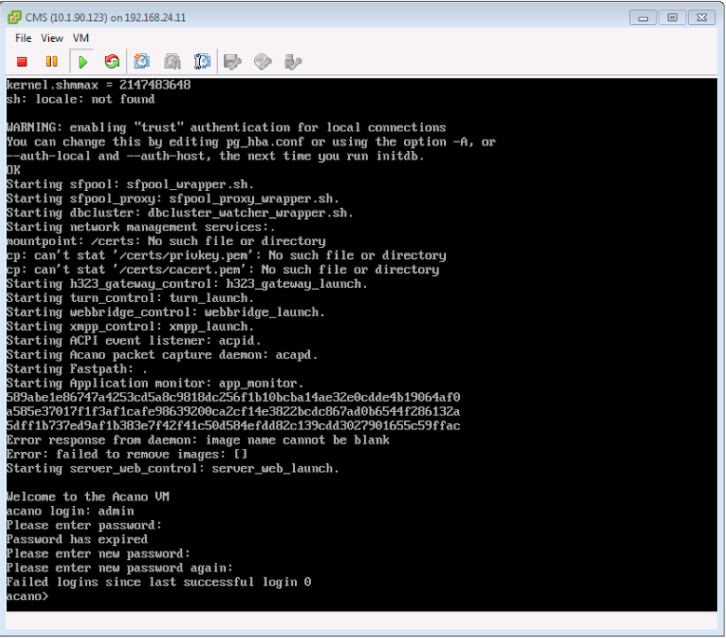
After the deployment is over, open the server console and log in. The default CMS login/password is admin/admin. The system will prompt you to change the password.

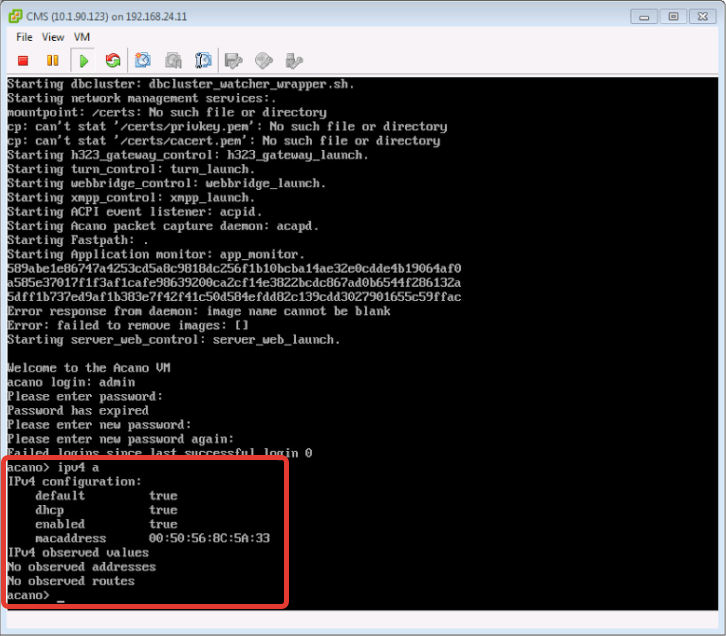
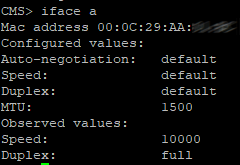
Now you should configure the network parameters. If you have DHCP, you can use ipv4 a command to check the issued address at once.

a” is the name of the first network interface. In CMS, they are named with letters. The next one will be “b”, etc.

You should also save the MAC address from this command’s output. You’ll need it to get a trial or permanent license for CMS.

If DHCP server is unavailable for CMS, you should set an IP address manually. Use the following command:

ipv4 a add x.x.x.x/y z.z.z.z

with x.x.x.x standing for the address, y — the net mask, z.z.z.z — the default gateway. For example:

ipv4 a add 192.168.1.250/24 192.168.1.1

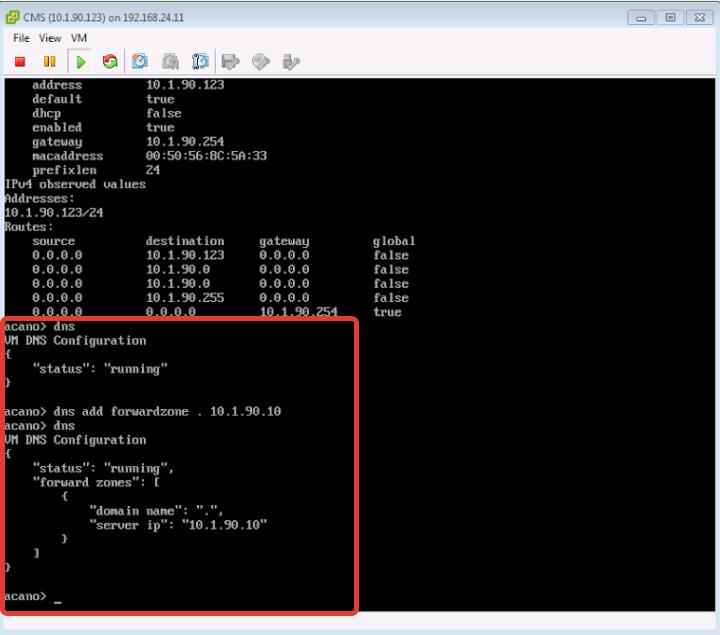
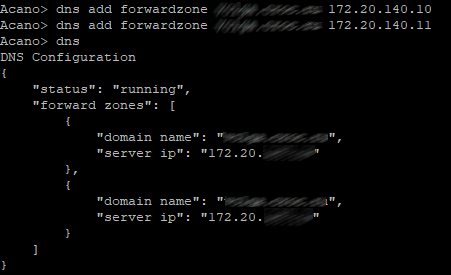
The next step is to configure the DNS server. Use the following command:

dns add forwardzone . y.y.y.y

with y.y.y.y standing for the address of your DNS server with Active Directory zone. The dot means forwarding all requests to the specified server. Use dns command to view the DNS settings.

The network configuration is over. Now you can ping the specified address and log in to CMS via ssh.

CMS Webadmin Configuration

The next step is to configure CMS administration panel. First of all, get an SSL certificate. There are 2 options: to issue a self-signed certificate, or to sign a certificate in your domain certification service (local CA). (You can purchase a certificate as well).

To issue a self-signed certificate, execute the following command:

pki selfsigned webadmin

(webadmin is the name for your key and certificate, you will need it later).

Personally, we decided to issue a certificate signed by a local CA, using a single certificate for all CMS services.

When you are planning a deployment, you have to choose a domain for CMS and host. For example, if domain.com is your domain where S4B is deployed, then it would be better to deploy CMS in a subdomain (e.g. vc.domain.com), so you can configure call routing from S4B to CMS. You should keep this decision in mind while creating a certificate for all services.

The command is:

pki csr onecert CN:cms.vc.domain.com

with onecert standing for the certificate name, CN:cms.vc.domain.com – the CMS host address configured in DNS.

Now you should copy the CSR file to your computer via SSH and issue a certificate for this file. Then upload the resultant certificate with .cer extension to CMS.

Now you can configure webadmin:

webadmin cert onecert.key onecert.cer
webadmin listen a 445
webadmin restart
webadmin enable

We have chosen port 445 because the standard port 443 may be needed later for a webrtc client for guest access.

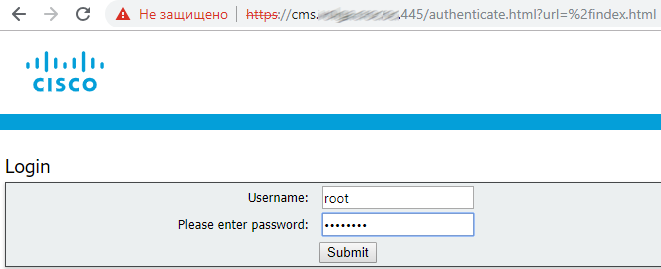
Now you can access the admin panel using a URL like this one: https://cms.vc.domain.com:445

Cisco Meeting Server License Installation

After you have entered CMS webadmin, you’ll see the following warning:

You have to get and install a license file. Send the previously obtained MAC address to Cisco and wait for an answer with a license file.

Save that file and rename it into cms.lic, then upload it to CMS via an ssh client (e.g. WinSCP).

Now you should configure and run callbridge. You will need a certificate again. We used a single certificate for all services, so the configuration commands looked like this:

callbridge certs onecert.key onecert.cer
callbridge listen a
callbridge restart

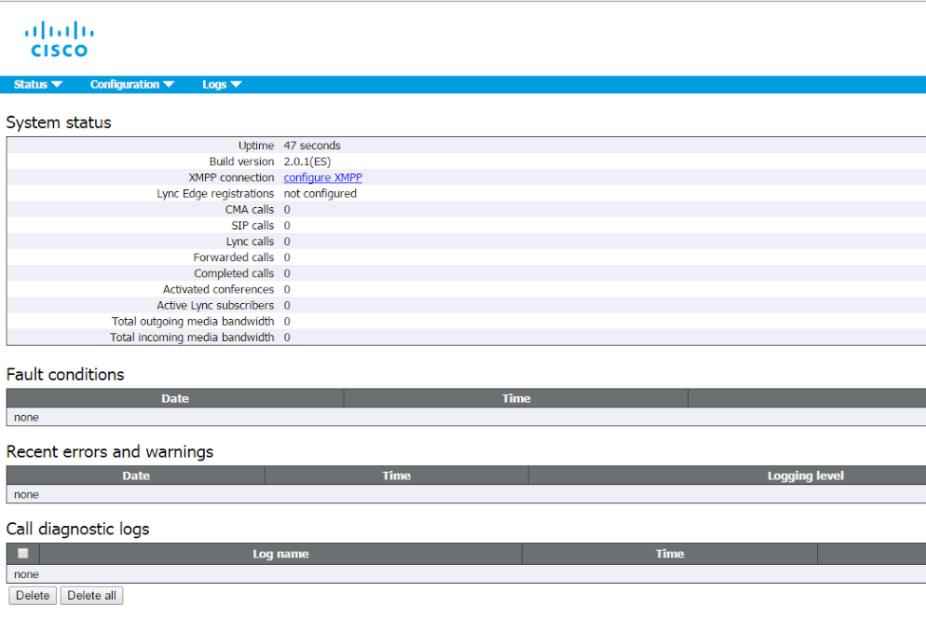
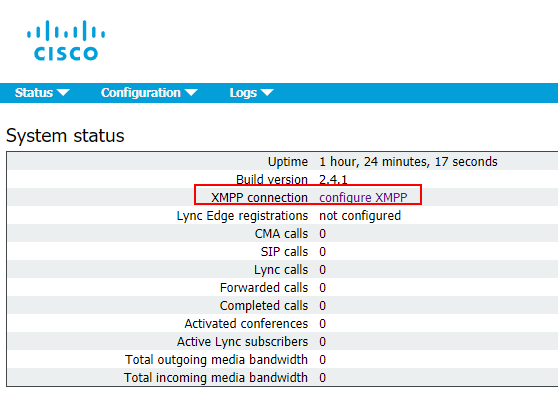
If you log in to webadmin now, you’ll see that the warning is gone.

The first part of configuration is done.

Cisco Meeting Server Cluster: Scalability and Resilience deployment with meeting recording - PART 3

In the previous part of this article we’ve described the configuration of database, Call Bridge and XMPP clusters, as well as Web Admin service. We have also connected Call Bridge to XMPP and performed the Web Bridge configuration.

In this part of the article, we’ll finish discussing the details of CMS clustered deployment and configuration.

Call Bridge Groups

By default, CMS may use the available conferencing resources inefficiently.

For example, in a meeting with three participants, all participants may end up being on three different Call Bridges. For these participants to be able to communicate, Call Bridges will automatically create connections between all servers and clients using a single Space, so it will look as though all clients are using the same server. Unfortunately, such conference of 3 participants will take 9 media ports. This is inefficient resource usage. Besides that, when Call Bridge is really overloaded, the default procedure is to go on accepting calls and provide lower-quality service to all Call Bridge subscribers.

These problems can be solved with Call Bridge Group feature. This feature was introduced in Cisco Meeting Server 2.1 and extended to support load balancing for incoming and outgoing calls, Cisco Meeting App (CMA), including WebRTC participants.

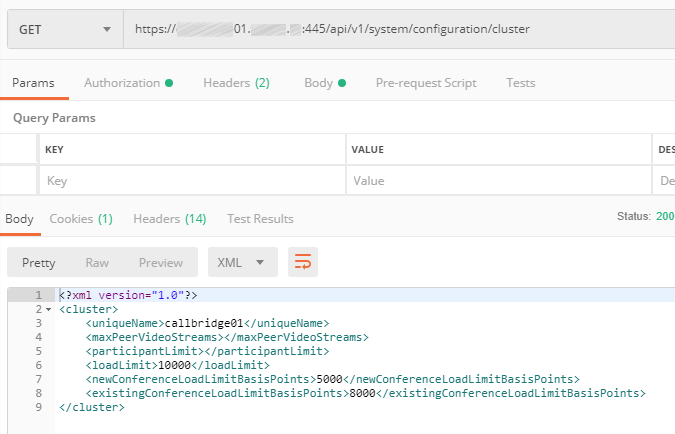
There are three load limits to be configured for each Call Bridge:

  • LoadLimit — maximum load value for a Call Bridge. Each platform has a recommended load limit, e.g. 96000 for CMS1000 and 1.25 GHz per virtual CPU for a virtual machine. Different calls require different amount of resources depending on the participant’s resolution and frame rate.
  • NewConferenceLoadLimitBasisPoints (by default, 50% of loadLimit) — maximum server load above which new conferences will be rejected.
  • ExistingConferenceLoadLimitBasisPoints (by default, 80% of loadLimit) — server load value above which new participants trying to join an existing conference will be rejected.

This feature was created for load balancing and call distribution. Other groups, such as TURN servers, Web Bridge servers and recording devices, can also be assigned to Call Bridge Groups, so they can also be grouped correctly for optimal usage. If any of these objects is not assigned to a call group, it is considered available to all servers without any priority.

These parameters can be configured here: cms.example.com:445/api/v1/system/configuration/cluster

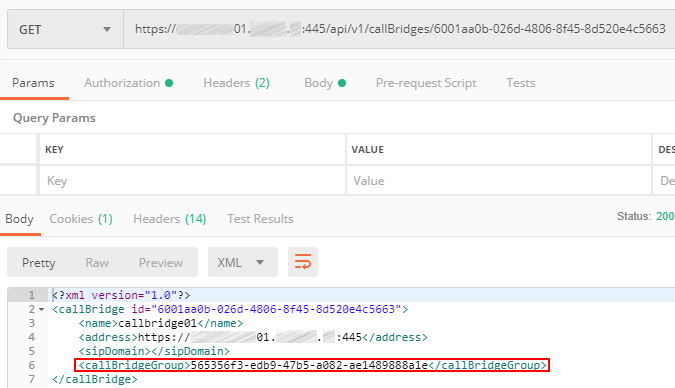
For each Call Bridge, set the Call Bridge Group it belongs to.

The first Call Bridge:

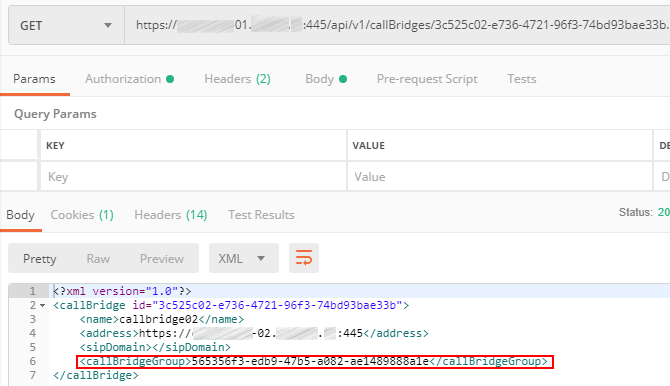
The second Call Bridge:

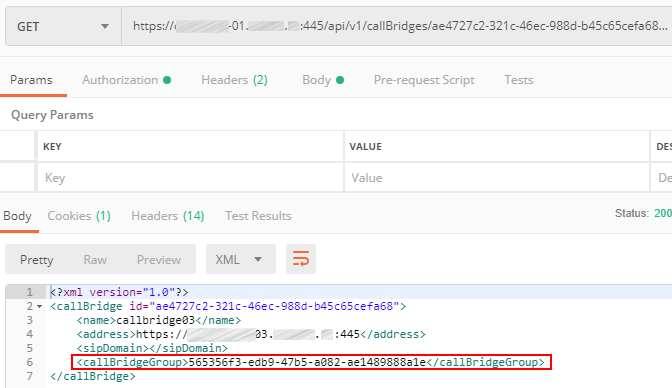
The third Call Bridge:

So, you have configured a Call Bridge Group for better usage of Cisco Meeting Server cluster resources.

Importing Active Directory Users

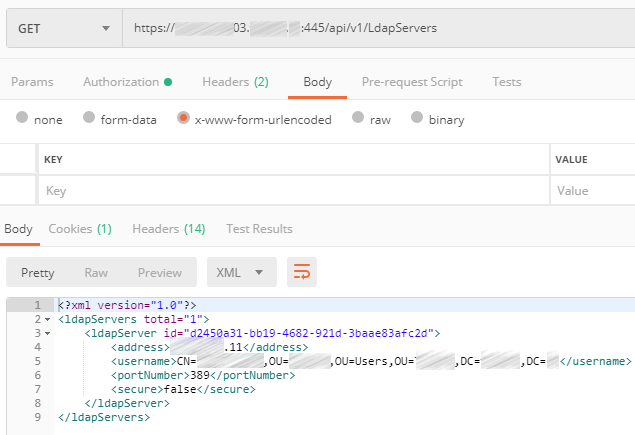
Web Admin Service has LDAP configuration section, but it doesn’t provide complex configuration parameters, and the information won’t be saved in the clustered database, so you’ll either have to perform the configuration manually on each server via Web interface, or do it through API. Let’s do it through API to save the time.

Use the URL: cms01.example.com:445/api/v1/ldapServers

Create a LDAP Server object with the following parameters:

  • server IP address
  • port number
  • username
  • password
  • secure

Set Secure to true or false depending on the port number: 389 — not secure, 636 — secure.

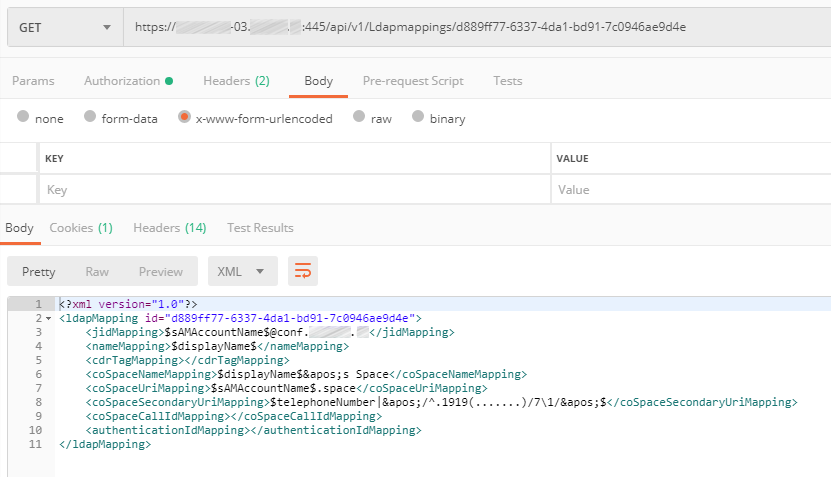
Map LDAP source parameters to attributes in Cisco Meeting Server:

  • jidMapping
  • nameMapping
  • coSpaceNameMapping
  • coSpaceUriMapping
  • coSpaceSecondaryUriMapping

Attribute description

JID is an identifier for CMS login. It will be mapped onto sAMAccountName in LDAP, which is user’s login identifier in Microsoft Active Directory. Note that you should take sAMAccountName and append the domain name conf.pod6.cms.lab. This is the login name for your CMS users.

nameMapping maps the contents of Active Directory displayName field onto CMS user’s name.

coSpaceNameMapping creates CMS Space name based on the displayName field. This attribute along with coSpaceUriMapping is required for each user’s Space creation.

coSpaceUriMapping defines the user’s part of URI, associated with user’s personal Space. Some domains can be configured for dialing into a space. If the user’s part matches this field for one of those domains, the call will be routed into this user’s Space.

coSpaceSecondaryUriMapping defines a second URI to reach the Space. You will use this to add a numeric alias to route calls into the imported user's Space as an alternative to the alphanumeric URI defined in the coSpaceUriMapping parameter.

LDAP server and mapping are configured. Now you should create a LDAP source to bind them together.

Use the URL: cms01.example.com:445/api/v1/ldapSource
Create a LDAP Source object with the following attributes:

  • server
  • mapping
  • baseDn
  • filter

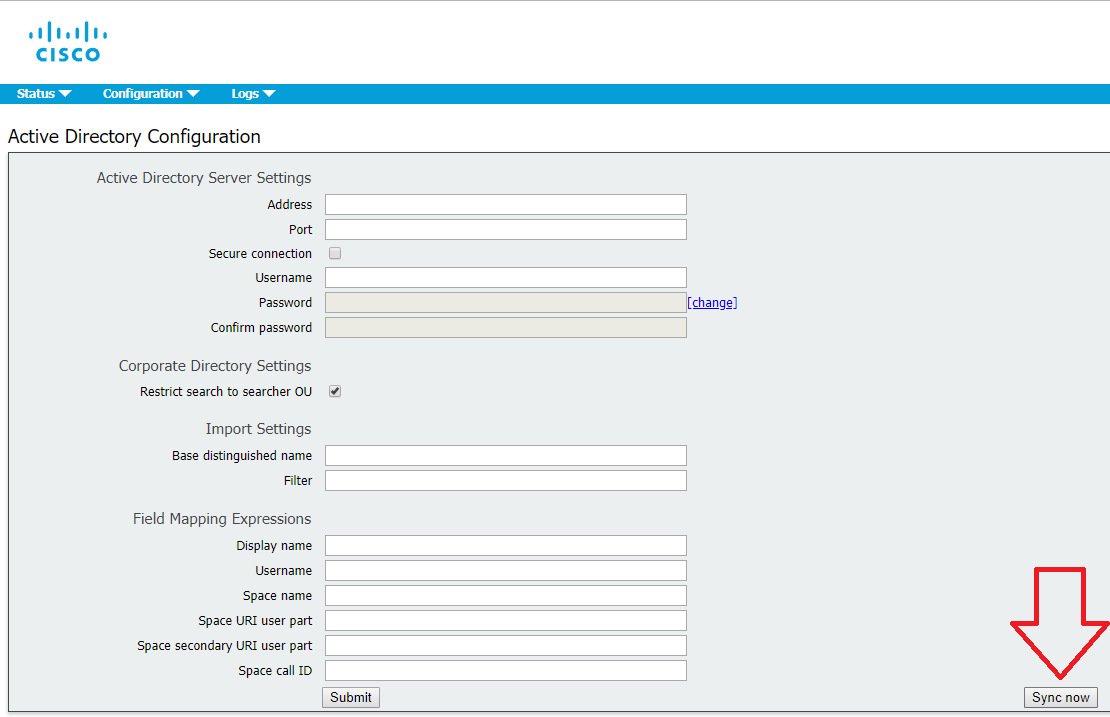
Now the LDAP configuration is over, so you can perform manual synchronization. You can either do it in each server’s Web interface (Active Directory section > Sync now button) or through API using a POST command (URL: cms01.example.com:445/api/v1/ldapSyncs).

Ad Hoc Conferences

What’s that?

In traditional Unified CM telephony, ad-hoc conferencing is a call by which two participants are talking directly to one another when one party (using a device registered to the Unified CM) presses the Conference button, calls a different person, and after talking to that 3rd party, presses the Conference button again to join everyone into a 3-party conference.

What makes this feature different than a scheduled or permanent conference is that an adhoc conference is not simply a SIP call to the CMS. When the conference initiator presses the Conference button the second time to bring everyone into the same meeting, Unified CM must make an API call to CMS to create a conference on the fly, to which all the calls are then transferred. All this happens transparently to the participants.

This means that Unified CM needs to have the API credentials and Web Admin address/port configured, as well as a SIP trunk directly to the CMS server in order to extend the call.

When required, CUCM can then dynamically create a Space on CMS, so that each call can be extended directly to CMS and match an Incoming call rule that targets Spaces.

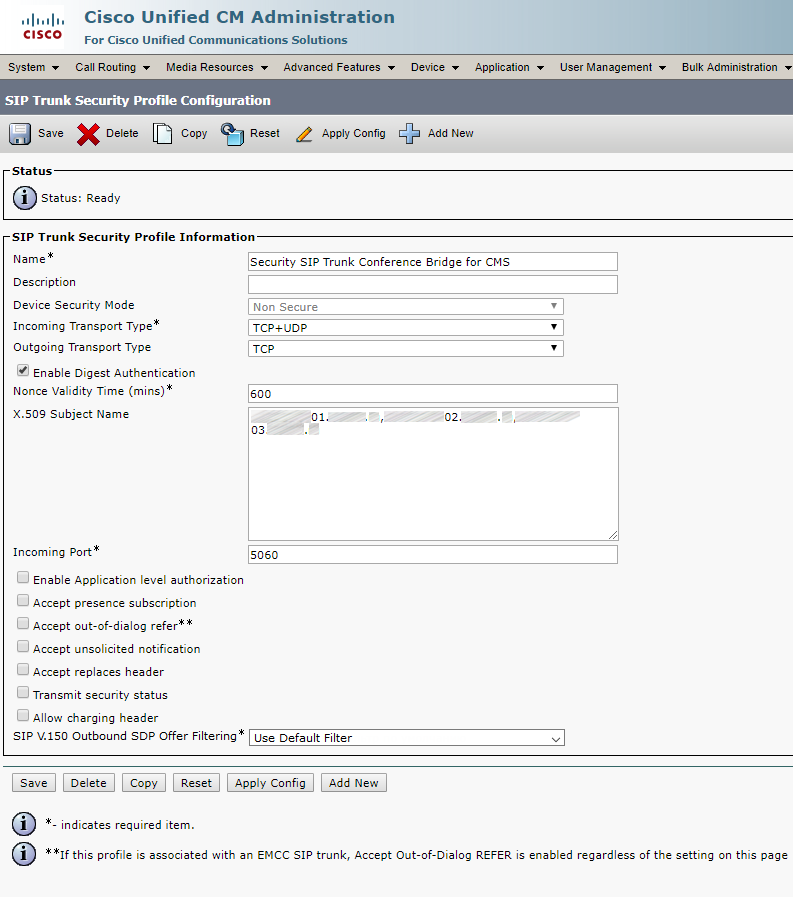
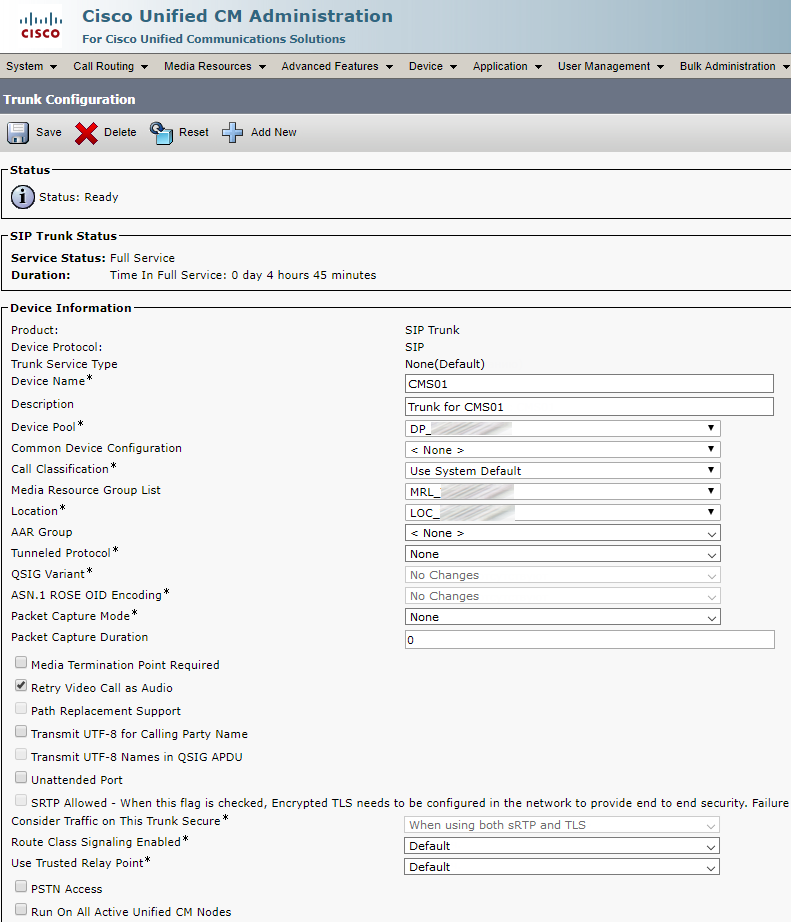
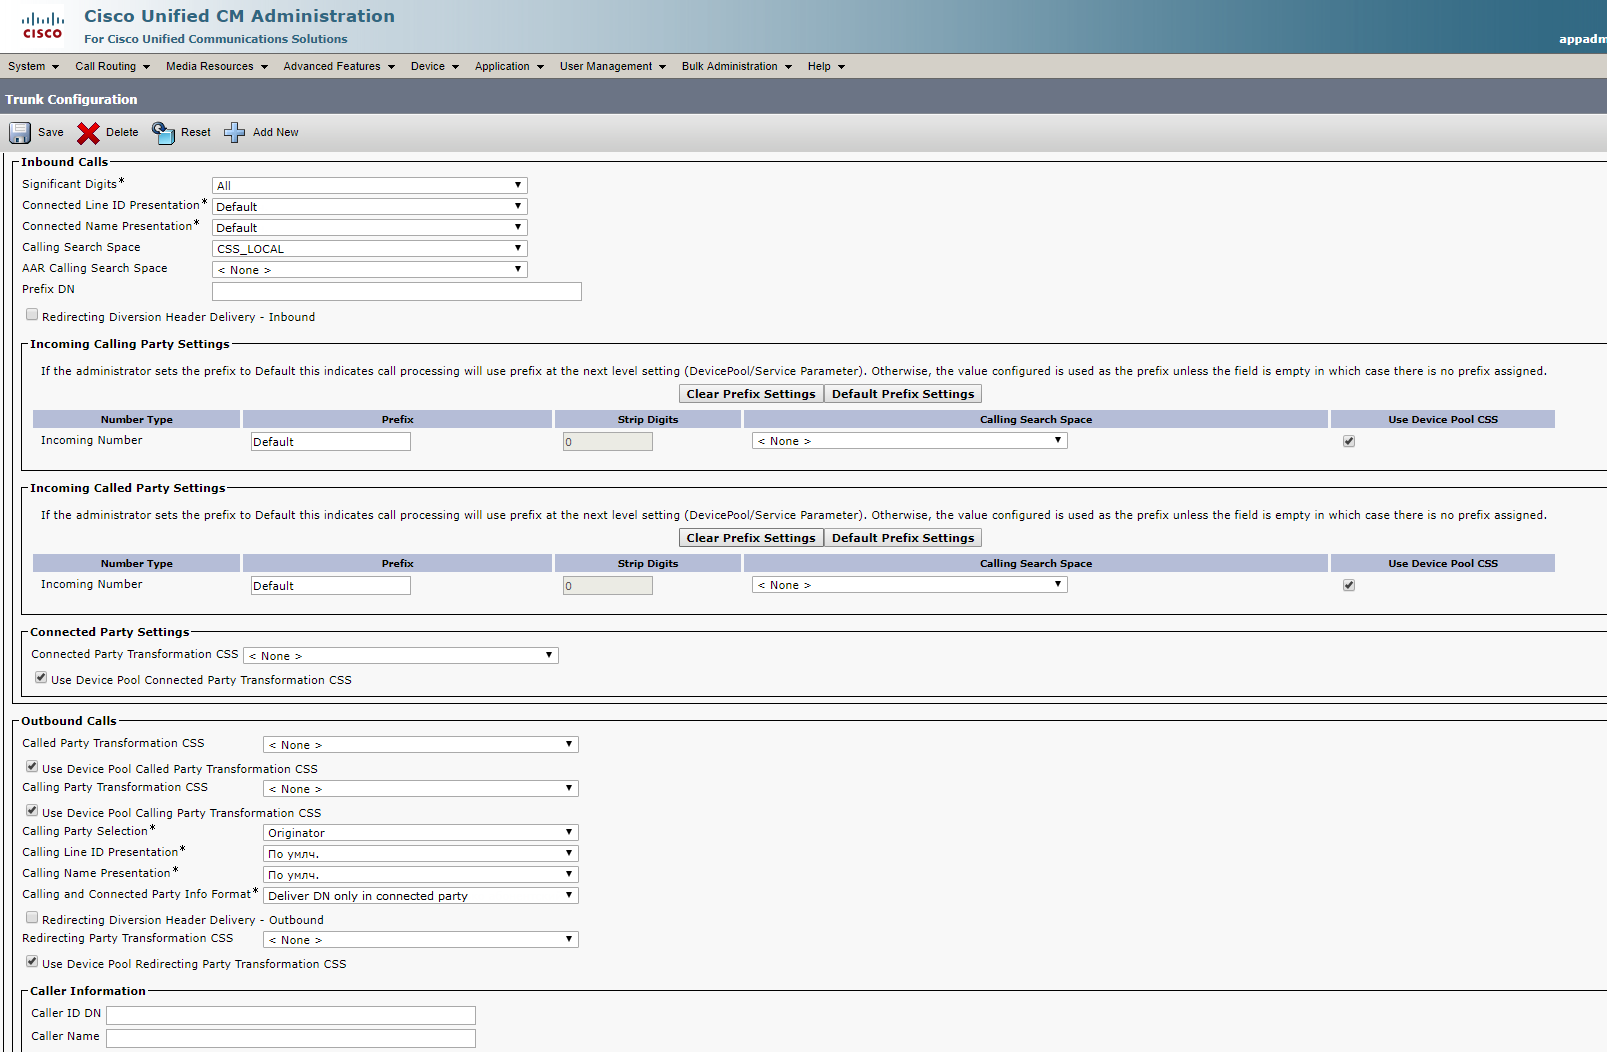
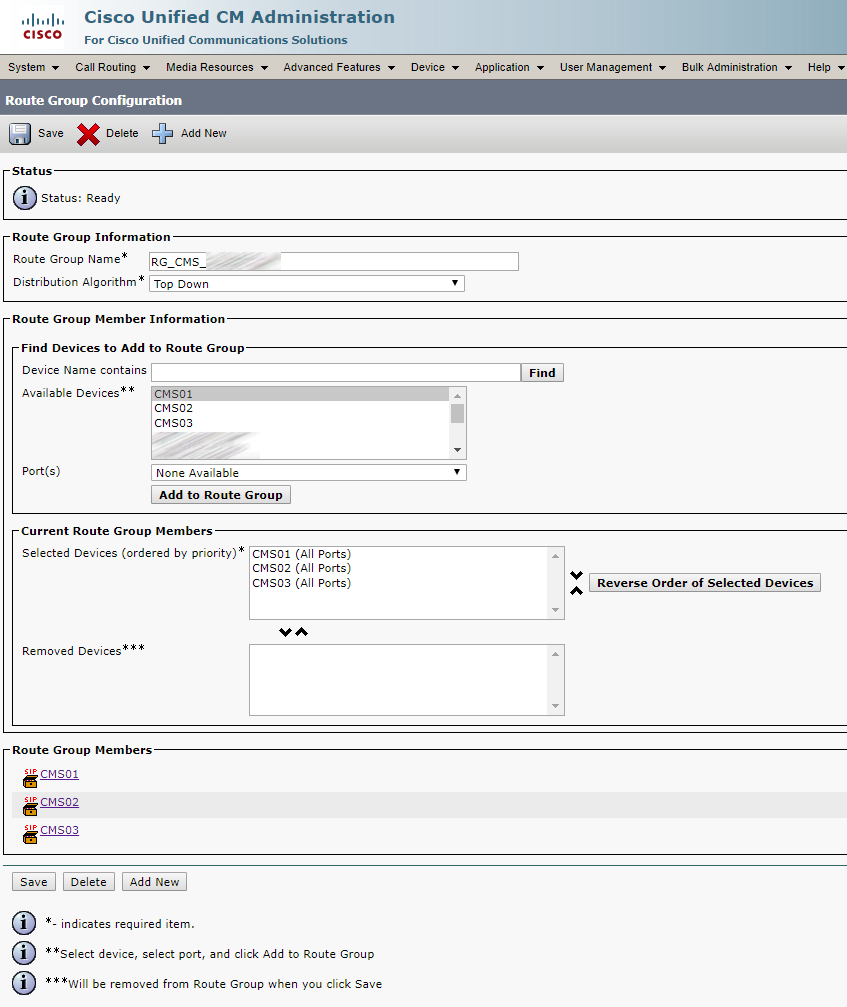
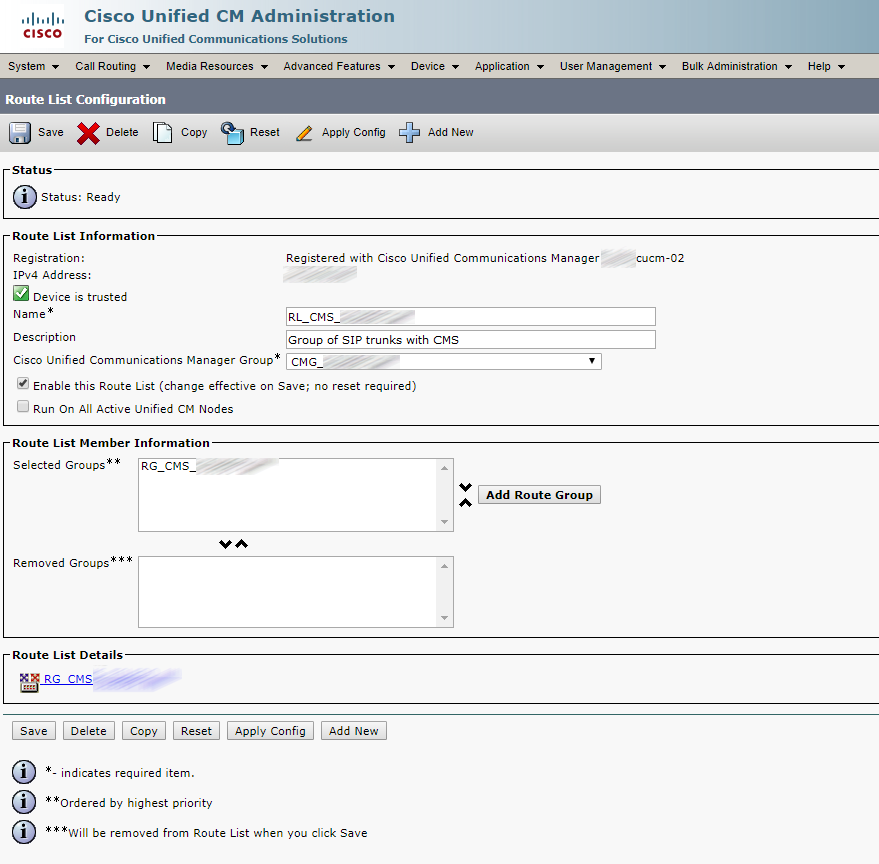
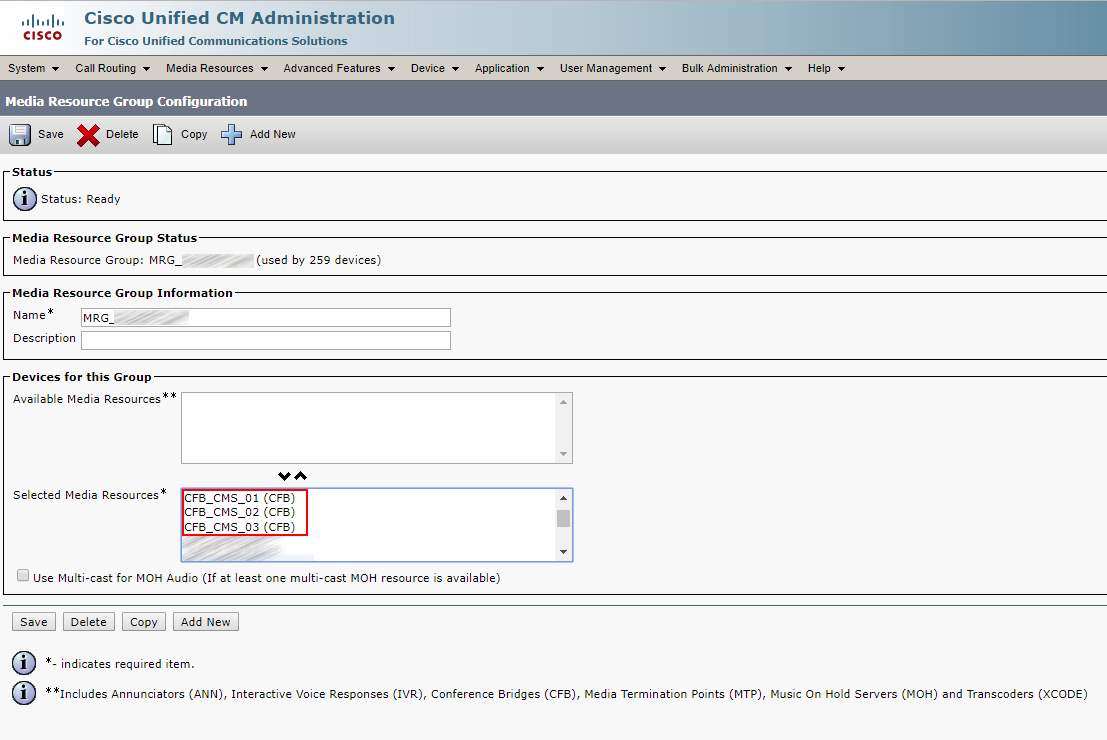
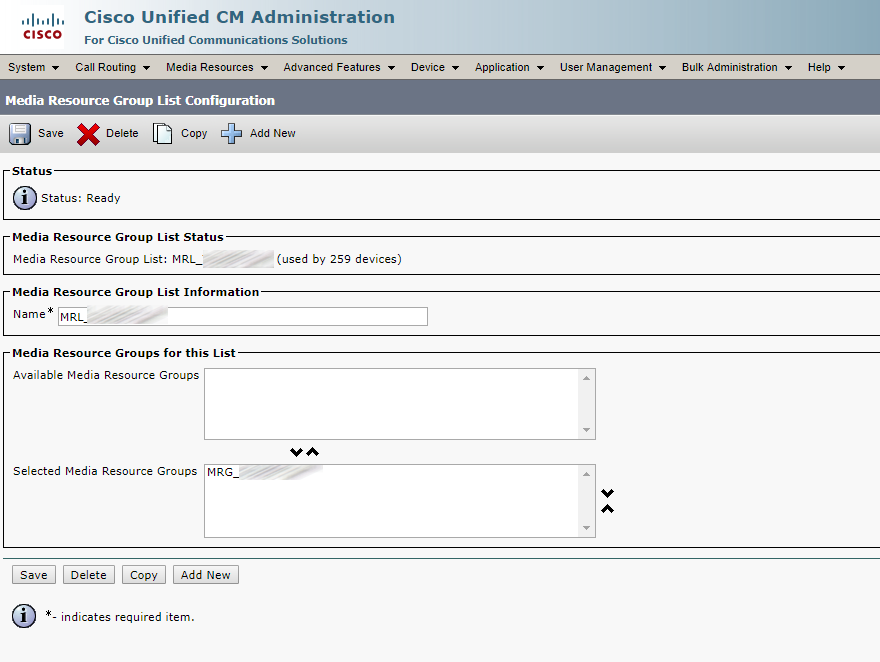
Integration with CUCM is similar to the described in an earlier article, but this time you must create three CMS trunks and three Conference Bridges, enter three Subject Names in SIP Security Profile, configure Route Group, Route List, Media Resource Group and Media Resource Group List correspondingly, and add some routing rules on Cisco Meeting Server.

SIP Security Profile:

Trunks:

Each trunk looks similarly:

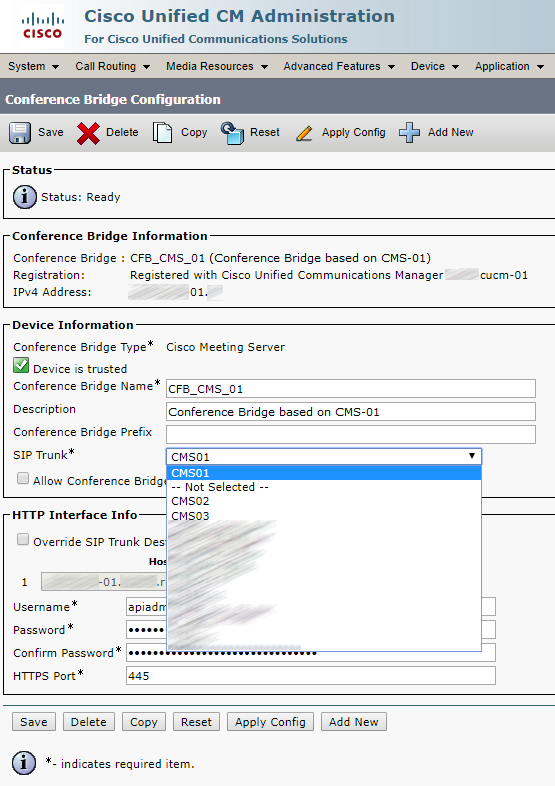
Conference Bridge

Each Conference Bridge looks similarly:

Route Group

Route List

Media Resource Group

Media Resource Group List

Call Routing Rules

Unlike more advanced call management systems (Unified CM or Expressway), CMS only looks at the domain in the SIP Request-URI field. So if the SIP INVITE is destined to sip:user@domain.com, CMS only cares about the domain.com. CMS follows these rules for determining where to route a call:

  • 1. CMS tries to match the SIP domain to those configured on the Incoming call matching rules. Those calls can then be routed to any configured Spaces, logged-in users, internal IVRs, or to look up a conference on a Microsoft Lync / Skype for Business (S4B) integration.
  • 2. If there is no match on the Incoming call matching rules, CMS will try to match a domain configured in the Call forwarding table. If a match is made, the rule can explicitly reject a call or forward a call. At that time, CMS can re-write the domain, which is sometimes useful for calls to Lync domains. You can also choose to pass through the call, meaning that none of the fields will be further modified, or to use the internal CMS dial plan. If there is no match in the Call forwarding rules, the default behavior is to reject the call. Keep in mind that forwarding will still anchor the call at CMS, so you're essentially placing CMS in the middle of the call flow.
  • 3. Only forwarded calls are then subject to the Outbound call rules. These settings define the destinations where to send the calls, the trunk type (whether or not the new call will be Lync or standard SIP), and any transformations that may be performed, if pass-through is not selected in the call forwarding rule.

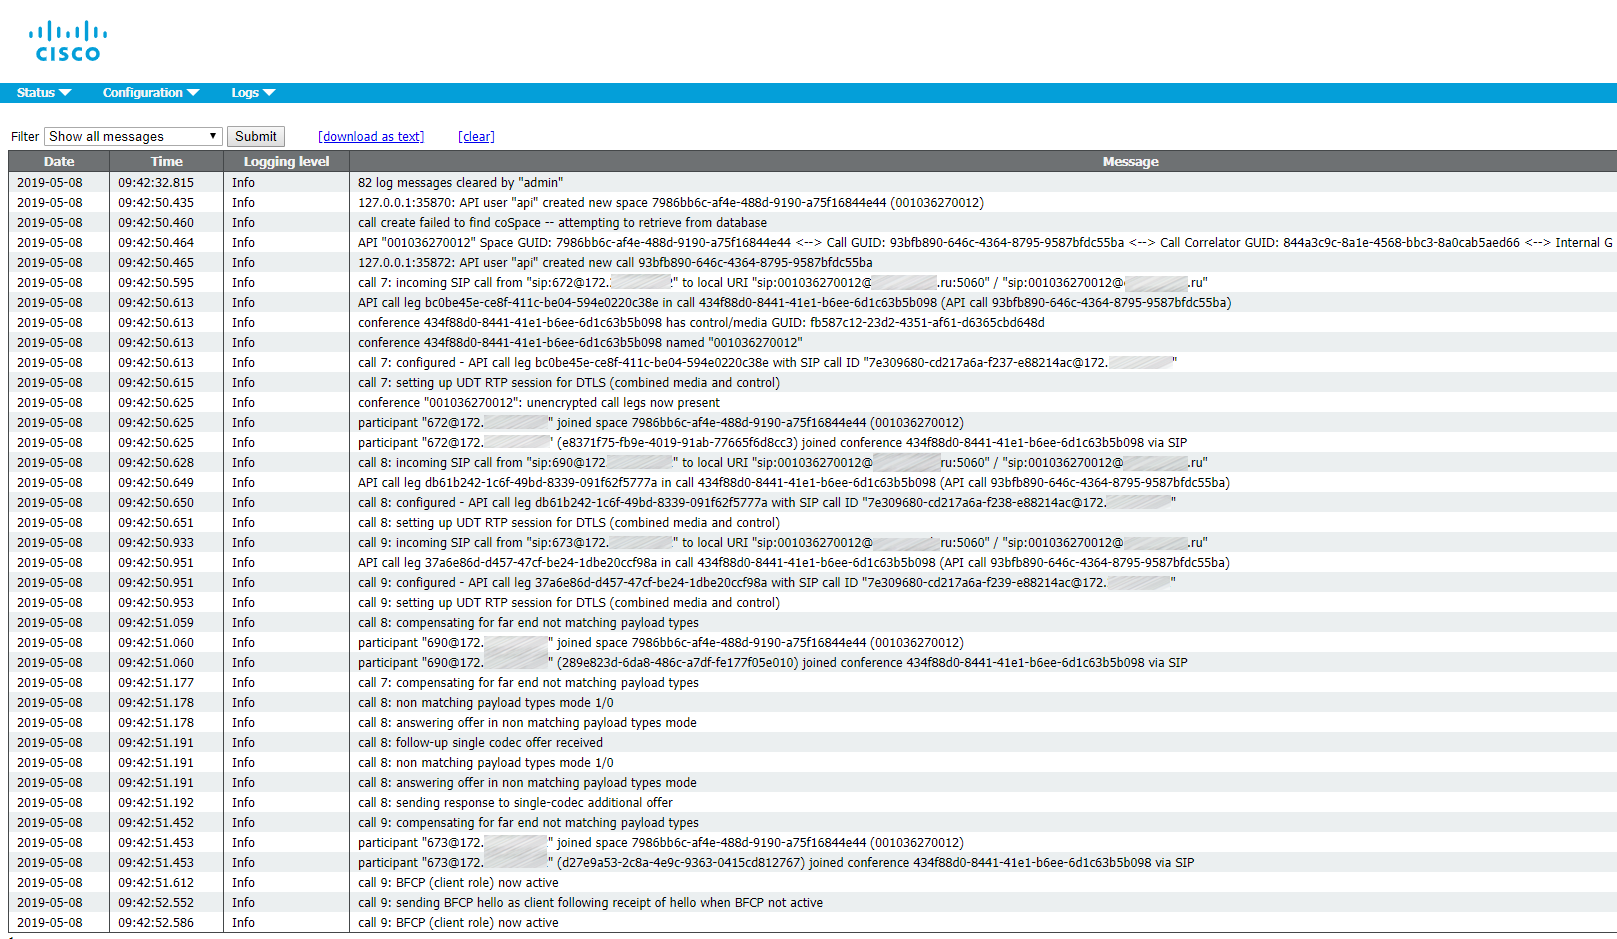
Here is a log of what’s happening during an Ad Hoc conference:

The Ad Hoc conference itself:

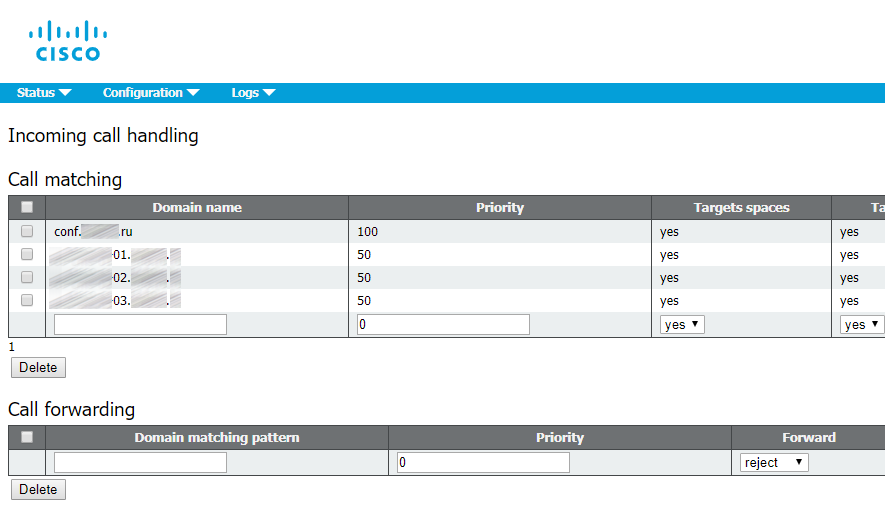
Incoming Call Rules

Configuring Incoming Call Settings is required to be able to receive a call on CMS. As you saw in the LDAP setup, all the users were imported with the domain conf.pod6.cms.lab. So at minimum, you want calls to that domain to target the Spaces. You will also need to set up rules for anything destined to the fully qualified domain name (and potentially even the IP address) of each of the CMS servers. Our external call control, Unified CM, will be configured with SIP trunks targeting each of the CMS servers individually. Depending on whether or not the destination of those SIP trunks is an IP address or the FQDN of the server will determine whether or not the CMS needs to be configured to accept calls destined to its IP address or FQDN.

The domain that has the highest priority Inbound rule is used as the domain for any user's Spaces. When users are synchronized via LDAP, CMS automatically creates Spaces, but only the user part of the URI (the coSpaceUriMapping), say user.space. The @domain part of the full URI is constructed based on this rule. In fact, if you were to log into Web Bridge at this point, you would see the Space URI has no domain. By setting this rule as the highest priority, you are setting the domain for the generated Spaces to conf.example.com.

Outbound Call Rules

To allow for users to make outbound calls to the Unified CM cluster you must configure an Outbound rule. The domain of your Unified CM-registered endpoints, such as Jabber, is example.com. Calls to this domain should be routed as standards-based SIP calls to the Unified CM's call processing nodes. These are cucm-01.example.com as the primary, and cucm-02.example.com as the secondary.

The first rule sets simple call routing between the cluster nodes.

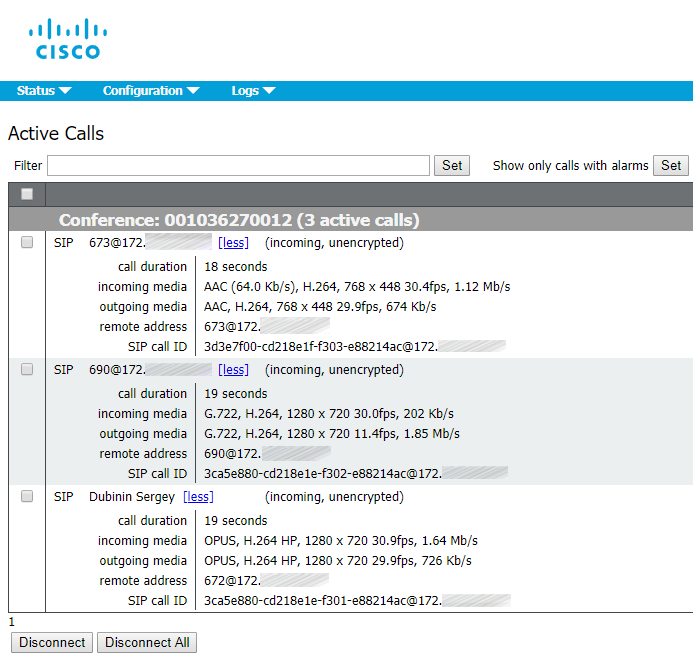
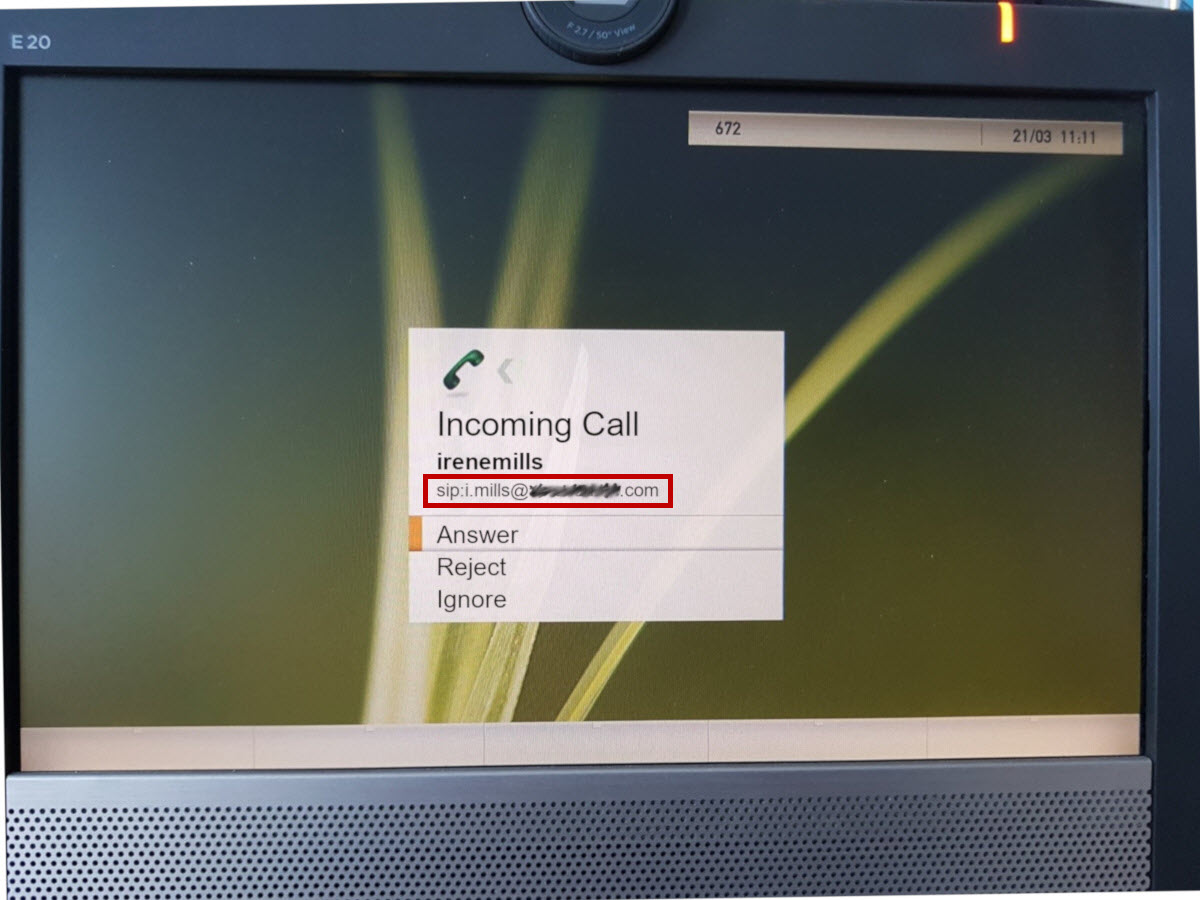
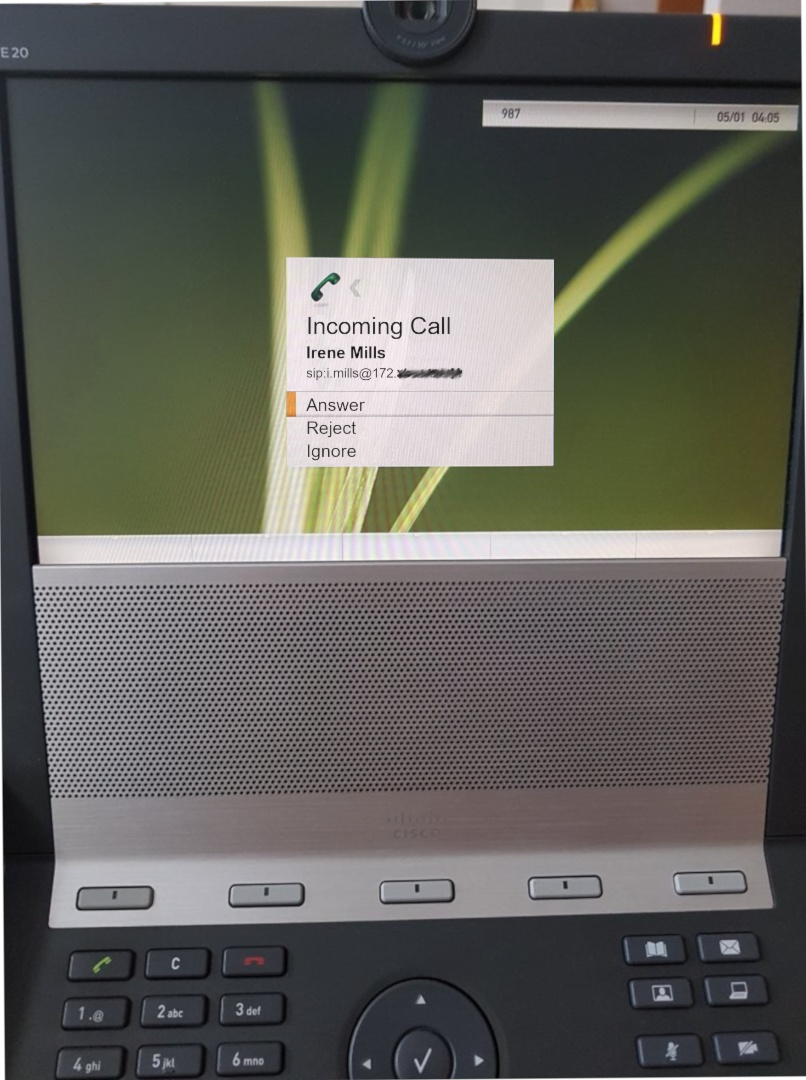
The Local from domain field contains the domain part of a caller’s SIP-URI (the part after the “@” symbol) to be displayed at receiving side. If you leave it empty, then it will be substituted with an IP address of CUCM the call has passed through. This field is required to make callback possible, as it will be impossible to call the SIP-URI name@ip-address.

Calling with a Local from domain set:

Calling without a Local from domain:

Make sure to set the incoming calls to be Encrypted or Unencrypted, because it won’t work with Auto value.

Recording

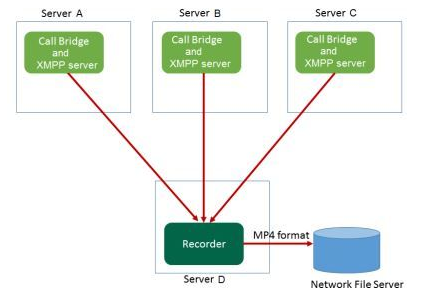
The CMS Recorder provides the capability to record meetings. It appears to be just another Cisco Meeting Server. Recorder license is needed and must be applied on the CallBridge component, and not on the Recorder server.
The Recorder behaves like an Extensible Messaging and Presence Protocol (XMPP) client, so the XMPP server must be enabled on the server that hosts the Call Bridge.

We have a cluster, so a license must be distributed to all three clustered servers. In your personal area, proceed to licenses and associate (add) MAC addresses for A-interfaces of all CMS nodes.

It should look like this on each server in a cluster.

There are several scenarios of Recorder deployment. We’ll stick to the following:

Before you set Recorder up, make sure you have enough space for the recordings. Here’s a link to a thorough guide to Recording configuration. I’ll make a few important notes for you:

  • It’s best to use the first cluster node’s certificate.
  • The “Recorder unavailable” error may occur if you have specified a wrong certificate in the recorder trust.
  • The recording may fail if the directory you have set for recordings is not a root directory.

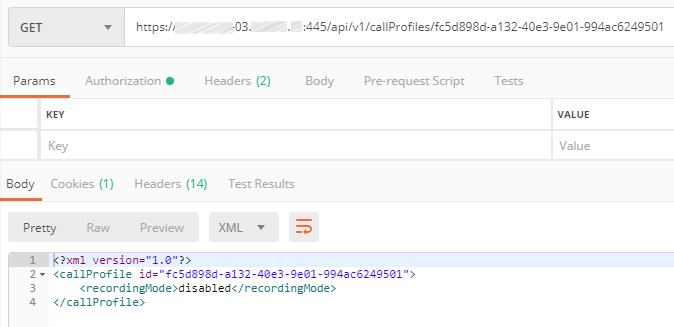
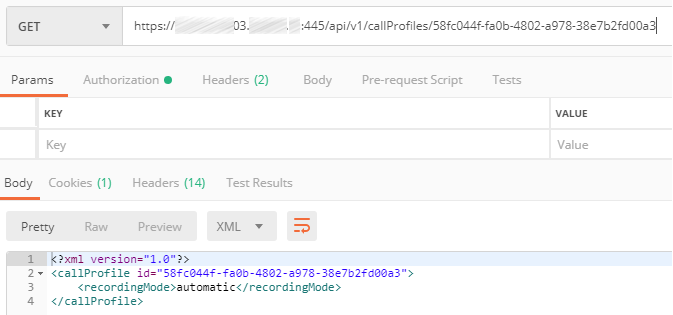
Sometimes there’s a need to record a single user’s or Space’s conferences automatically. This requires two Call Profiles:

With disabled recording feature:

And with automatic recording:

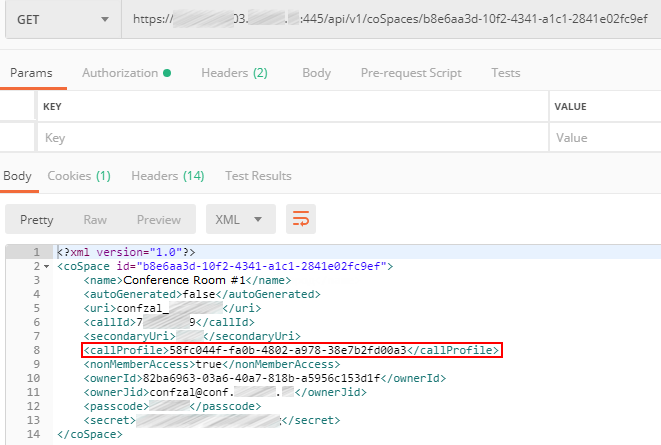
Assign the Call Profile with automatic recording to the chosen Space:

If a call profile is explicitly assigned to some Space or Spaces, then this call profile will only be applied to these specific Spaces. However, if it is not assigned to any spaces, it will be applied to the spaces that do not have any call profiles assigned.

Sources:

Read also:

This article is a translation of a guide originally created by S. Dubinin, Telecommunications Specialist - https://habr.com/ru/post/434240/

Cisco Meeting Server Cluster: Scalability and Resilience deployment with meeting recording - PART 2

In the previous part of this article we’ve discussed the basic configuration and certificate installation process.

In this part we’ll continue getting into the details of CMS deployment in a failover cluster.

Database Cluster

You have uploaded all certificates to your CMS servers. Now you can set up and turn the database clustering on for 3 nodes. The first step is to choose one server as a master database node and set it up.

Master Database

The first step of database replication setup is to select the certificates that will be used for the database. Use the following command:

database cluster certs <server_key> <server_crt> <client_key> <client_crt> <ca_crt>

Now configure the interface that will be used for DB clustering:

database cluster localnode a

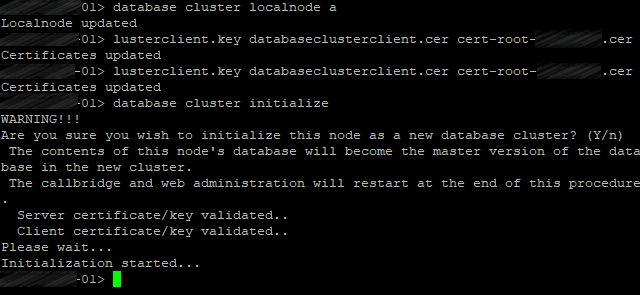
Now initialize the cluster’s database on the master server:

database cluster initialize
Client Database Nodes

Perform the same actions, but use the following command instead of database cluster initialize:

database cluster join <ip address existing master>

with <ip address existing master> standing for the IP address of CMS server where the cluster was initialized (master server).

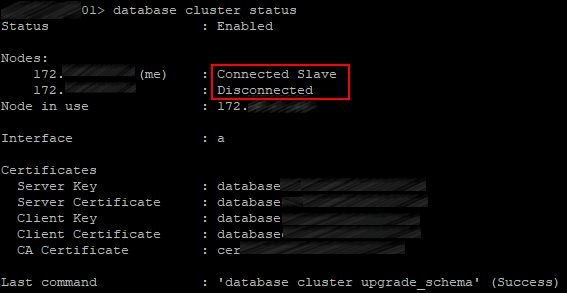
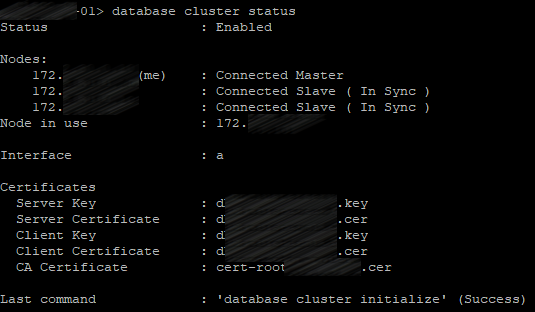
Check the database cluster status on all servers:

database cluster status
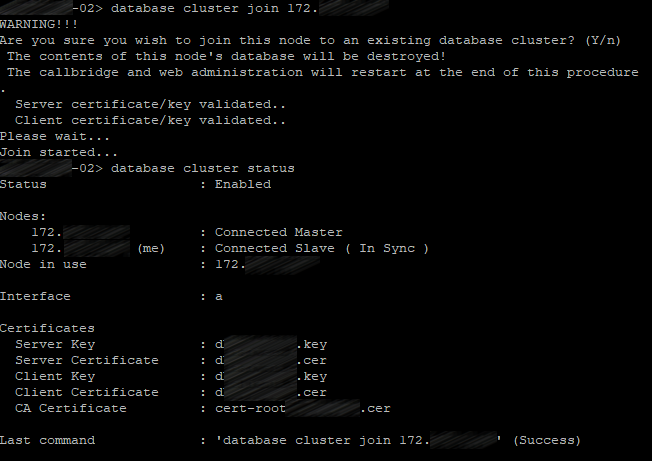
The same for the third server.

The first server will be the master server; two others will be slave servers.
Web Admin Service

Turn on the Web Administrator service:

webadmin listen a 445

Port 445 has been chosen because port 443 is used for users' access to web client.

Configure the certificate files for Web Admin service:

webadmin certs <keyfile> <certificatefile> <ca bundle>

Enable Web Admin:

webadmin enable

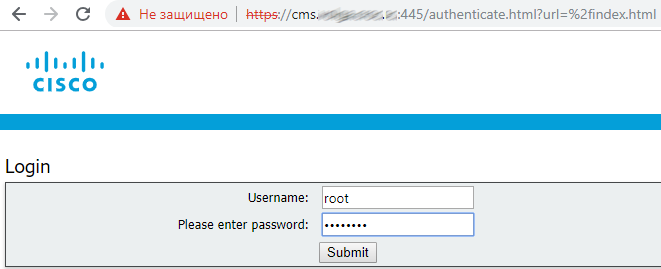
If everything is right, you’ll get SUCCESS lines saying that Web Admin certificates and network have been configured correctly. Use your web browser to make sure that the service is working: enter the Web Admin address, e.g. cms.example.com:445
Call Bridge Cluster

Call Bridge is the only service that is included in every CMS deployment. Call Bridge is the main conferencing tool. It also provides SIP interface, so calls can be routed to or from it, by Cisco Unified CM, for example.

The following commands should be executed on each server with corresponding certificates.

Link certificates with Call Bridge service:

callbridge certs <keyfile> <certificatefile>[<cert-bundle>]

Bind Call Bridge services to the required interface:

callbridge listen a

And restart the service:

callbridge restart

Now, with Call Bridges configured, we can set up Call Bridge clustering. It is different from database or XMPP clustering. Call Bridge Cluster may support from 2 to 8 nodes without any restrictions. It provides redundancy as well as load balancing, so conferences can be actively distributed between Call Bridge servers. CMS has additional features, Call Bridge groups and associated features that can be useful for further management.

Bridge clustering is mostly set up through Web Admin interface.

The following procedure should be performed on each server in the cluster.

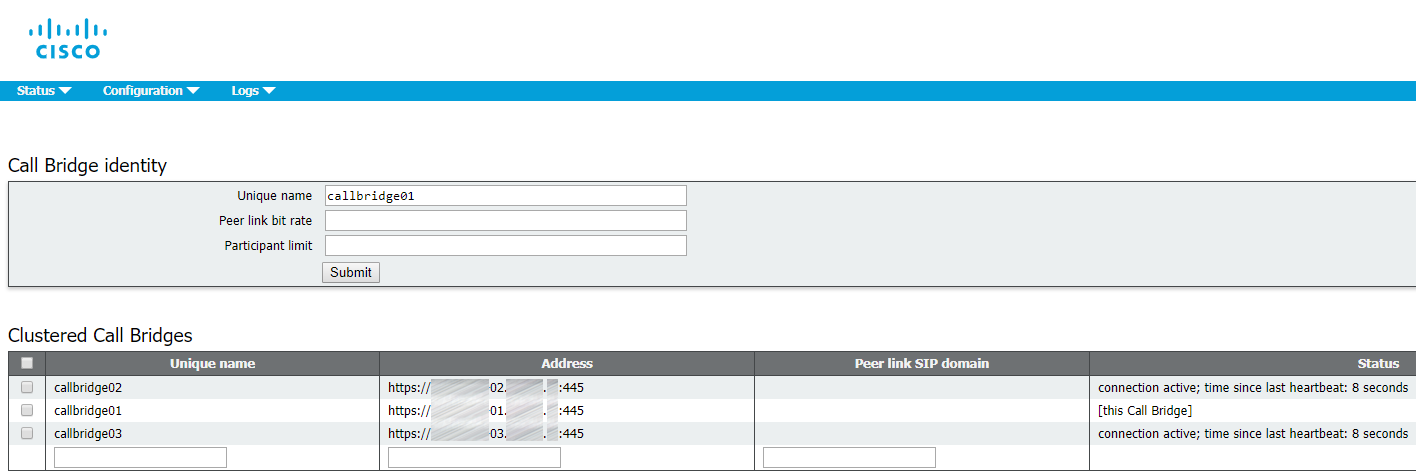
1. Proceed to Web Admin: Configuration > Cluster.

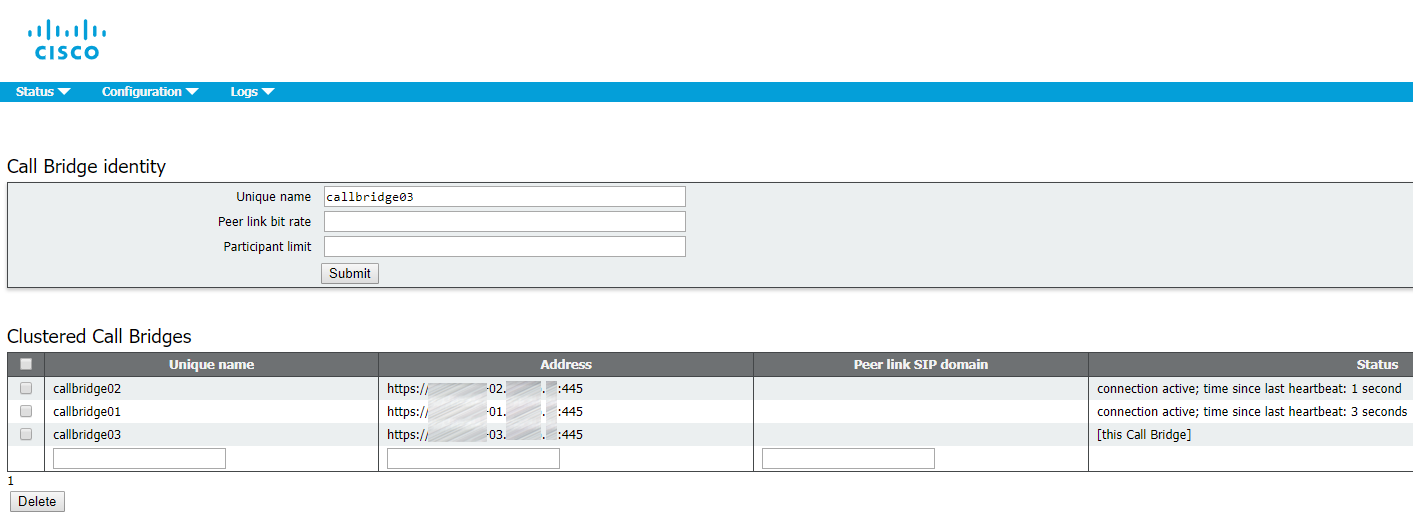
2. In Call Bridge identity: enter callbridge[01,02,03] (corresponding to the server name) as a Unique name. You can use any names that are unique for this cluster. They are descriptive, because they indicate the server identifiers (01,02,03).

3. In Clustered Call Bridges: enter your clustered servers’ Web Admin URLs in the Address field: cms[01,02,03].example.com:445. Make sure to specify the port number. You can leave Peer link SIP domain field empty.

4. Add the certificate bundle (file containing all your servers’ certificates) as a trusted certificate for each server’s Call Bridge:

callbridge trust cluster <trusted cluster certificate bundle>

And restart the service:

callbridge restart
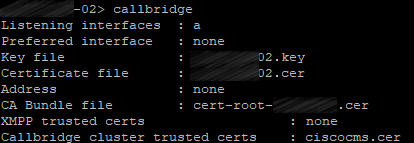
So, for each server it should look like this:
XMPP Cluster

In CMS, XMPP service is used to process all registration and authentication for Cisco Meeting Apps (CMA), including CMA WebRTC web client. Call Bridge also functions as XMPP client for authentication purposes, so it should be configured the same way as the other clients. XMPP fault tolerance is a feature that is supported in enterprise environments starting from version 2.1.

The following commands should be executed on each server with corresponding certificates.

Link certificates with XMPP service:

xmpp certs <keyfile> <certificatefile>[<cert-bundle>]

Set the interface to listen:

xmpp listen a

XMPP service needs a unique domain name. It is used for users’ authentication. When users try to log in via CMS application (or a WebRTC client), they enter userID@logindomain. In our case, it is userid@conf.example.com. Why isn’t it just example.com? In this specific deployment we have chosen example.com as the Unified CM domain for Jabber users, so we need another domain for CMS users, so calls from and to CMS can be routed through SIP domains.

Set XMPP domain:

xmpp domain <domain>

Enable XMPP service:

xmpp enable

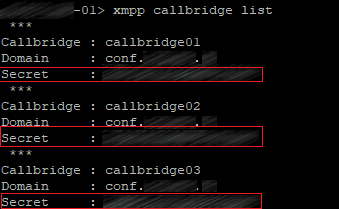
In XMPP service, you should create a user account for each Call Bridge. These accounts will be used for XMPP registration. You can use any names (they are not related to the unique names you have configured for Call Bridge clustering). You should add 3 call bridges on one XMPP server, and then enter the same authentication data on other clustered XMPP servers, because this configuration won’t be placed into the clustered database. Later we’ll configure each Call Bridge to use that name and secret for XMPP registration.

Now we should configure XMPP service on the first server. There are three Call Bridges: callbridge01, callbridge02 and callbridge03. Each account will get a random secret. Those secrets will be used later on other Call Bridge servers to log in to this XMPP server. Enter the following commands:

xmpp callbridge add callbridge01

xmpp callbridge add callbridge02

xmpp callbridge add callbridge03

Check the result:

xmpp callbridge list
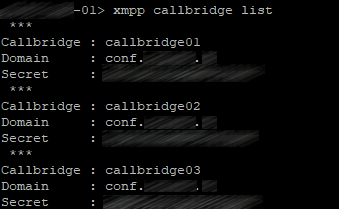
You should get the same picture on other servers after you perform the following actions.

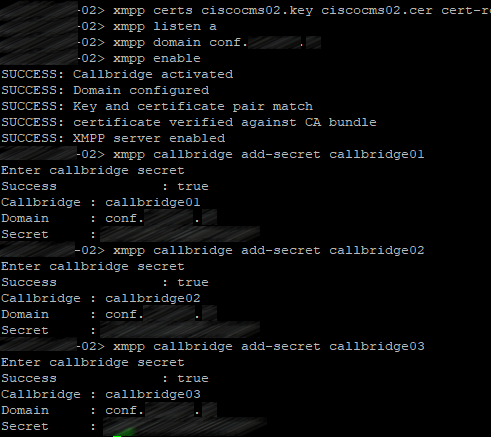
Create identical accounts on two other servers:

xmpp callbridge add-secret callbridge01

xmpp callbridge add-secret callbridge02

xmpp callbridge add-secret callbridge03

Be careful not to put unnecessary spaces in secrets.

So, you should get the following picture on all servers:
Add the certificate bundle (file containing all your servers’ certificates) as a trusted certificate on each clustered server:

xmpp cluster trust <trust bundle>

Enable XMPP cluster mode on each clustered server:

xmpp cluster enable

Initialize XMPP cluster on the first server in the cluster:

xmpp cluster initialize

Join XMPP clusters on other servers:

xmpp cluster join <ip address head xmpp server>

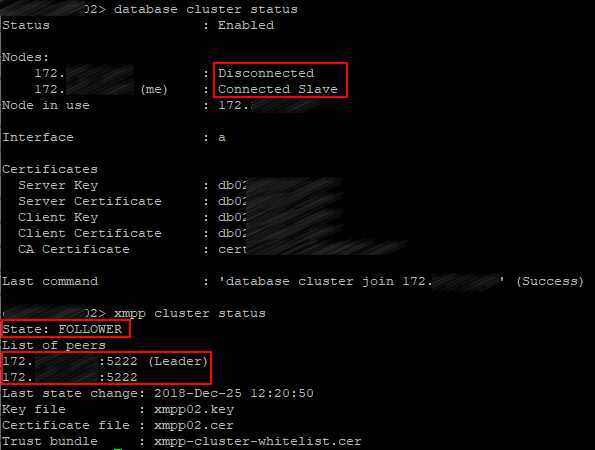
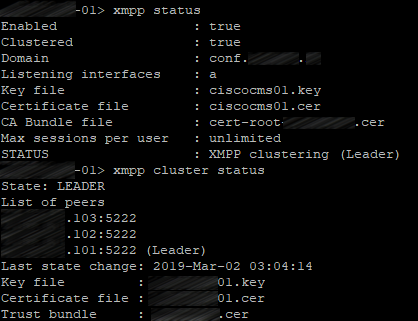
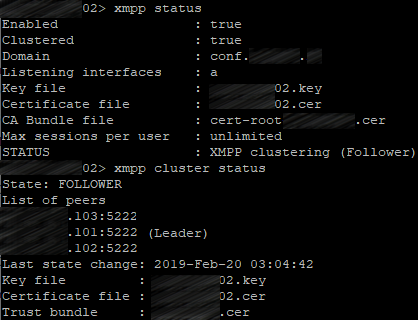
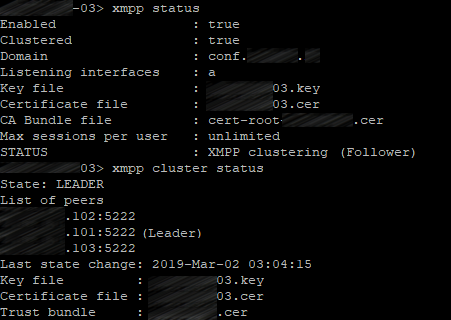
Check the XMPP cluster status on each server:

xmpp status

xmpp cluster status

The first server:
The second server:
The third server:
Connecting Call Bridge to XMPP

Now your XMPP cluster is online. The next step is to configure Call Bridge services to connect to the XMPP cluster. This configuration step should be performed via Web Admin.

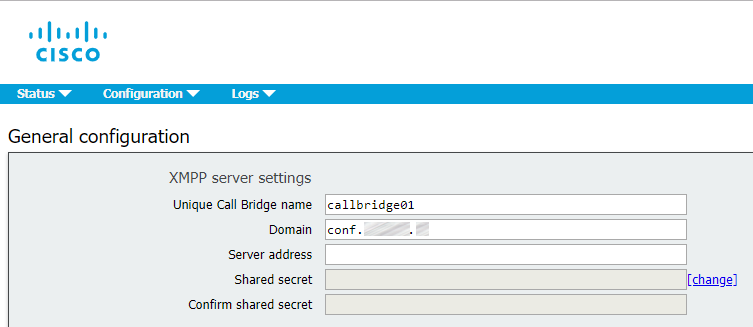
On each server you should proceed to Configuration > General and fill the Unique Call Bridge name field with the corresponding names: callbridge[01,02,03]. The Domain is conf.example.com, and secrets can be listed on any server in the cluster:

xmpp callbridge list
Leave the Server address field empty. Call Bridge will search DNS SRV records for _xmpp-component._tcp.conf.example.com to find an available XMPP server. The IP addresses used to connect to XMPP may be different on each server, depending on the values that will be found for _xmpp-component._tcp.conf.example.com for each Call Bridge, which depends on the priority settings for this DNS record.

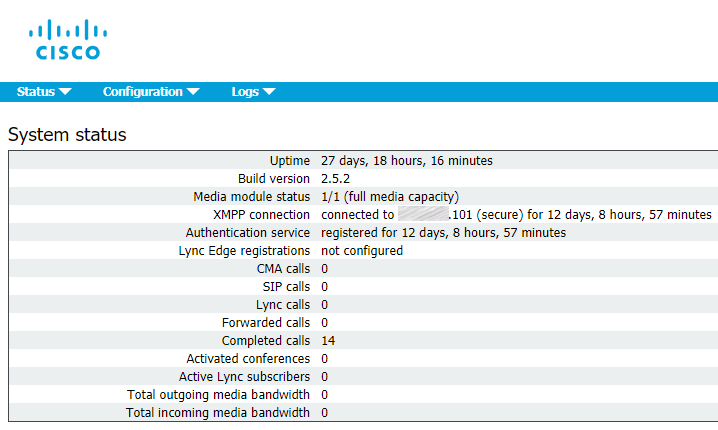
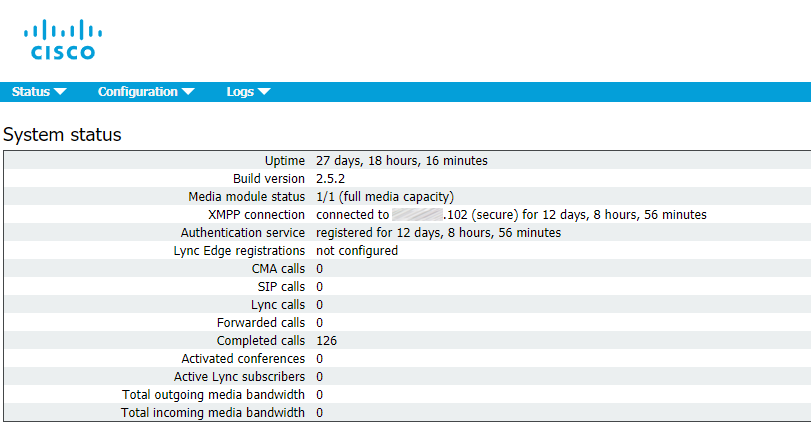
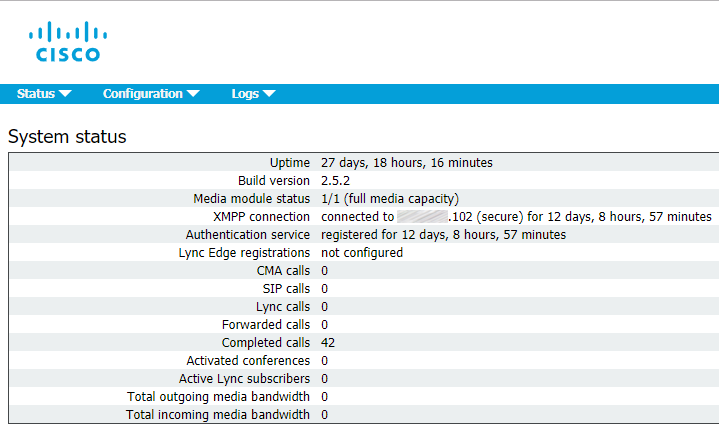
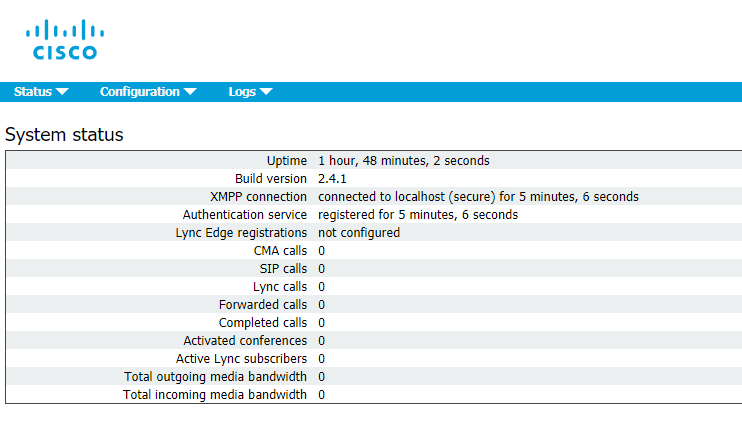
Now proceed to Status > General to make sure that Call Bridge service has successfully established a connection to XMPP service.
Web Bridge

Enable Web Bridge service on each clustered server:

webbridge listen a:443

Set up the certificates for Web Bridge service:

webbridge certs <keyfile> <certificatefile> <ca bundle>

Web Bridge supports HTTPS. It will redirect HTTP to HTTPS if http-redirect is enabled.

Use the following command to enable it:

webbridge http-redirect enable

Use the following command to make Web Bridge trust the connections from Call Bridge:

webbridge trust <certfile>

with <certfile> standing for the certificate bundle (file containing all your clustered servers’ certificates).

So, you should get the same picture on each server:

Now create a user with appadmin role. You need this user to configure your cluster with settings being applied to each server automatically instead of configuring each server separately.

Use Postman (https://www.postman.com/downloads/) for further configuration.

Choose Basic Auth in the Authorization section.

Set the correct encoding for the commands sent to CMS.

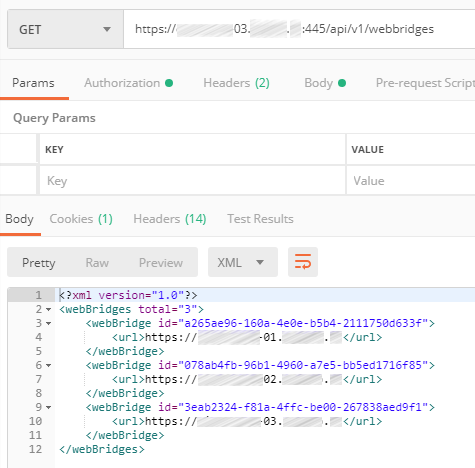
Configure a POST command for Web Bridges with url parameter set to cms.example.com:
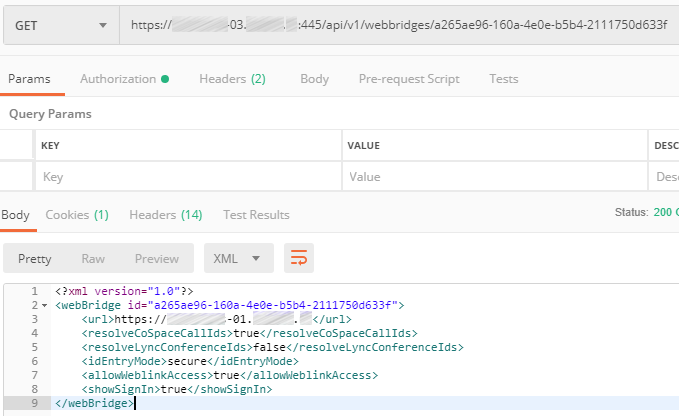
Set the required parameters for each WebBridge: guest access, secure entry mode, etc.
So, we have configured database, Call Bridge and XMPP clusters, as well as Web Admin service. We have also connected Call Bridge to XMPP and performed the Web Bridge configuration.

In the last part of the article, we’ll finish discussing the details of CMS clustered deployment and configuration.

Read also:

This article is a translation of a guide originally created by S. Dubinin, Telecommunications Specialist - https://habr.com/ru/post/434240/

Cisco Meeting Server Cluster: Scalability and Resilience deployment with meeting recording - PART 1

In this article, we’ll go into the details of CMS deployment in a failover cluster.

Theoretics

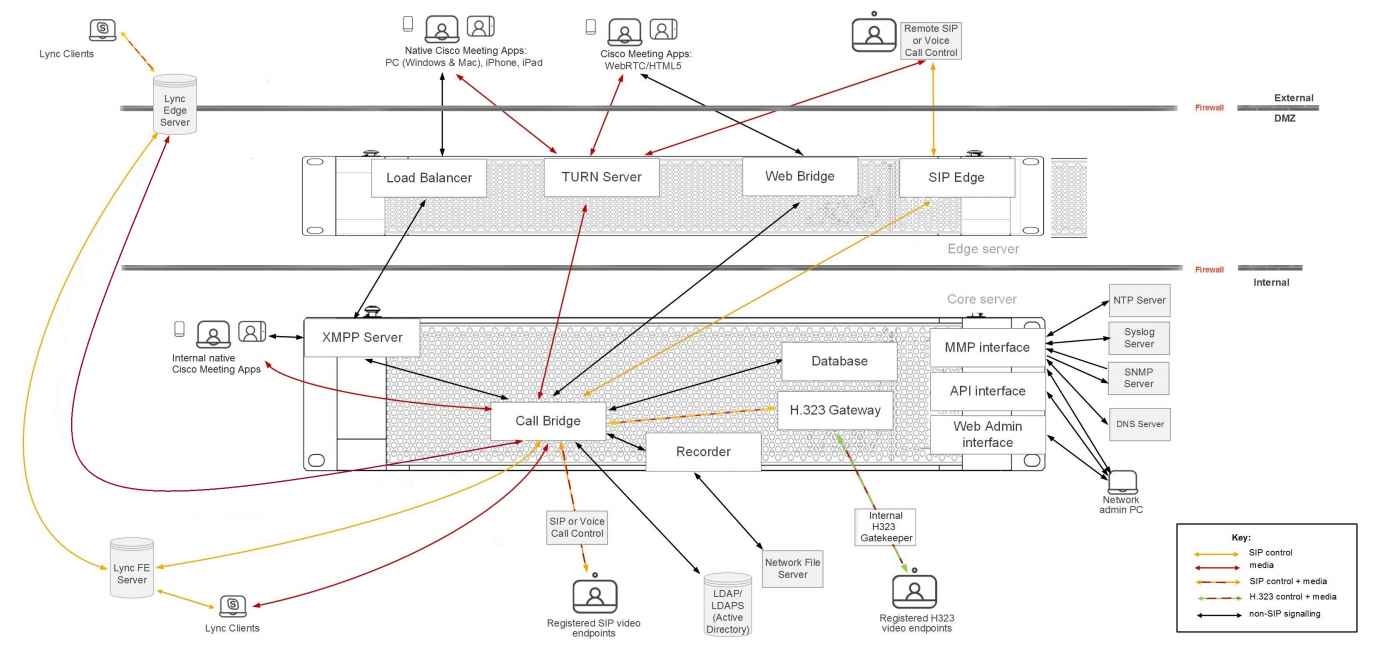
Basically, there are 3 types of CMS deployment:

  • Single Combined with all services running on a single server. In most cases, this deployment type is only applicable for systems with internal clients, or for small environments with scalability and redundancy restrictions not being crucial, or for the situation when CMS only carries out certain functions, such as CUCM special conferences.
    Approximate working scheme:
  • Single Split extends the previous deployment type with a separate server for external access. In outdated deployments this meant having CMS server deployed in DMZ (demilitarized zone) where external clients can access it, and another CMS server in core layer for the local clients. This specific deployment model is being replaced with so-called Single Edge type with Cisco Expressway servers that have (or will have) most firewall bypassing techniques, so clients won’t have to add a separate CMS edge server.
    Approximate working scheme:
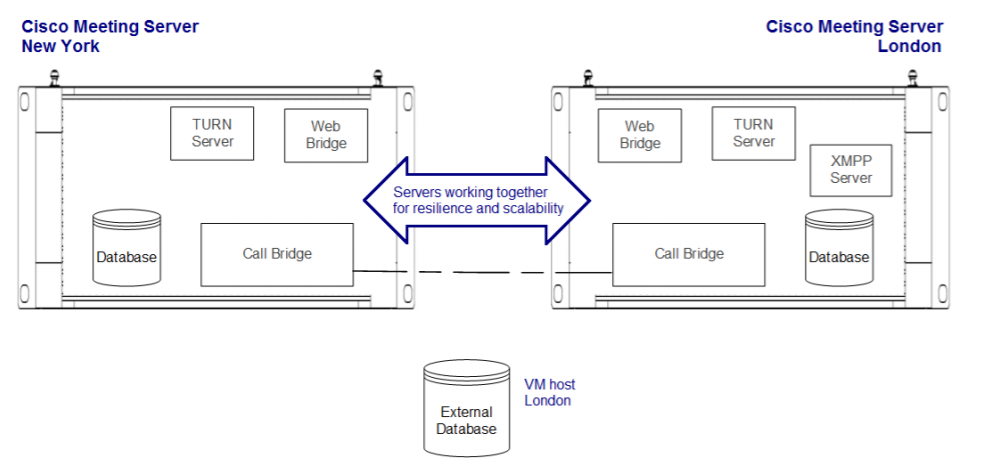
  • Scalable and Resilient type includes redundancy for each component, so the system can grow along with your needs up to the maximum capacity, providing redundancy in case of a failure. It also uses Single Edge conception to provide safe external access. This is the type we are going to discuss here. If we know how to deploy this type of cluster, not only will we understand other deployment types, but we also will be able to understand how to create CMS server clusters taking into account the potential requirement increases.

Before we discuss the deployment, we should clarify some basic ideas.

Basic CMS Program Components

  • Database: helps to combine some configurations, such as subscriber groups, user spaces and users. Supports high availability clustering only (one master).
  • Call Bridge: audio and video conferencing service that implements full control and processing of calls and multimedia processes. Supports high availability and scalable clustering.
  • XMPP server: controls registration and authentication for the clients that use Cisco Meeting Application and/or WebRTC (real-time communication, used in browser), and intercomponent signaling. Supports high availability clustering only.
  • Web Bridge: provides WebRTC access for the clients.
  • Load balancer: provides a unified connection point for Cisco Meeting Applications in Single Split mode. It listens on an external interface and port for incoming connections. The load balancer also accepts incoming TLS connections from an XMPP server and transfers incoming TCP connections from external clients. It won’t be used in our scenario.
  • TURN server: provides firewall bypassing technique that allows launching our CMS behind a Firewall or NAT with external clients using Cisco Meeting App or SIP devices. It won’t be used in our scenario.
  • Web Admin: administration interface and API access (for Unified CM special conferences as well).

Configuration Approaches

Unlike most Cisco products, Cisco Meeting Server supports 3 configuration approaches, allowing you to perform any deployment type:

  • Command line interface (CLI), also known as MMP, can be used for initial configuration and certificate management.
  • Web admin: mostly for Call Bridge-related configuration tasks, especially for the configuration of a single non-clustered server.
  • REST API: for the most complicated configuration tasks and for clustered database-related tasks.

Besides that, you can use SFTP protocol for transferring files, including licenses, certificates and logs, to/from your CMS server.

Practice

Cisco deployment guides say in cold print that in the context of databases, a cluster must consist of 3 nodes at least, since the new database Master selection mechanism can only work with an odd number of nodes:

Note: It's recommended to have an odd number of DB cluster nodes as it is important for the master selection and the active failover mechanism. Another reason for this is that the master DB node would be the node that has connections to the most of the DB in the cluster. You can have a maximum of 5 nodes in a DB cluster.

Indeed, as practice shows, 2 cluster nodes are not enough. The master selection snaps into action at the Master reset, and a Slave server becomes Master only after a rebooted server launches. However, if a Master server goes down in a cluster of two servers, then the Slave won’t become a Master. And if the Slave goes down, then the remaining Master will become a Slave, too.

Speaking of XMPP, a cluster should consist of 3 servers, indeed. If you stop XMPP service on the server that has XMPP in Leader status, then XMPP will stay in Follower status on the remaining server, and Call Bridges will be disconnected, because a Call Bridge can only connect to XMPP with Leader status. And this is critical, because no calls will go through.

These deployment guides also show a cluster with a single XMPP server.

In view of the aforementioned, it’s clear: it works in failover mode.

In our case, XMPP server will be running on all three nodes.

Suppose that all three servers are up.
DNS Records

Before we proceed to the servers’ configuration, the following A and SRV DNS records must be created:

Record typeRecordDescription

A

servername-01.example.com
servername-02.example.com
servername-03.example.com
Resolving the name of each server in our cluster into its IP address.
A join.example.com
join.example.com
join.example.com
Three identical records resolved into the corresponding servers’ IP addresses. Users can enter this DNS name in a browser to access a conference from web.

SRV

_xmpp-client._tcp.conf.example.com
Three identical records referring to A records: servername-0x.example.com, allowing the servers’ port 5222. Cisco Meeting App clients use these records to find XMPP server.

SRV

_xmpp-component._tcp.conf.example.com
Three identical records referring to A records: servername-0x.example.com, allowing the servers’ 5223 port. Call Bridges use these records to detect XMPP server, if it is not defined explicitly.

Note that our DNS records have 2 domains: example.com and conf.example.com. Example.com can be used in URIs by all subscribers of Cisco Unified Communication Manager (which most likely is or will be used in your infrastructure). Or: example.com is the same domain that is used for email addresses. Or: Jabber client on your notebook can have the following URI: user@example.com.

Conf.example.com is the domain to be configured for all Cisco Meeting Server users. The Cisco Meeting Server domain will be conf.example.com, and Jabber users should use user@conf.example.com URI to log it to Cisco Meeting Server.

Basic Configuration

The configuration process will be described for a single server, but it should be performed for each server in a cluster.

QoS

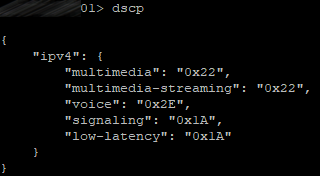
Since CMS produces real-time traffic that is sensitive to delays and packet loss, in most cases it’s recommended to set up quality of service (QoS). CMS supports marking packets with DSCP (differentiated services code points). DSCP-based traffic prioritizing depends on the way the traffic is processed by the network components in your infrastructure. We are going to configure our CMS with typical DSCP prioritizing that is based on best QoS practices.

Enter the following commands on each server:

dscp 4 multimedia 0x22
dscp 4 multimedia-streaming 0x22
dscp 4 voice 0x2E
dscp 4 signaling 0x1A
dscp 4 low-latency 0x1A

So, all video traffic will be marked with AF41 (DSCP 0x22), all voice traffic will be marked with EF (DSCP 0x2E), other low-latency traffic types, such as SIP and XMPP, will be marked with AF31 (DSCP 0x1A).

Let’s check:

NTP

Not only is network time protocol (NTP) important for providing precise timestamps for the calls, but also for certificate verification.

Use the following command to add your NTP servers:

ntp server add <server>

In our case, there are two of them, so the command will be executed twice.

Let’s check:

Set the time zone for your server.

DNS

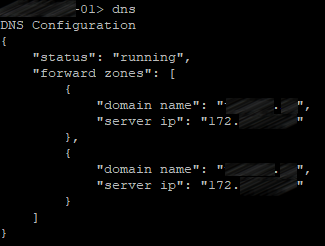
Use the following command on CMS to add DNS servers:

dns add forwardzone <domain-name> <server ip>

In our case, there are two of them, so the command will be executed twice.

Let’s check:

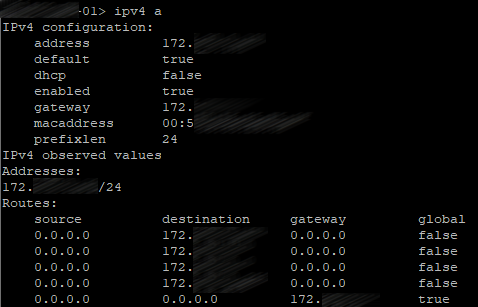
Network Interface Configuration

Use the following command to create a network interface:

ipv4 <interface> add <address>/<prefix length> <gateway>

Let’s check:

Hostname

Use the following command to set the hostname:

hostname <name>

Then reboot the system.

The basic configuration is over.

Certificates

Theoretics

Cisco Meeting Server uses an encrypted connection between different components, therefore X.509 certificates are required for all CMS deployments, so servers and services know if they can trust each other.

Each service needs a certificate, but creating a separate certificate for each service may lead to confusion and excessive complexity. Fortunately, we can generate a public and private certificate key pair and then use it for several services. In our case, one and the same certificate will be used for Call Bridge, XMPP server, Web Bridge and Web Admin. So, we only have to create a public/private key pair for each server in a cluster.

Database clustering, however, has special requirements to the certificates, so it needs separate certificates that are different from the other services’ certificates. CMS utilizes a server certificate that is similar to other servers’ certificates, but there also is a client certificate to be used for database connections. Database certificates are used for authentication and encryption both. Instead of providing a username and password to connect a client to the database, it provides a client certificate that is trusted by the server. Each server in a database cluster uses one and the same public/private key pair. So, any server in a cluster can create encrypted data that can be decrypted by any other server that uses the same key pair.

In order for reservation to work properly, a database cluster should consist of three servers at least and five at most, with maximum signal transmission time of 200 ms between any two nodes. This limit is more restrictive than Call Bridge limits, so it usually becomes the limiting factor in geographically distributed deployments.

CMS database role has several specific requirements. Unlike other roles, it requires client and server certificates, with client certificate having the CN field specified to be presented to the server.

CMS uses postgres database with one main server and several identical replications. Every single moment there is only one main database (“database server”). Other nodes are replications or “database clients”.

A database cluster requires a dedicated server certificate and a client certificate. They must be signed, usually by an internal private CA. Since any node in a database cluster can become the main one, the certificates for database server and client (public/private key pairs) must be copied on each server, so it can become a database client or server. Besides that, the root CA certificate must be uploaded, so the client and server certificates can be verified.

Certificate Requests

So, use the following command to create a certificate request for all server services except database (it will require a separate request):

pki csr hostname CN:cms.example.com
subjectAltName:hostname.example.com,example.com,conf.example.com,join.example.com

CN should contain the common name of our servers. For example, if the hostnames are: server01, server02, server03, the CN should be server.example.com.

Do the same for both other servers with the corresponding hostnames used in commands.

Create two request for the certificates that will be used by the database service:

pki csr dbclusterserver CN:hostname1.example.com
subjectAltName:hostname2.example.com,hostname3.example.com

pki csr dbclusterclient CN:postgres

where dbclusterserver and dbclusterclient are the names of our request and future certificates, and hostname1(2)(3) are the corresponding server names.

Perform this procedure on one server only, and upload the certificates and corresponding .key files to the other servers.

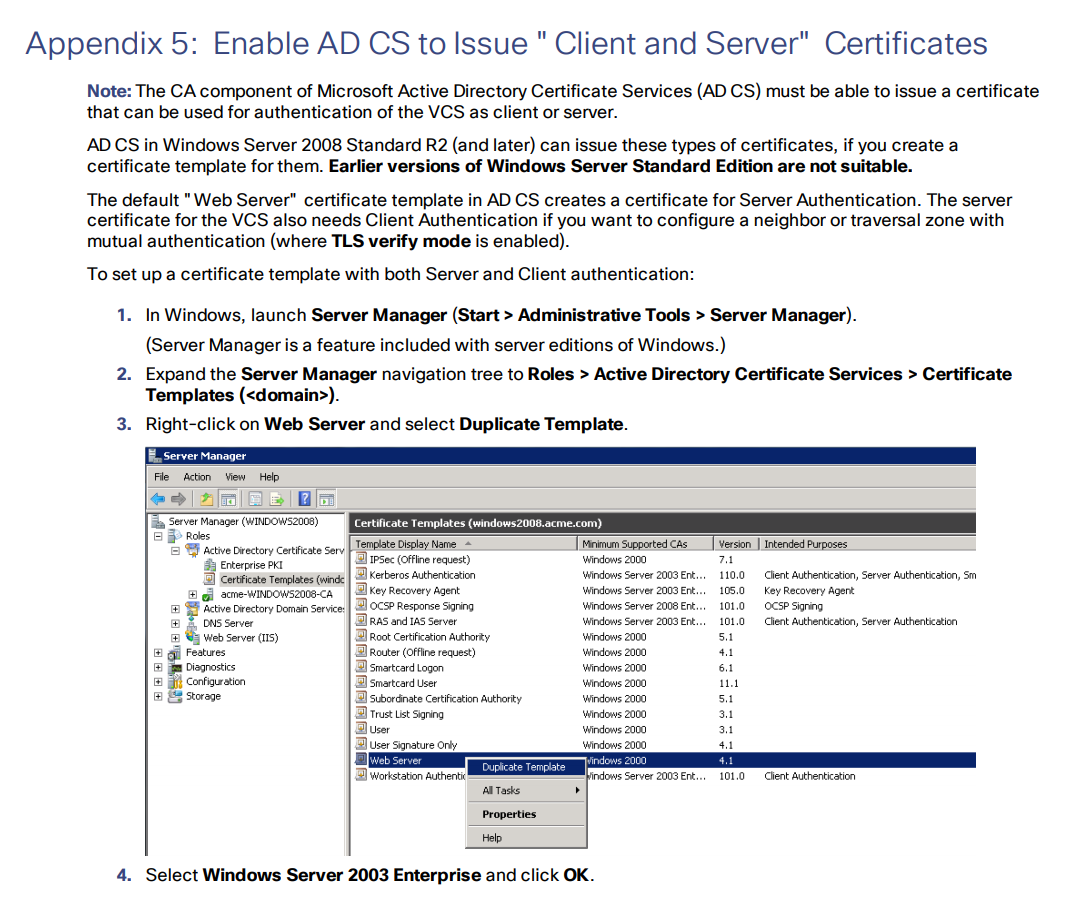
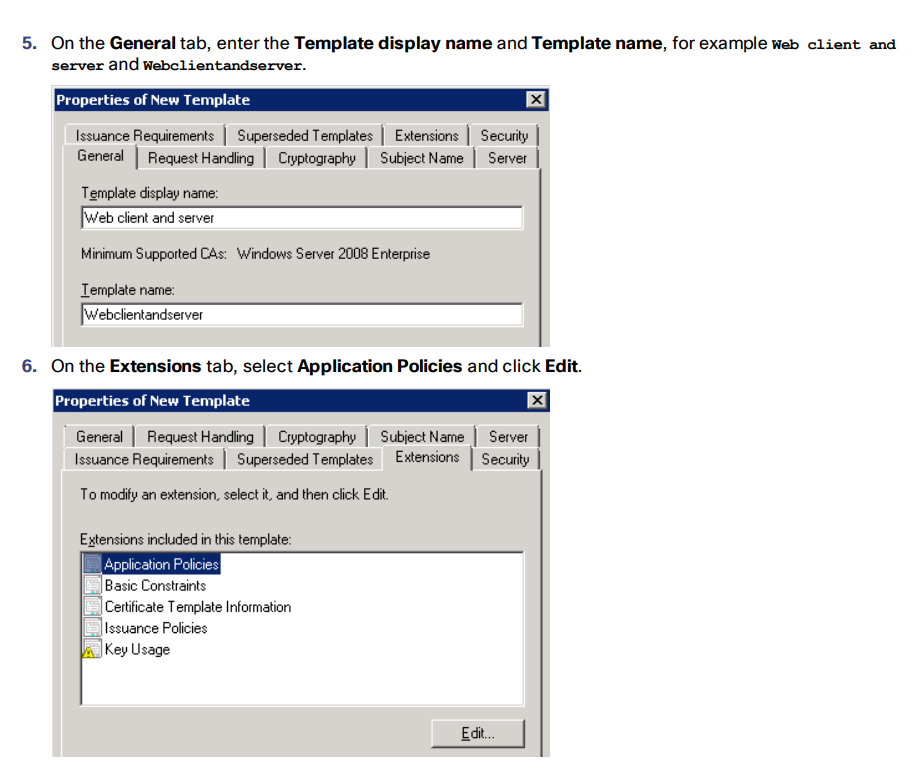
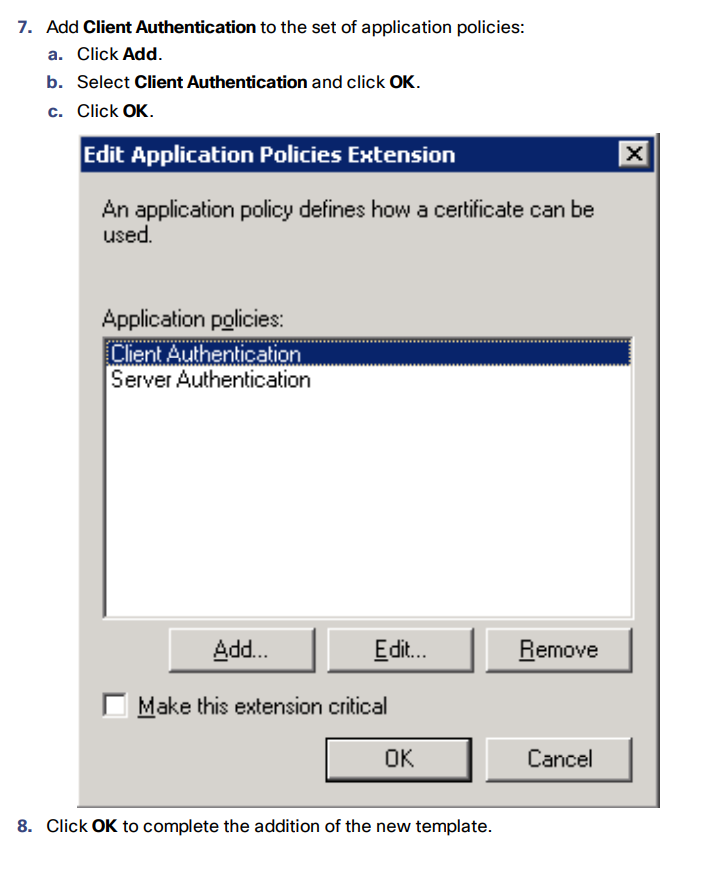
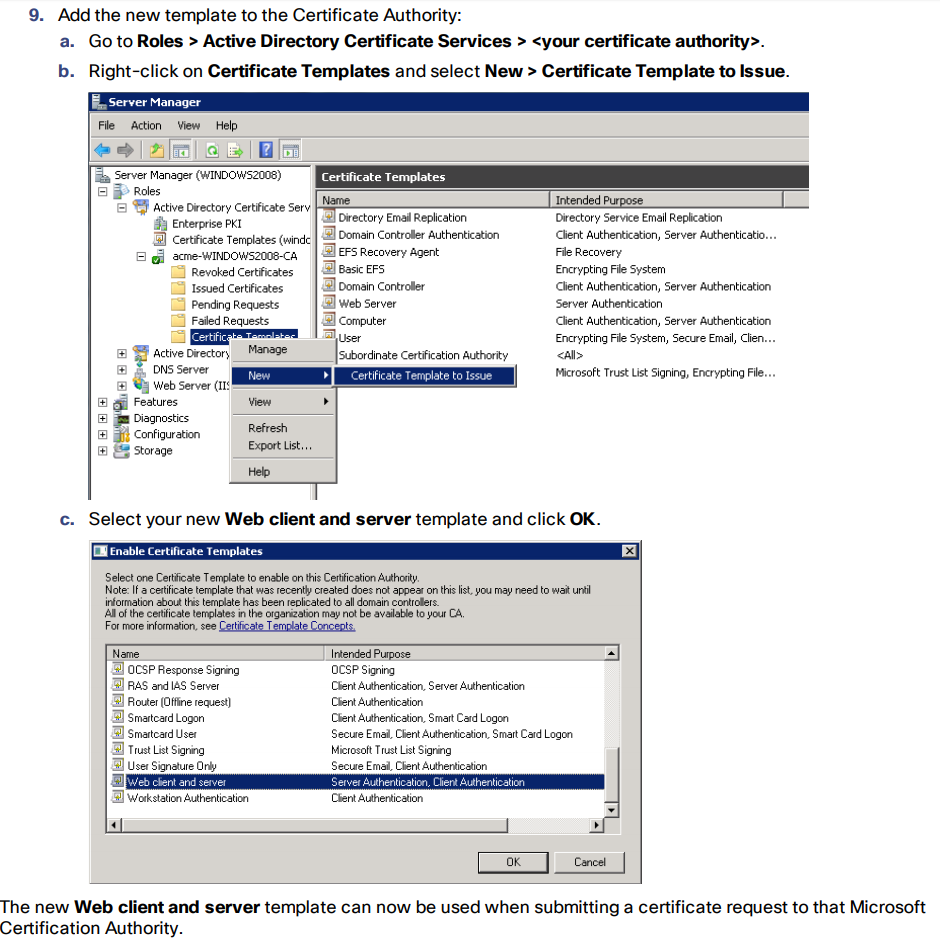
Enable AD CS to Issue “Client and Server” Certificates

Merge Certificates

Merge all servers’ certificates into one file:

In *NIX:

cat server01.cer server02.cer server03.cer > server.cer

In Windows/DOS:

copy server01.cer + server02.cer + server03.cer server.cer

And upload the following files to each server:

  • The server's certificate.
  • Root certificate (with intermediate ones if they exist).
  • Database certificates (“server” and “client” ones) and .key files that have been created upon the request for “server” and “client” database certificates. These are the same files for all servers.
  • All servers’ certificates.

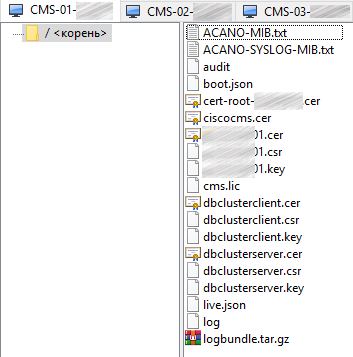
You should get a similar set of files on each server:

In the next part of this article we’ll continue discussing the details of CMS clustered deployment.

Read also:

This article is a translation of a guide originally created by S. Dubinin, Telecommunications Specialist - https://habr.com/ru/post/434240/

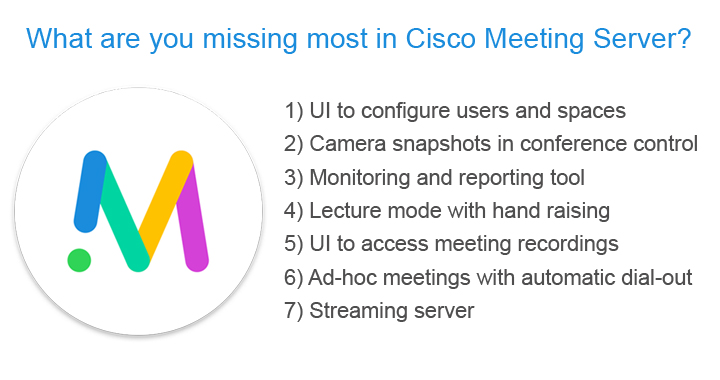
What are you missing in Cisco Meeting Server?

This post is to list some of the gaps of Cisco Meeting Server highlighted by our customers migrating from Cisco TelePresence Server to Meeting Server and partners who deploy Cisco videoconferencing solutions. 


1) UI to configure users and spaces
As you know most of the configuration options are only available via CMS API 

2) Camera snapshots in conference control
The Cisco Meeting Manager tool does not provide camera snapshots. See CMM 2.6 user guide for video operators for more.

3) Monitoring and reporting tool
CMS servers provide API and CDR records but no native reporting tool is available.

4) Lecture mode with hand raising
There used to be a native lecture more for Telepresence Server conferences. Though there are guides about how to configure it with API (see https://kb.acano.com/content/9/68/en/how-do-i-set-up-%E2%80%9Clecture-mode%E2%80%9D.html) the hand raising feature is missing.

5) UI to access meeting recordings
CMS can record meetings (special license is required) but it only stores recording on a NFS. No interface to play recordings, manage access rights etc.

6) Ad-hoc meetings with automatic dial-out
Lots of clients want to start a meeting with a push of a button and have a predefined list of participants to be dialed and joined automatically.

7) Streaming Server
CMS meetings can be streamed to a predefined IP, but you have to deploy some 3rd party media streaming engine to capture it and broadcast to users.

If you feel something major is missing in this list, please give us a shout.

Integration of Cisco Meeting Server with CUCM 11 – PART 3


The last part is about SIP trunking, сonference bridge, route patterns and users.

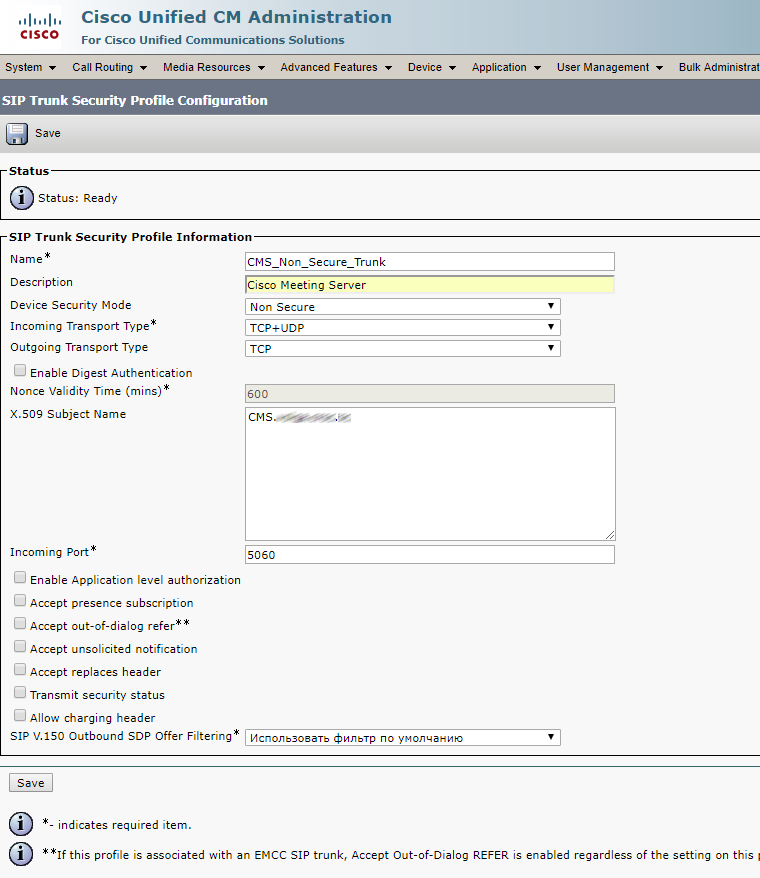
SIP trunk security profile

Now create a SIP trunk security profile.

If the calls won’t be encrypted, select the values specified below. Enter Call Bridge certificate CN (your CMS server FQDN).

Check Accept Replaces Header if you are going to use conference call bridges.

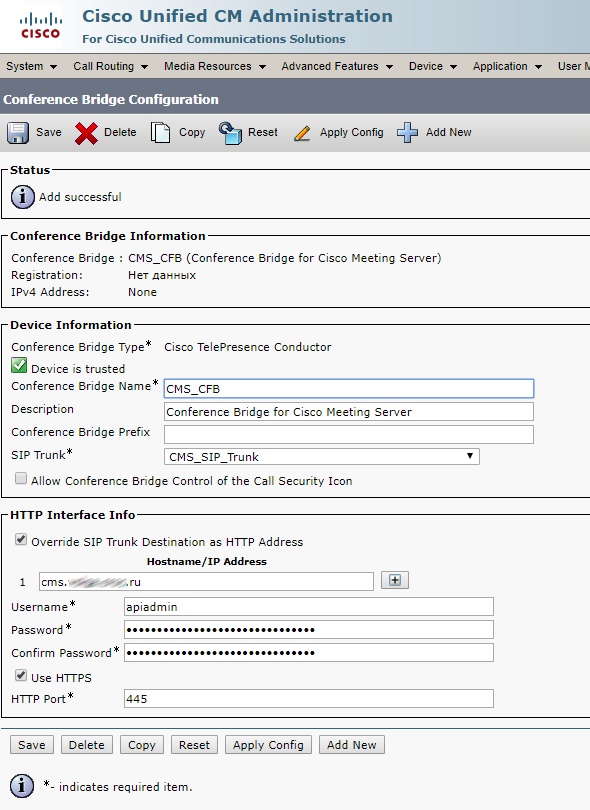
Conference Bridge

Create a Conference Bridge as described below. Enter username and password of the user with appadmin role (we have created this user in the very beginning).

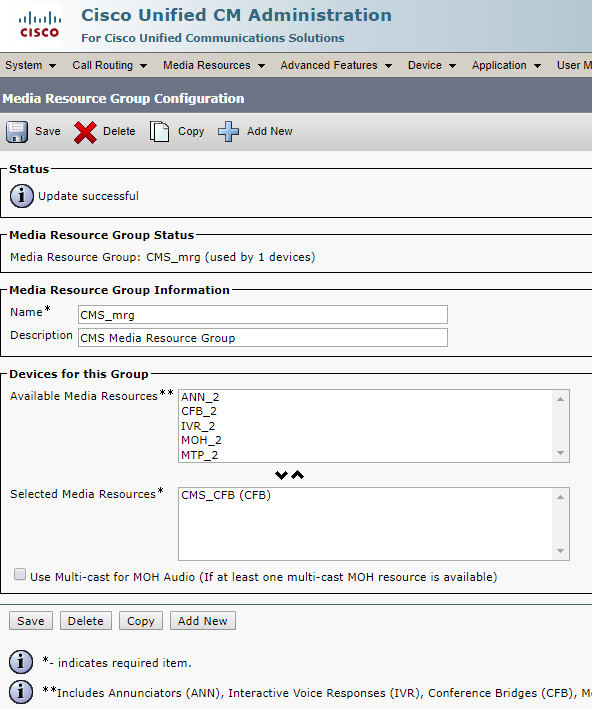
Create a Media Resource Group and add your Conference Bridge there.

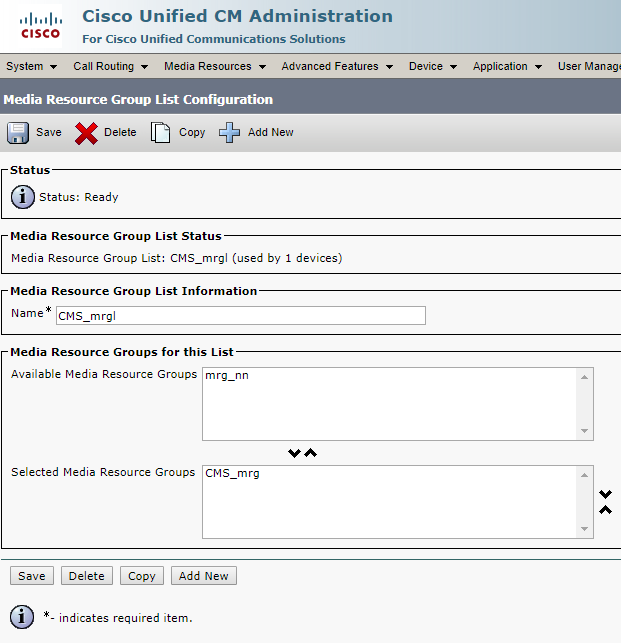
Create Media Resource Group List and add your Media Resource Group there.

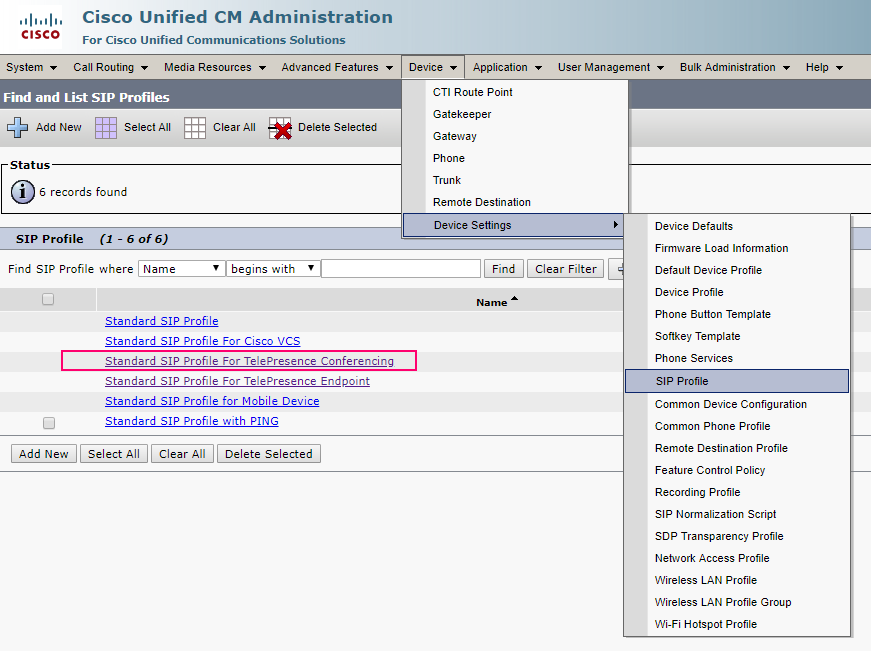
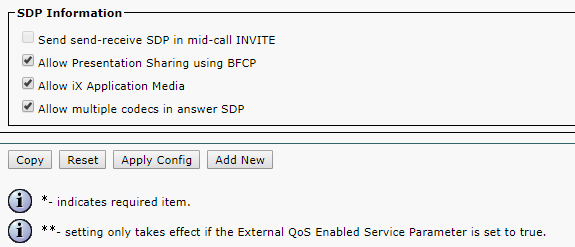
Proceed to Standard SIP Profile For TelePresence Conferencing and make sure that Allow iX Application Media, Use Fully Qualified Domain Name in SIP Requests, and Allow Presentation Sharing use BFCP options are checked.

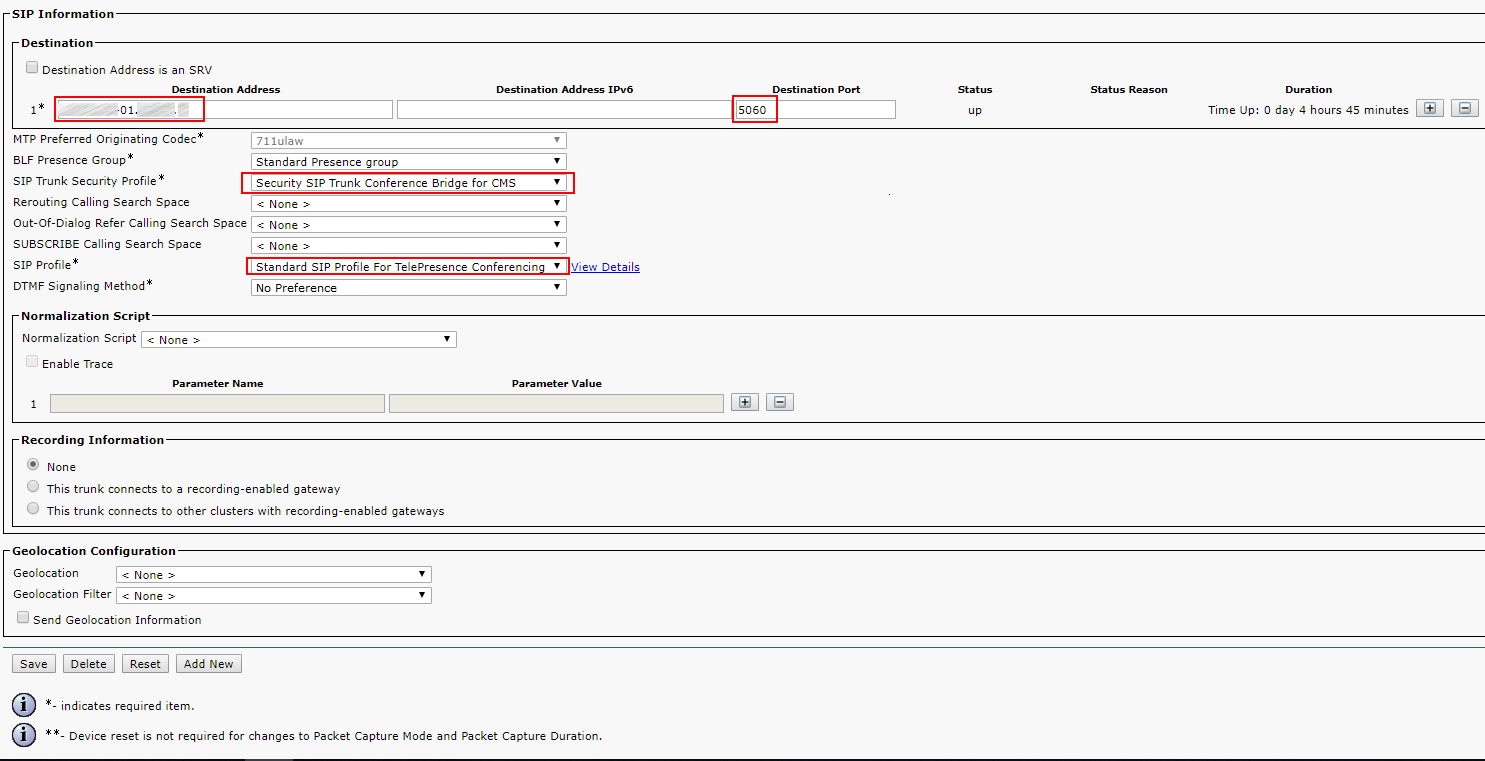
SIP Trunk

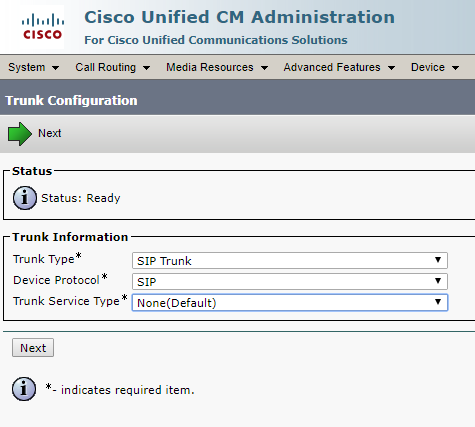
Now create a SIP Trunk to CMS server.

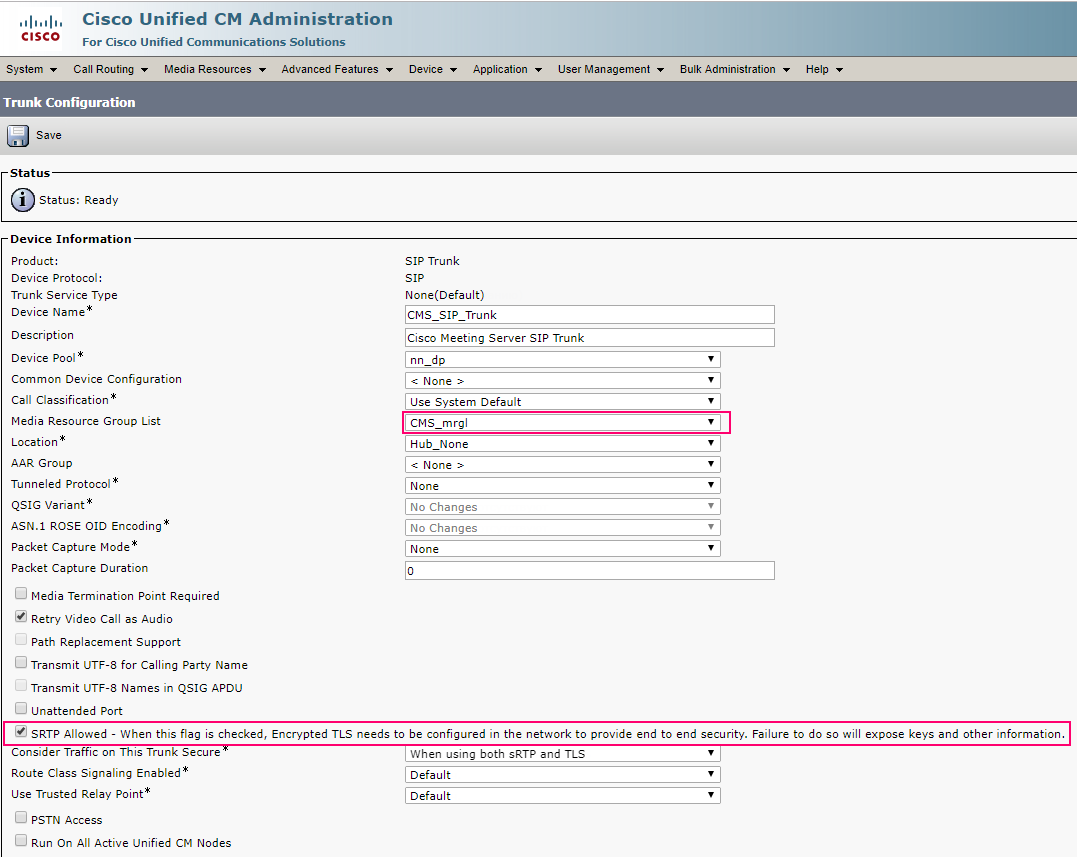
You should set the correct Calling Search Space, so calls will be successful. Otherwise, CMS won’t be able to find the required phone number. Both the device and the phone number have to be added to the Calling Search Space.

Media Resource Group List — select the one you have created.

SRTP Allowed flag allows encrypted calls. You can disable it.

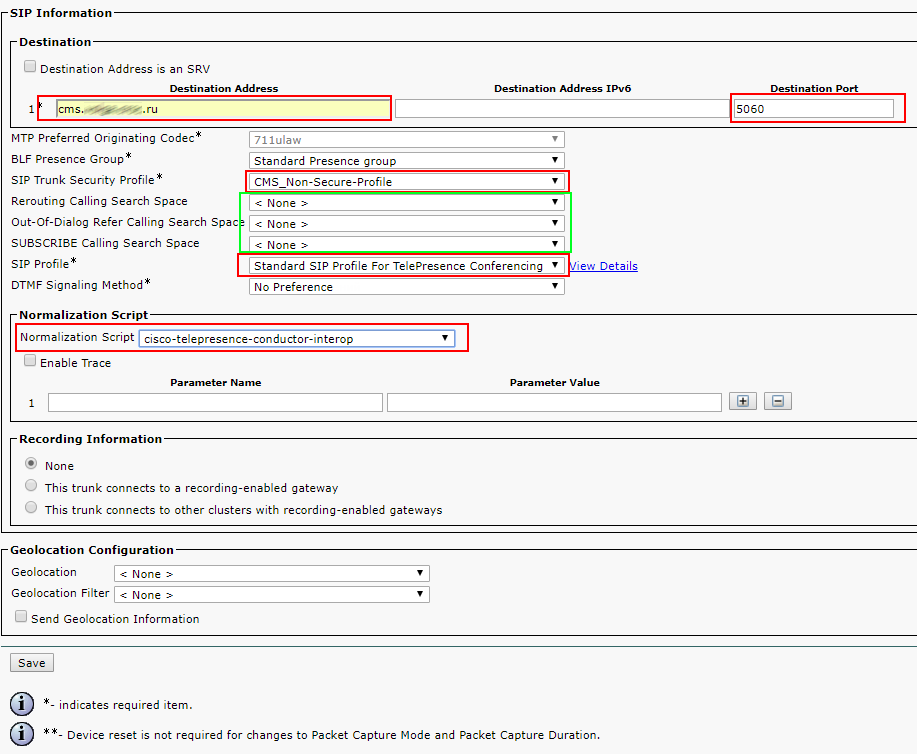
SIP Information > Destination address — enter your CMS FQDN or IP address.
SIP Information > Destination Port — standard SIP port is 5060, 5061 is for encrypted calls.
SIP Trunk Security Profile — select the one you have created.
SIP Profile — select Standard SIP Profile For TelePresence Conferencing
Normalization Script — don’t set. It is only needed for encrypted calls. Set cisco-telepresence-conductor-interop if you are using encryption.

Pay attention to the green marked parameters. You should gain an understanding of Calling Search Spaces to fill them correctly.

Leave other fields with default values.

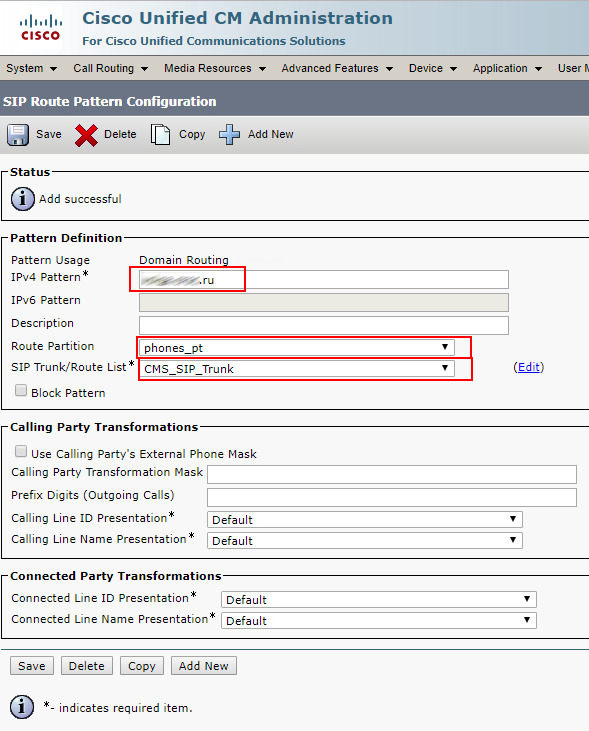
SIP Route Pattern

Create a SIP Route Pattern for calls to SIP addresses like smith.j@example.com

Check CMS and CUCM:

The trunk is up.

However, the Conference Bridge is down due to the difference in TLS versions on CUCM and CMS. This issue can be solved by TLS 1.0 installation on CMS:
tls webadmin min-tls-version 1.0
webadmin restart

Check the Conference Bridge:

Our configuration is being performed on trunks without Media Termination Point (MTP).
Disable MTP if it won’t affect your services.

Disbling MTP can affect your services if your phones use SCCP protocol and you have to send DTMS to CMS.

If this is true for your services, you may have to increase MTP capacity on CUCM depending on the number of simultaneous calls.

Importing Active Directory Users

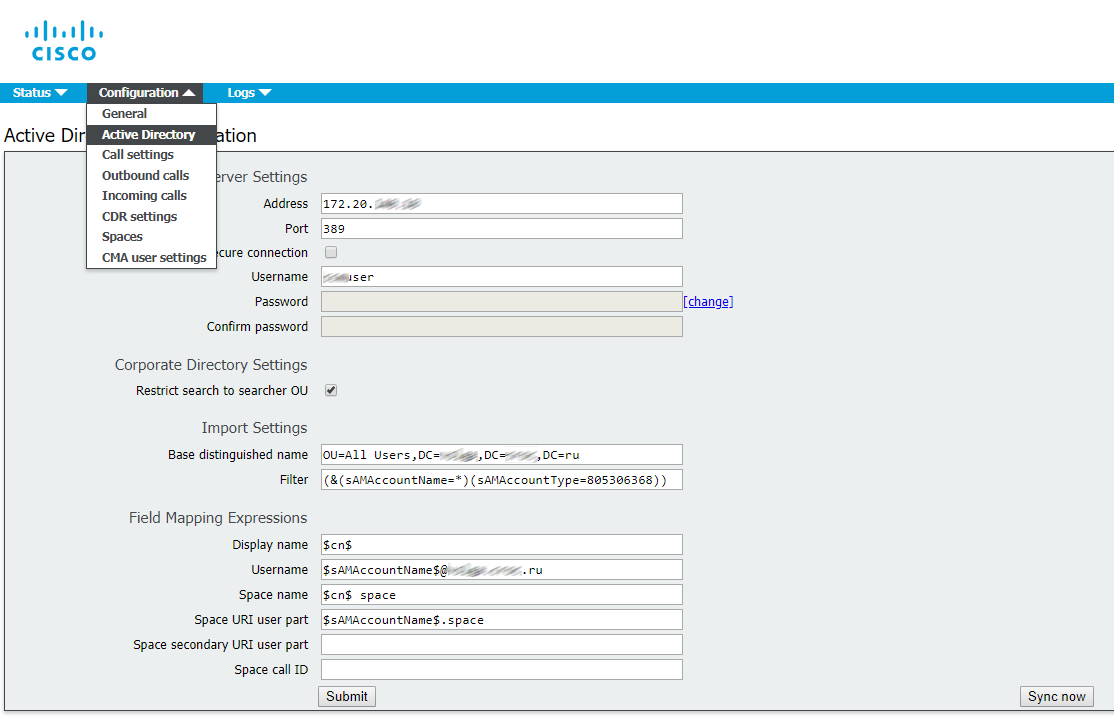
Now import the users from Active Directory.

Proceed to Configuration -> Active Directory, fill out the fields (see the figure below).

Filter is a very important field. You can enter your own filter or use the filter shown on the picture.

Look through the logs.

Everything is right.

Proceed to Status -> Users to make sure that all users have been imported.

Availability check

We got to the best part.

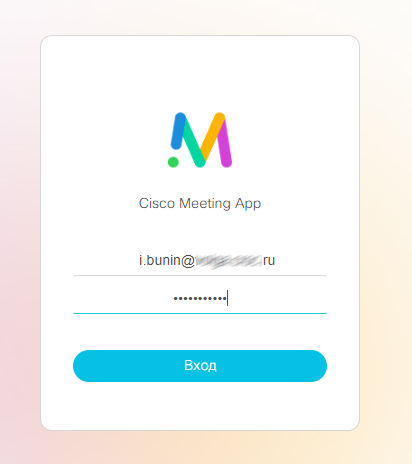
To perform a call, access the web interface: cms.example.com
Enter an Active Directory user login and password to log in.

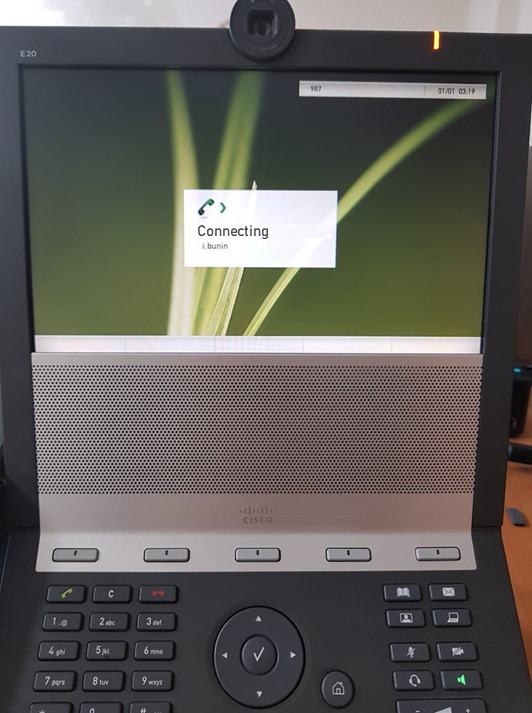
Now let’s check a video call from an IP Phone (we are using Cisco E20) to our user account.

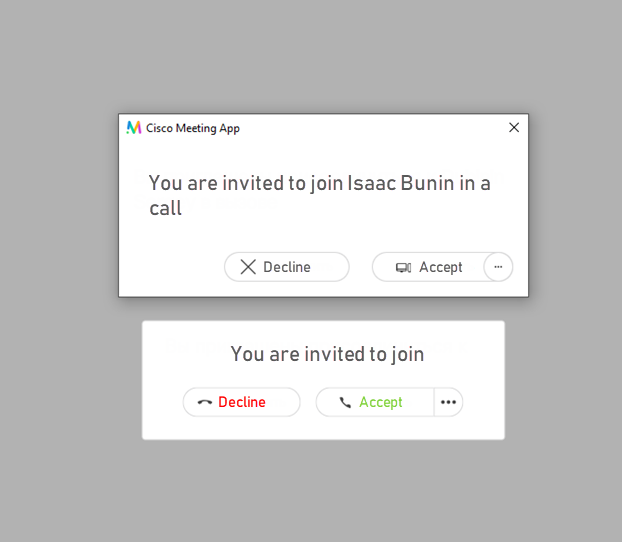
I have web and desktop Cisco Meeting clients running, and both are calling.

You can also test the video call from your user account to IP Phone. In our case, the video call was successful in both directions.

Encrypted calls can bring in some complications, but that’s a story for another day.

See also:

Read also:

This article is a translation of a guide originally created by S. Dubinin, Telecommunications Specialist - https://habr.com/ru/post/433528/

Integration of Cisco Meeting Server with CUCM 11 – PART 2


Part 2 explains call settings, Incoming and Outbound calls configuration, spaces and CUCM certificates

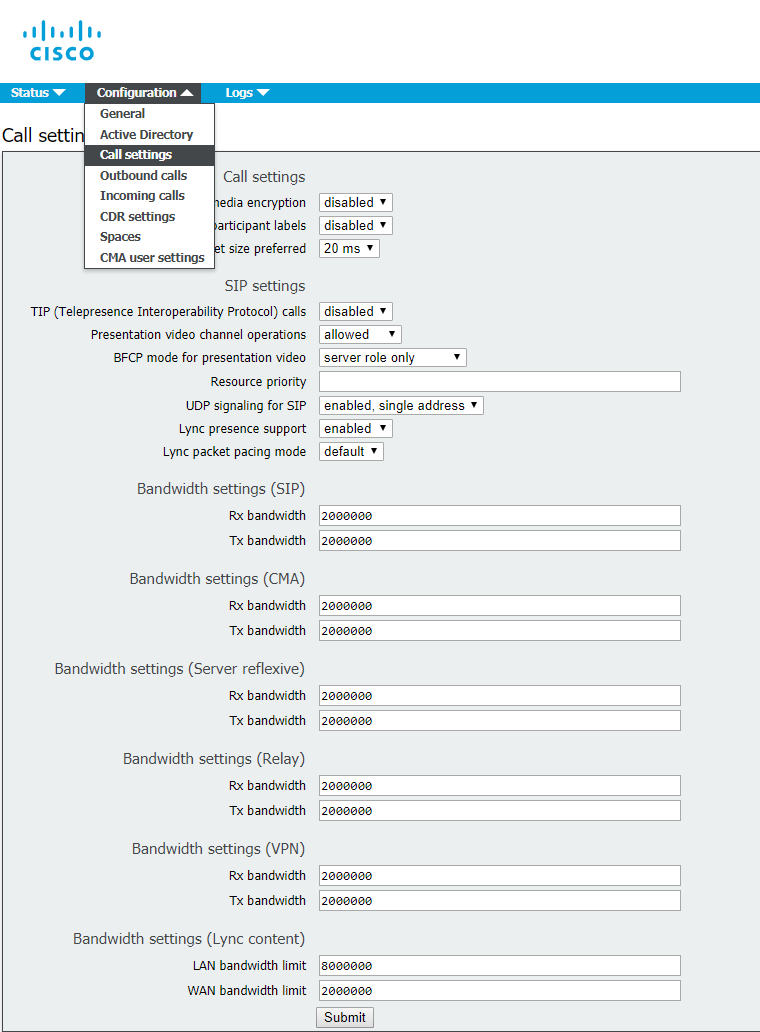
Basic Call Settings Configuration

Proceed to Configuration > Call settings and set the values as given below:

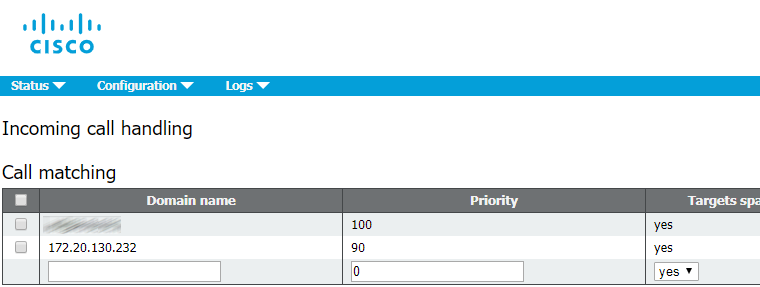
Incoming Call Handling Configuration

Proceed to Configuration > Incoming calls and set the values as specified below:

This configuration determines the way of incoming SIP calls handling on CMS. Any call routed to CMS will have a verified alias. The rules in call matching table determine where CMS will look for potential matches. Each rule can be set to match any combination of users, IVR or MicrosoftSkype / Lync. To handle incoming calls, Cisco Meeting Server tries to match the value after "@" sign with the values in “domain name” column.

Outbound Call Handling Configuration

Proceed to Configuration > Outbound calls.
Domain name: leave empty (to match all domains)
SIP Proxy to use: enter your CUCM FQDN (IP address is admissible, but FQDN is recommended)
Local contact domain: leave empty, it is only needed for Skype for Business SIP Trunk configuration.
Local from domain: enter Cisco Meeting Server SIP domain (e.g. cms.example.com)
Trunk type: Standard SIP
Behavior: Continue
Priority: 1
Encryption: Auto or Unencrypted
Click Add New to save the changes.

Space Creation

Create a space where the users will be stored.

Proceed to Configuration > Spaces

The Secondary URI should be a E.164 value compatible with your dial plan that will be routed to CMS. The CallID can be any number that is not used yet. In this example we use the same value as for Secondary URI.

Configure Web Bridge for Call Bridge

To allow guest access to Web Bridge, configure Call Bridge to set Web Bridge address.

Proceed to Configuration > General

Configure a HTTPS CMS URL address for a guest account. For example:
meetingserver.example.com

Fill External Access field if you want to add Cisco Expressway web proxy. This address will be used in invites for external users.

CUCM Certificates

Perform the requests for Tomcat (CUCM web server) and CallManager services.
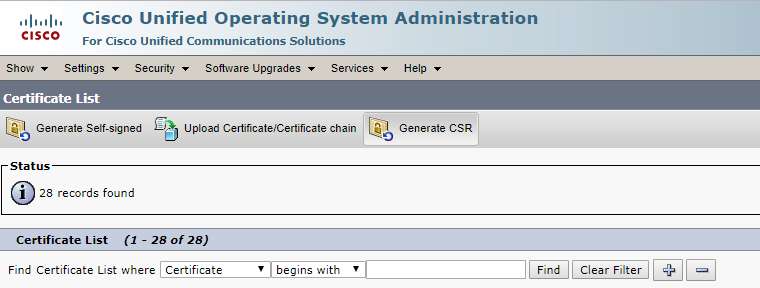
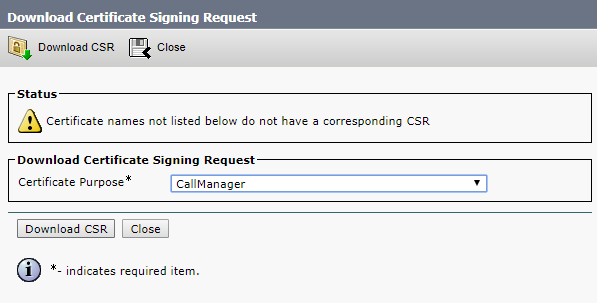
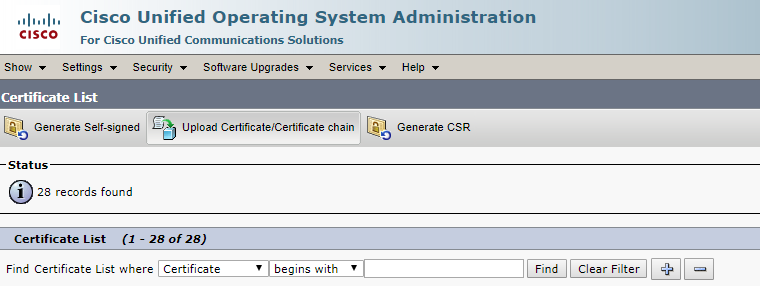
Proceed to Cisco Unified OS Administration > Security-Certificate Management and click Generate CSR.

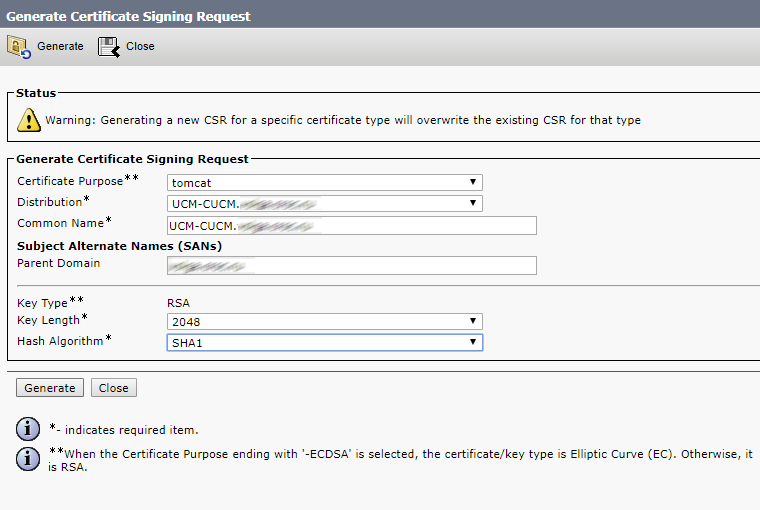
First, select Tomcat in the Certificate Purpose field, so you won’t get errors in your browser.

Click Generate.

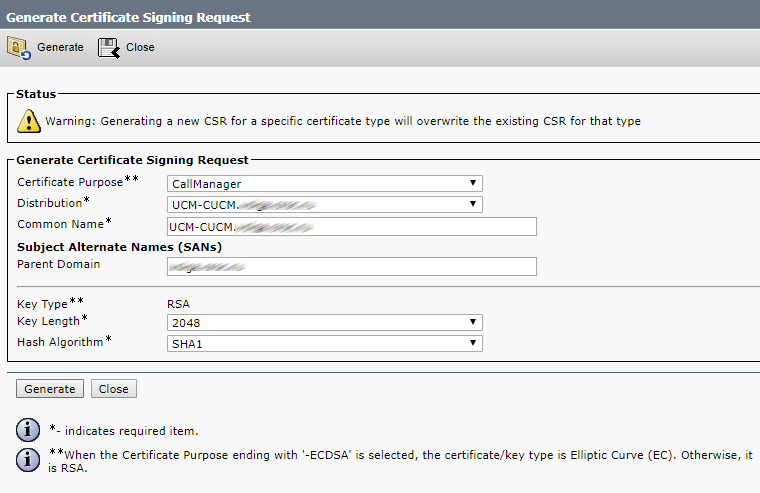
Then select CallManager, so CMS and CUCM will check each other’s certificates for Conference Bridge registration.

Click Generate.

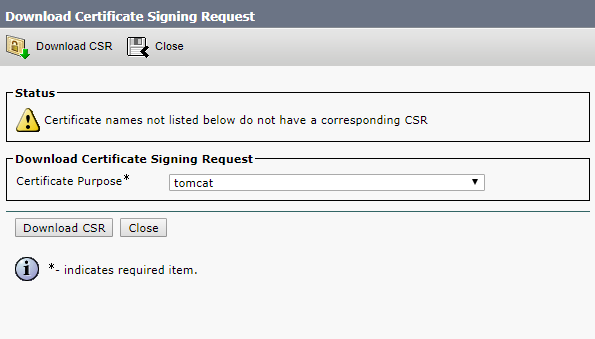
Now download the certificate signing request files for CA.


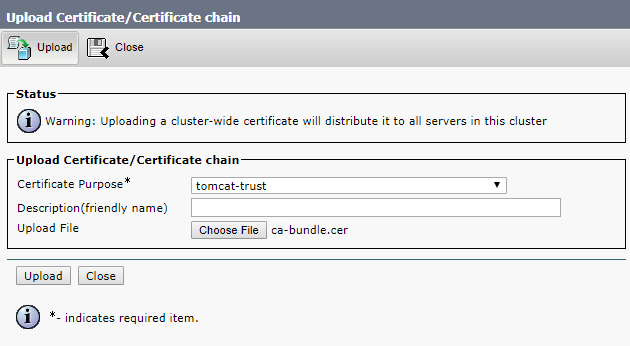
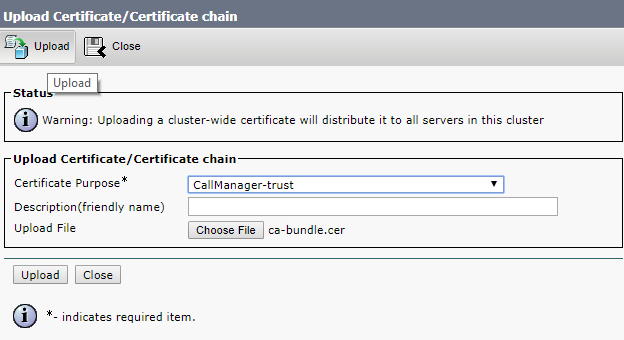
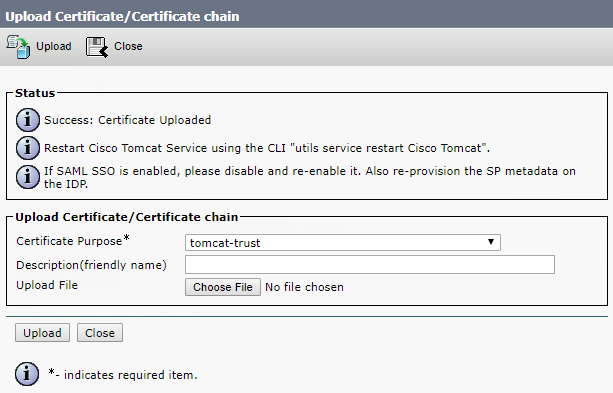
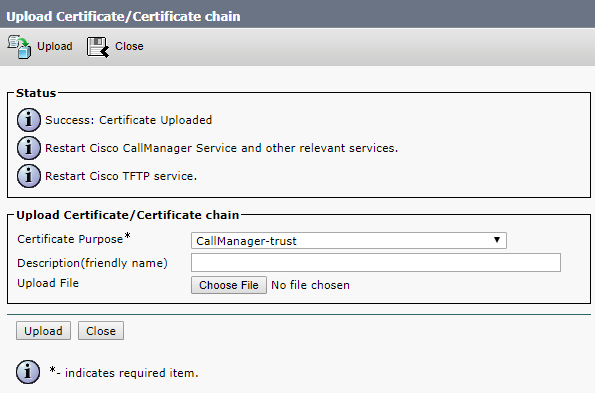
Upload root and intermediate certificates for Tomcat-trust and CallManager-trust, either one by one (root certificate first) or as a single file (as described above).

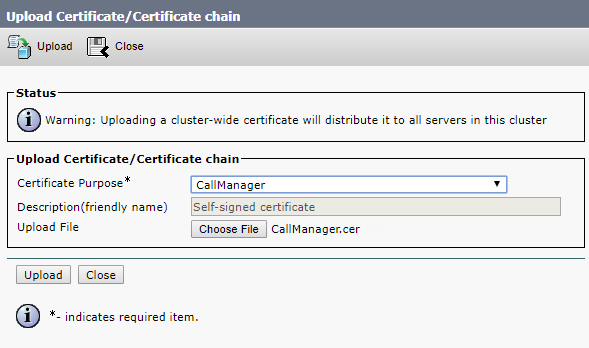
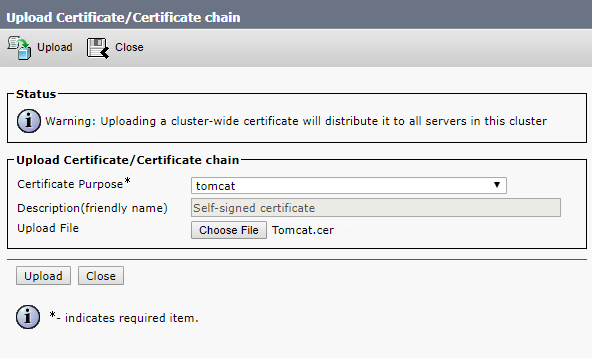
Click Upload.

Upload the CA certificate files formed upon your request.

Now restart Cisco Tomcat, Cisco CallManager and Cisco TFTP services.

Restart Cisco Tomcat from the command line.

The other ones can be restarted from web interface.


Click Restart and wait for the services to be restarted.

Read also:

This article is a translation of a guide originally created by S. Dubinin, Telecommunications Specialist - https://habr.com/ru/post/433528/

Integration of Cisco Meeting Server with CUCM 11 – PART 1


The first part covers network settings, CMS License and Certificates, Call Bridge, Web admin, XMPP, Web Bridge.

This article is about CMS (Cisco Meeting Server) and its integration with CUCM (Cisco Unified Communications Manager).

Suppose that CMS and CUCM have already been deployed on virtual machines.

Before the configuration, make the following preparations:

  • Create a DNS record for CMS IP address with an alias to be used by end users. For example:
    meetingserver.example.com
  • XMPP Domain Name: the name that will be used to log in to Cisco Meeting App. In our case, it will be the user’s sAMAccountName, imported from Active Directory.
  • To support Cisco Meeting App users, add a DNS SRV record for XMPP domain name. SRV record for _xmpp-client._tcp.<xmpp domain> needs TCP port 5222.
  • Note: you don’t need this if you use the desktop application only.
    SIP domain for the meeting server.

Suppose you are using a sub-domen, for example, meet.example.com.

IP address, mask, gateway, DNS, NTP, new user

First of all, enter the valid IP address of your service (CMS has several interfaces, select the first one: "a";).

Add DNS addresses for your zone (if needed). Use "dns" command to check the configuration.

Set CMS hostname and reboot.

It’s recommended to create separate administrator accounts for safety purposes. «Admin» account is not safe enough. Besides that, it’s recommended to have 2 administrator accounts in case you lose one of the administrator passwords. In this situation, you’ll still be able to log in as the second administrator and reset the lost password.

Username: «root», role: «admin».

Getting ahead of it, create another user with role "appadmin", so CUCM will be able to configure CMS on application level via Web Admin interface (i.e. for Conference Bridge registration).

Now set your NTP server and timezone and reboot.

CMS License and Certificates

Now you have to form a request for CMS certificates.

Cisco Meeting Server services use x.509 certificates for TLS connections and for some authentication purposes. In our case, the certificate is needed for Call Bridge, XMPP, Web Bridge and Web Admin services. Certificates can be self-signed or signed by internal or external CA.

Self-signed certificate is admissible, but not recommended, as it causes errors on web pages and prevents registering CMS Conference Bridge on CUCM.

Generate a request:

pki csr Cert CN:example.com subjectAltName:callbridge.example.com,xmpp.example.com,webbridge.example.com

Since we are using one certificate for all services, AltName should contain this services’ names.

Download, install and run WinSCP to get your request file and to put the license file on your CMS server.

To get the license (a 90-days demo version), apply to some Cisco partner and piteously ask for a demo license for education or demonstration purposes, or buy a full license and add your interface MAC address to your piteous letter.

Get the MAC address with the following command: "iface a"

Suppose you get lucky and obtain the license file with .lic extension. Rename it to "cms.lic"

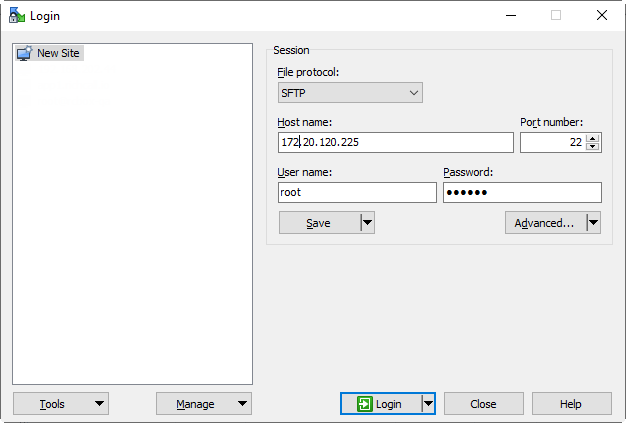
Now run WinSCP. Create a connection to CMS.

Connect:

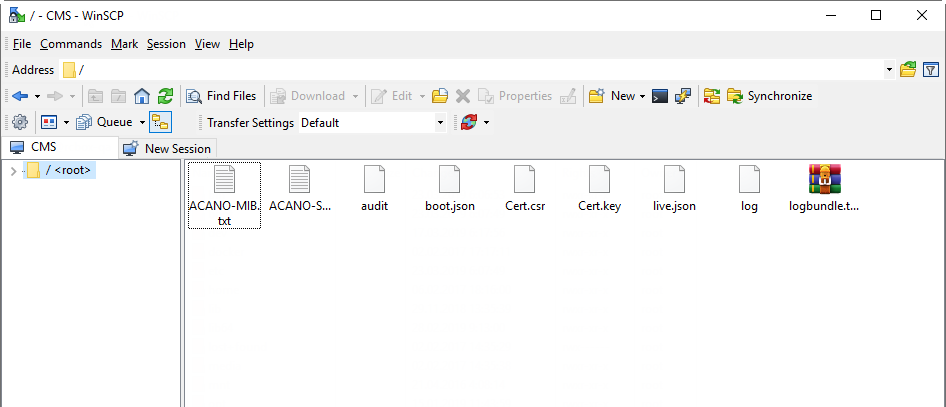
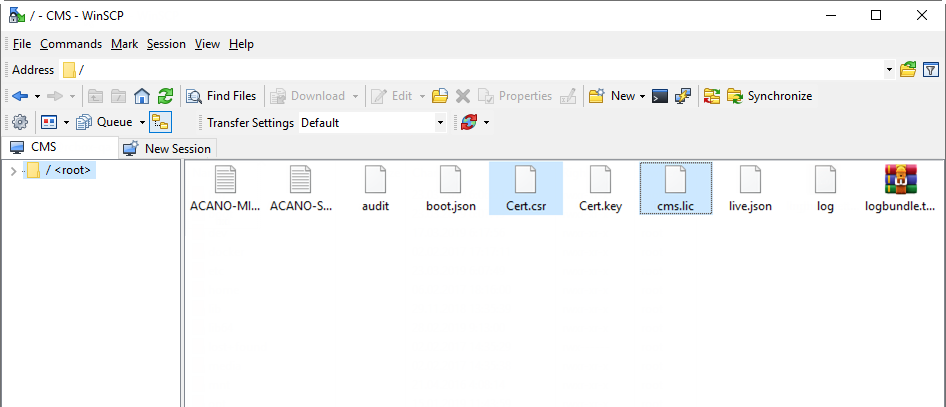
Save cms.lic and Cert.csr to CMS.

To create a full chain certificate file (because our CMS won’t use .p7b file), do the following:

In a command line:

a. In UNIX OS: cat “intermediate certificate 1” “intermediate certificate 2” “intermediate certificate 3” “root certificate” > ca-bundle

b. In Windows/DOS: copy “intermediate certificate 1” + “intermediate certificate 2” + “intermediate certificate 3” + “root certificate” ca-bundle

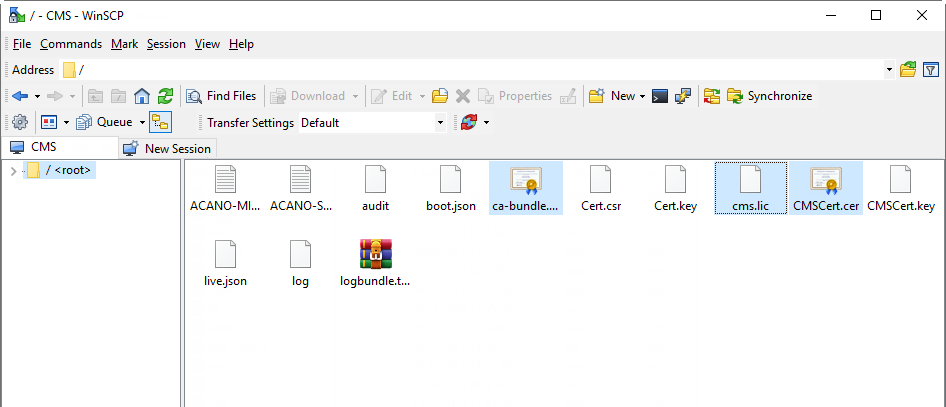
Use WinSCP to load the resultant file and the CMS certificate file to CMS.

Reboot, check the license:

Call Bridge, Web admin, XMPP, Web Bridge

Call Bridge

Configure Call Bridge to listen on a interface:

callbridge listen a

Configure Call Bridge to use the certificate, key and CA bundle files:

callbridge certs <keyfile> <certificatefile> <ca bundle>

Restart callbridge:

callbridge restart

Web Admin

Setup Web Admin service:

webadmin listen a 445

Port 445 has been chosen because 443 is already used for web access.
Configure the certificate files for Web Admin service:

webadmin certs <keyfile> <certificatefile> <ca bundle>

And turn it on:

webadmin enable

If everything is right, you'll get SUCCESS messages telling about Web Admin certificate and network parameters being correctly configured. To check if the service is available, enter the web administrator address in your web browser, for example: cms.example.com:445

XMPP

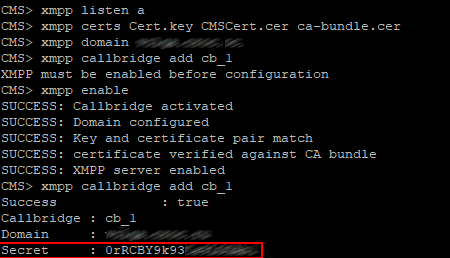
Setup XMPP service:

xmpp listen a

Configure the certificate files for XMPP service:

xmpp certs <keyfile> <certificatefile> <ca bundle>

Set XMPP deployment domain:

xmpp domain <domain name>

Turn the service on:

xmpp enable

Check CMS and CUCM:

Add Call Bridge to XMPP server:

xmpp callbridge add

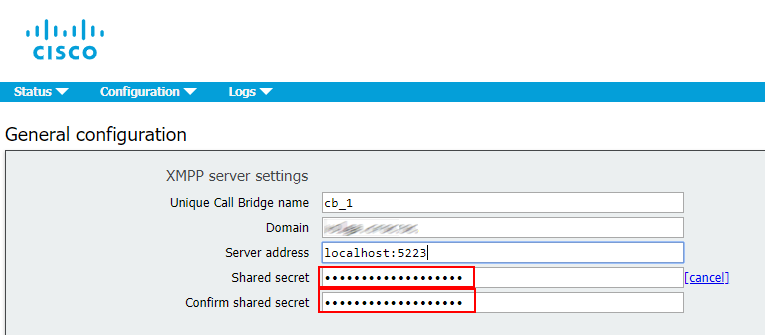
Copy the Secret and paste it to XMPP server settings, configure the other parameters (see the figure below)

Web Bridge

Setup Web Bridge service:

webbridge listen a:443

Configure the certificate files for Web Bridge service:

webbridge certs <keyfile> <certificatefile> <ca bundle>>

Web Bridge supports HTTPS. If it is configured to use httpredirect, then HTTP will be redirected to HTTPS. To enable HTTP redirection, use the following command:

webbridge http-redirect enable

Use the following command to make Web Bridge trust Call Bridge connections with the certificate previously issued by a certification center:

webbridge trust <certfile>

Read also:

This article is a translation of a guide originally created by S. Dubinin, Telecommunications Specialist - https://habr.com/ru/post/433528/

Is Cisco going to discontinue all its software communication tools except Webex Teams?

1. Cisco Jabber transforms to Teams.

With Cisco Jabber 12.7 release Cisco announced the "Modern Design view" which mirrors the look and feel of Webex Teams user interface.

They say the strategy is to unify its collaboration portfolio to simplify the experience for users and IT administrators.

Ok, but at the same time...

2. Webex Teams App is now available for on-prem deployments with Cisco UCM

The new "Calling in Webex Teams" solution lets you register Webex Teams to the on-prem Cisco UCM (Enterprise, BE 6000/7000, or HCS partner solution).

Here are the details - https://www.cisco.com/c/en/us/td/docs/voice_ip_comm/cloudCollaboration/wbxt/ucmcalling/unified-cm-wbx-teams-deployment-guide/unified-cm-wbx-teams-deployment-guide_chapter_01.html

Will it just replace Cisco Jabber in couple of years?

3. Webex Teams and Webex Meetings are getting merged

Until recently Webex Teams and Webex Meetings were separate products relying on different cloud platforms.

Now Cisco brings them closer together - https://searchunifiedcommunications.techtarget.com/news/252465007/Cisco-unifies-Webex-calling-messaging-and-meetings

4. Cisco IP communicator, my love, reaches its end of life

And even more... The end-of-sale and end-of-life dates are announced for Cisco IP Communicator.

5. Is Cisco Meeting App next?

Now rumors are that Cisco Meeting App which is the software endpoint for Cisco Meeting Server is also going away soon.

If this is really going to happen, guess what will the replacement be?

Cisco Meeting Server (CMS) and Skype for Business (Lync) Integration – Basics and Hints

On S4B front-end server, configure a trusted application and routing. Execute the following commands in PowerShell:

  • New-CsTrustedApplicationPool -Identity cms.vc.domain.com -ComputerFqdn cms.vc.domain.com -Registrar S4BFE.domain.com -Site 2 -RequiresReplication $false -ThrottleAsServer $true -TreatAsAuthenticated $true
  • New-CsTrustedApplication -Applicationid cms -TrustedApplicationPoolFqdn cms.vc.domain.com -Port 5061
  • New-CsStaticRoutingConfiguration -Identity "Service:Registrar:S4BFE.domain.com"
  • $route = New-CsStaticRoute -TLSRoute -Destination "cms.vc.domain.com" -Port 5061 -MatchUri "vc.domain.com" -UseDefaultCertificate $true
  • Set-CsStaticRoutingConfiguration -Identity "Service:Registrar:S4BFE.domain.com" -Route @{Add=$route}
  • Set-CsMediaConfiguration -MaxVideoRateAllowed Hd720p15M
  • Enable-CsTopology

On CMS proceed to Configuration\General and enter the S4B front-end server address and the username to be used to register.

In General Incoming Calls section, enter the CMS local domain name.

In General\Outbound Calls, enter the domain names to be called from Cisco Meeting. To allow calls to any domains, leave the Domain field empty. It will be set to ⟨match all domains⟩.

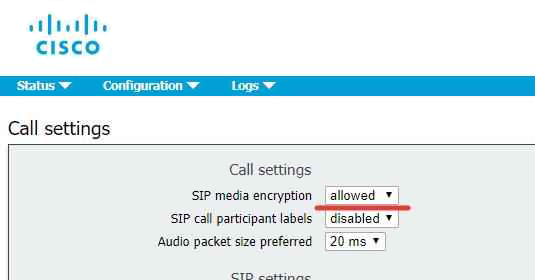
The Local From Domain field contains different domain names to be used to call domain.com and other domains. Calls from CMS will be transferred to the domains federated with yours in Skype for Business. However, it can be possibly configured differently. The last step is to configure encryption in General\Call Settings section.

That’s it. Now your Cisco Meting App clients and Skype for Business (Lync) clients should be able to call each other.

HINT: Limitation of the number of registrations in Skype for Business

During one of our conferences, we faced a limitation of the number of external Skype for Business participants. New participants would just disconnect, never visiting the room.

After talking to specialists, we decided to increase the number of CMS registrations on S4B servers.

First of all, we created 5 AD users for CMS and registered these accounts in Skype for Business. The accounts meet the following template: username[1-9]. So, to increase the number of participants up to 5, you should create 5 users: username1, username2, username3, username4 and username5, and add corresponding accounts to S4B.

Then you should enter the required number of registrations in CMS configuration:

After this simple manipulation you shouldn't face this kind of limitation anymore.